Chapter 06 – Part 03 & 04: STRENGTH DEVELOPMENT & LIFTING TECHNIQUES
06
CHAPTER
STRENGTH DEVELOPMENT & LIFTING TECHNIQUES
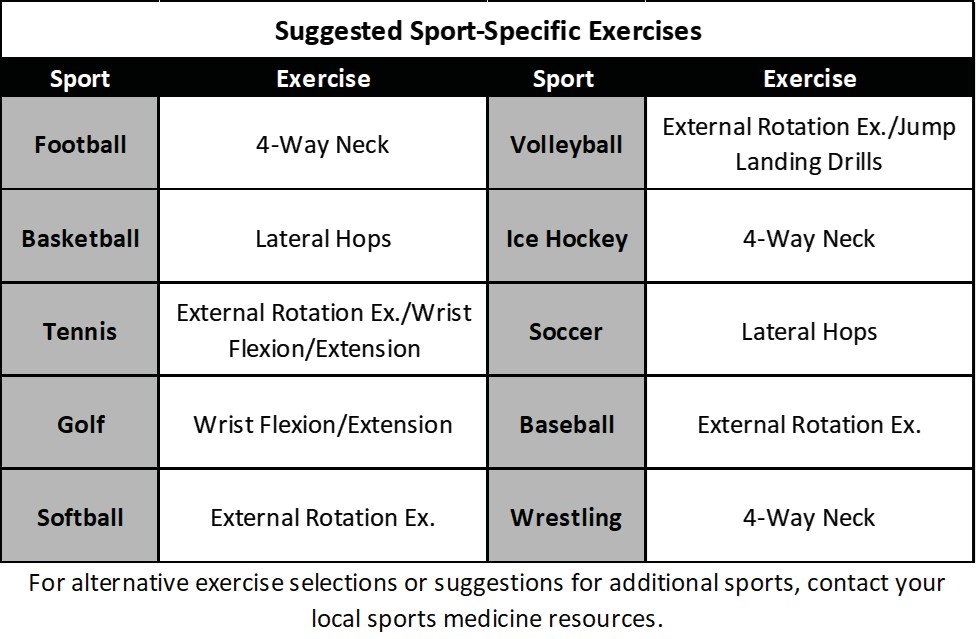
Part 3: Sport-Specific Exercises
The sport-specific exercises are special auxiliary exercises that are designed to add a sport-specific element to your program and aid in injury prevention. Below is a chart that provides examples of sports-specific exercises that can be inserted into your program. For multi-sport athletes, the sport-specific exercise can be based on their primary sport or exercises can be rotated using the exercises for the sports the athlete participates in.
Table 6.1:
Part 4: Full-Body Power Exercises
PowerRev full-body exercises are explosive lifts that feature triple extension of the hips, knees, and ankles. These are the program’s primary power development exercises. The primary core lifts in the program are the Power Clean and Snatch movements. Both these lifts are taught using a progressive series of exercises. The Push Jerk and any of the Clean or Snatch progression exercises can be used as secondary full body movements in the program.
Power Clean Progression Series
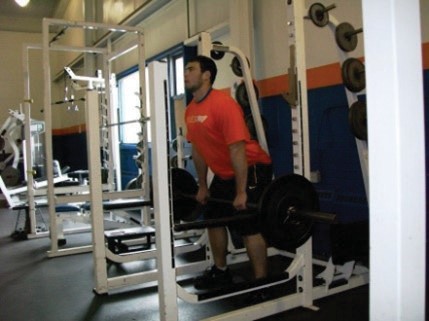
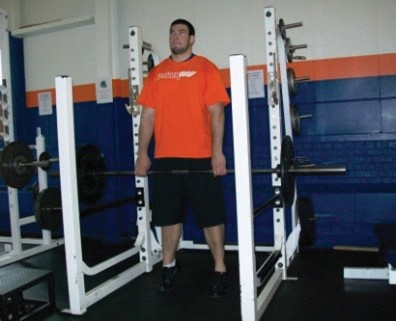
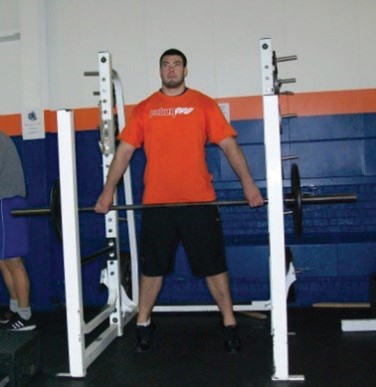
Box/Rack Pull
Use rack or box to elevate bar off the floor to above the knees (feet shoulder width, hands placed on bar at side of legs)
Bend knees so that bar is aligned with middle of upper thigh
Lean trunk forward so that chest is over bar (cover bar)
Explosively pop hips forward as you triple extend
Figure 6.100: Box/Rack Pull Start Position
Figure 6.101: Box/Rack Pull Top Position
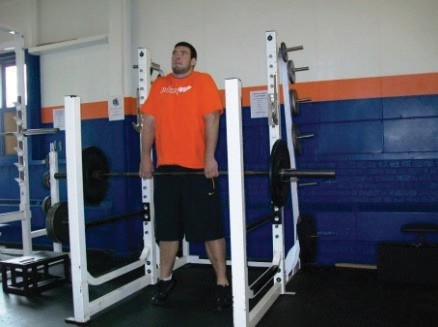
Box/Rack Shrug
Use rack or box to elevate bar off the floor to above the knees (feet shoulder width, hands placed on bar at side of legs)
Bend knees so that bar is aligned with middle of upper thigh
Lean trunk forward so that chest is over bar (cover bar)
Explosively pop hips forward as you triple extend
Continue to accelerate the bar (introducing the upper body) by aggressively shrugging the shoulders
Figure 6.102: Box/Rack Shrug Start Position
Figure 6.103: Box/Rack Shrug Top Position
Box/Rack High Pull
Use rack or box to elevate bar off the floor to above the knees (feet shoulder width, hands placed on bar at side of legs)
Bend knees so that bar is aligned with middle of upper thigh
Lean trunk forward so that chest is over bar (cover bar)
Explosively pop hips forward as you triple extend
Continue to move bar upwards, keeping elbows above wrists
Pull bar as high as possible (as weight is increased, ability to pull bar up high decreases)
Figure 6.104: Box/Rack High Pull Start Position
Figure 6.105: Box/Rack High Pull Top Position
Hang Pull
Picking up bar from floor, lift bar above knees and bend knees so that bar is aligned with middle of upper thigh (feet shoulder width, hands placed on bar at side of legs) – hang position
Flex at the hips, slightly leaning trunk forward so that chest is over bar – cover bar (power position)
Immediately from power position, explosively pop hips forward as you triple extend
Figure 6.106: Hang Pull Start Position
Figure 6.107: Hang Pull Power Position
Figure 6.108: Hang Pull Top Position
Hang Shrug
Picking up bar from floor, lift bar above knees and bend knees so that bar is aligned with middle of upper thigh (feet shoulder width, hands placed on bar at side of legs) – hang position
Flex at the hips, slightly leaning trunk forward so that chest is over bar – cover bar (power position)
Immediately from power position, explosively pop hips forward as you triple extend
Continue to accelerate the bar (introducing the upper body) by aggressively shrugging the shoulders
Figure 6.109: Hang High Pull Start Position
Figure 6.110: Hang Shrug Power Position
Figure 6.111: Hang Shrug Top Position
Hang High Pull
Starting with bar in hang position
Perform same movement as hang shrug
Explosively extend hips forward
Complete triple extension
Aggressively shrug shoulders upwards
Continue to move bar upwards, keeping elbows above wrists
Pull bar as high as possible (as weight is increased, ability to pull bar up high decreases)
Figure 6.112: Hang Shrug Start Position
Figure 6.113: Hang High Pull Power Position
Figure 6.114: Hang High Pull Top Position
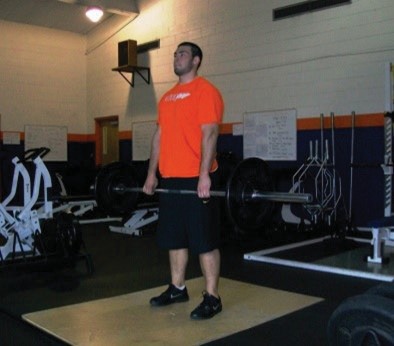
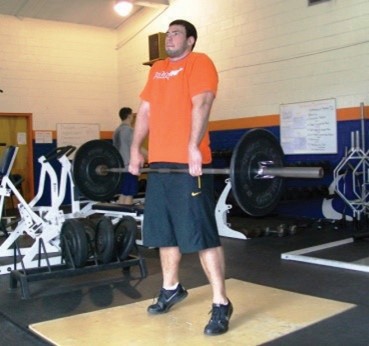
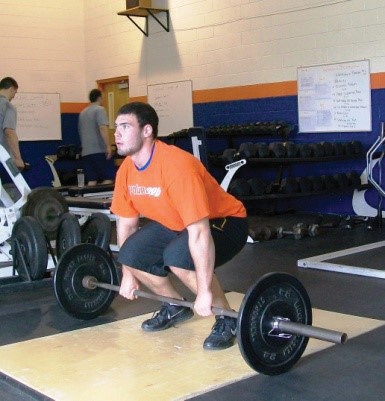
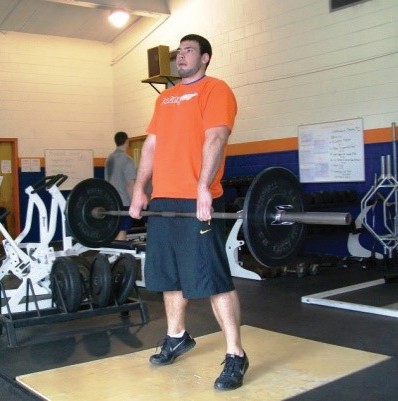
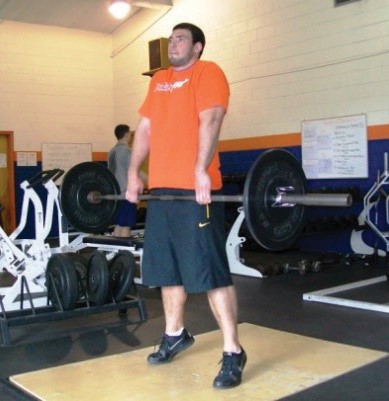
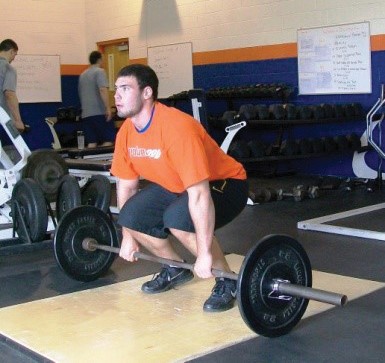
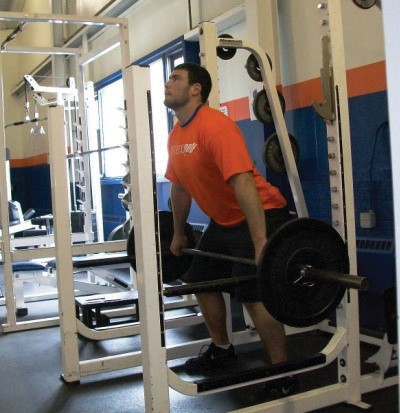
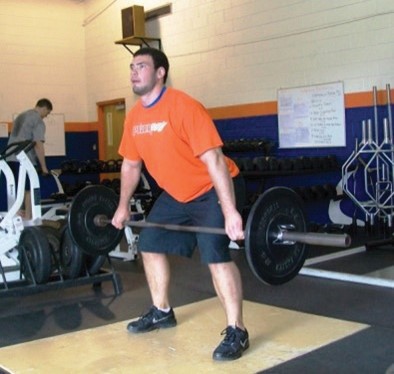
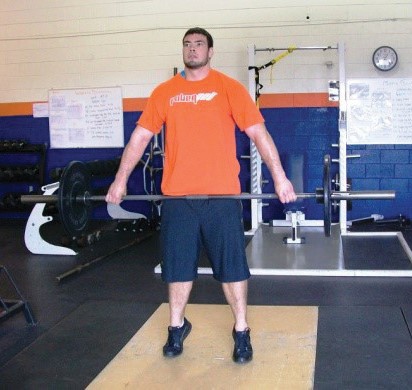
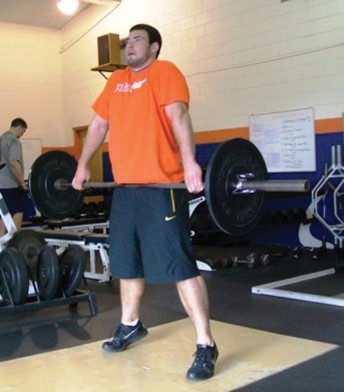
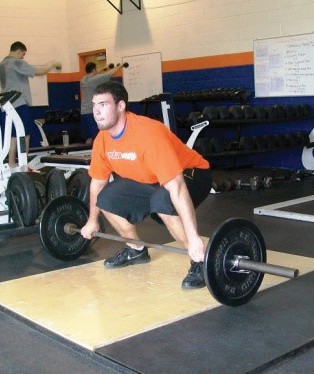
Floor Initial Pull
Feet at hip width, hands should be placed on the bar just outside of legs
Barbell in close to the body with arms straight with the elbows rotated out
Shoulder blades should be squeezed back with the chest as high as possible
Hips are higher than the knees but lower than the shoulders
Eyes straight ahead
Raise up hips slowly, pulling bar off ground
Maintain consistent back angle
As soon as the bar gets to above the knees, initiate a violent, explosive hip extension
Complete triple extension rising up on toes
Return weights to the ground
Figure 6.115: Clean Start Position
Figure 6.116: Floor Pull Top Position
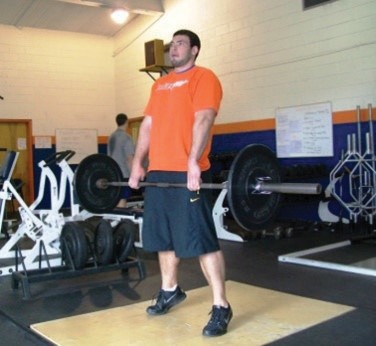
Floor Shrug
Perform same steps as Floor Pull
Add in aggressive shoulder shrug by lifting/shrugging shoulders up towards ears
Figure 6.117: Clean Start Position
Figure 6.118: Floor High Pull Top Position
Floor High Pull
Perform same movement as Floor Shrug
Explosively extend hips forward once bar passes above knees
Complete triple extension
Aggressively shrug shoulders upwards
Continue to move bar upwards, keeping elbows above wrists
Pull bar as high as possible (as weight is increased, ability to pull bar up high decreases)
Figure 6.119: Clean Start Position
Figure 6.120: Floor High Pull Top Position
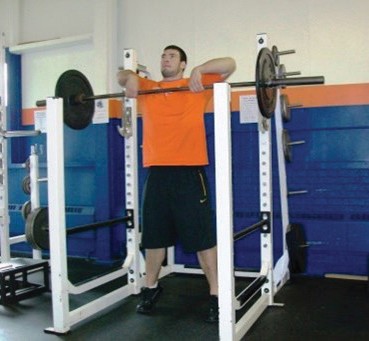
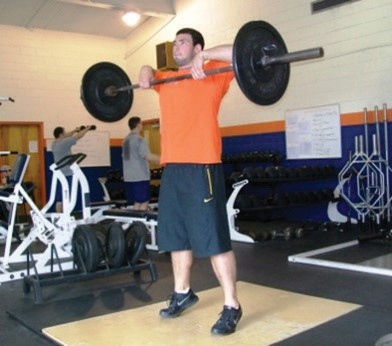
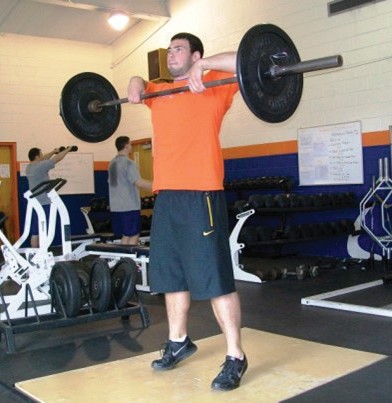
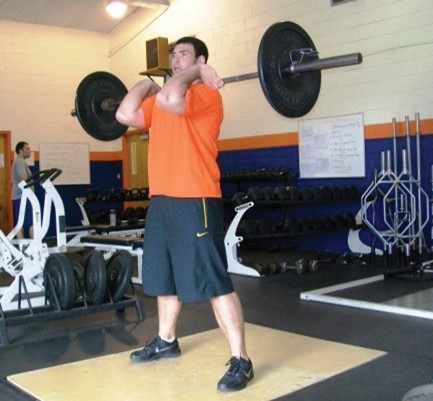
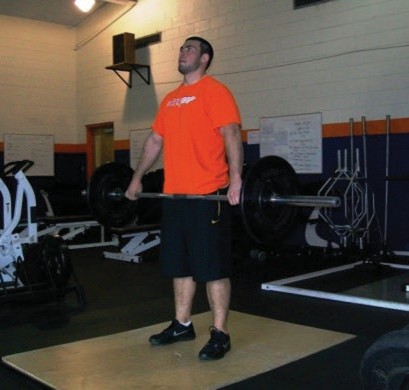
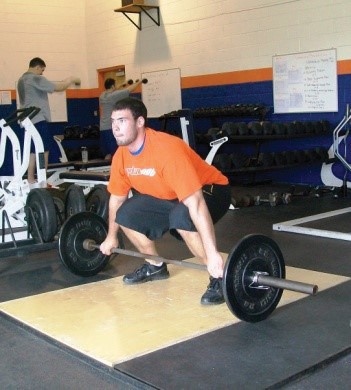
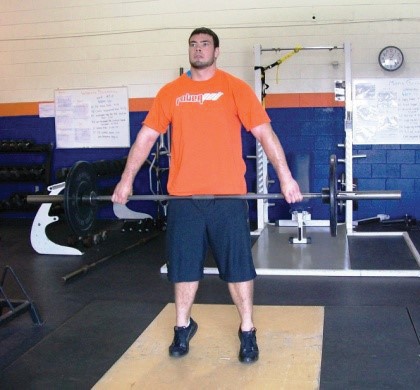
Power Clean
Perform the Floor High Clean Pull
Spread the feet to squat width (heels under the shoulders with the toes pointed slightly out)
At the same time, violently force the elbows forward and up while dropping the hips down and back
Catch bar in a Front Squat (Clean Grip) position and stand up with it
Floor Shrug
Figure 6.121: Clean Start Position
Figure 6.122: Clean Catch Position
Figure 6.123: Clean Finish Position
Snatch Progression Series
Box/Rack Pull
Use rack or box to elevate bar off the floor above the knees (feet shoulder width, using a snatch width grip – overhead squat grip)
Bend knees so that bar is aligned with middle of upper thigh
Lean trunk forward so that chest is over bar (cover bar)
Explosively pop hips forward as you triple extend
Figure 6.124: Box/Rack Snatch Start Position
Figure 6.125: Box/Rack Snatch Pull Top Position
Box/Rack Shrug
Use rack or box to elevate bar off the floor to above the knees (feet shoulder width, using a snatch width grip – overhead squat grip)
Bend knees so that bar is aligned with middle of upper thigh
Lean trunk forward so that chest is over bar (cover bar)
Explosively pop hips forward as you triple extend
Continue to accelerate the bar (introducing the upper body) by aggressively shrugging the shoulders
Figure 6.126: Box/Rack Snatch Start Position
Figure 6.127: Box/Rack Snatch Shrug Top Position
Hang Snatch
Picking up bar from floor, lift bar above knees and bend knees so that bar is aligned with middle of upper thigh (feet shoulder width, using a snatch width grip – overhead squat grip) – hang position
Flex at the hips, slightly leaning trunk forward so that chest is over bar – cover bar (power position)
Immediately from power position, explosively pop hips forward as you triple extend
Floor Shrug
Figure 6.128: Hang Snatch Start Position
Figure 6.129: Hang Snatch Power Position
Figure 6.130: Hang Snatch Pull Position
Hang Shrug
Picking up bar from floor, lift bar above knees and bend knees so that bar is aligned with middle of upper thigh (feet shoulder width, using a snatch width grip – overhead squat grip) – hang position
Flex at the hips, slightly leaning trunk forward so that chest is over bar – cover bar (power position)
Immediately from power position, explosively pop hips forward as you triple extend
Continue to accelerate the bar (introducing the upper body) by aggressively shrugging the shoulders
Figure 6.131: Hang Snatch Start Position
Figure 6.132: Hang Snatch Power Position
Figure 6.133: Hang Snatch Shrug Position
Floor Initial Pull
Feet at hip width, using a snatch width grip – overhead squat grip
Barbell in close to the body with arms straight and with the elbows rotated out
Shoulder blades should be squeezed back with the chest as high as possible
Hips are higher than the knees but lower than the shoulders
Eyes straight ahead
Raise up hips slowly, pulling bar off ground
Maintain consistent back angle
As soon as the bar gets to above the knees, initiate a violent, explosive hip extension
Complete triple extension, rising up on toes
Return weights to the ground
Figure 6.134: Snatch Start Position
Figure 6.135: Floor Initial Snatch Pull Top Position
Floor Shrug
Perform same steps as Floor Initial Pull
Add in aggressive shoulder shrug
Lifting / shrugging shoulders up towards ears
Figure 6.136: Snatch Start Position
Figure 6.137: Floor Initial Snatch Pull Top Position
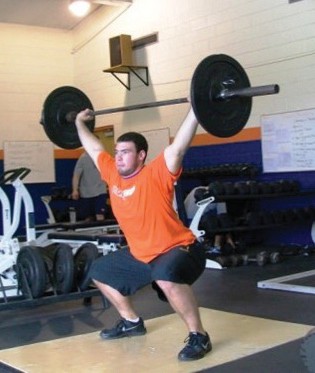
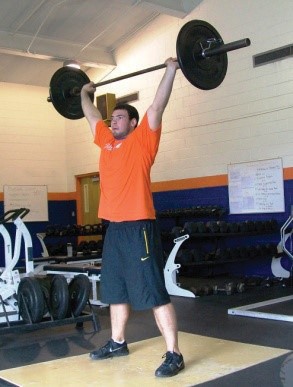
Snatch
Perform the Snatch Shrug continuing to accelerate the bar upwards
Spread the feet to squat width (heels under the shoulders with the toes pointed out)
At the same time, allow the bar to fly right by the lifter’s nose while dropping the hips down and back to catch the bar in an Overhead Squat position
Stand up with the bar overhead
Figure 6.138: Snatch Start Position
Figure 6.139: Snatch Catch Position
Figure 6.140: Snatch Finish Position
Secondary Full Body Movements
Pressing Continuum
Shoulder Press – all upper body and no help from the lower body
Push Press – primarily upper body with some help from the legs
Push Jerks – primarily lower body with some help from the upper body
Push Press
The Push Press and Push Jerk are very similar movements (see Push Jerk teaching points)
The difference is in the use of the arms and the legs
In the Push Press emphasizes the upper body, using more force production from the upper body and shoulders, with some help from the legs
The Push Jerk emphasizes the lower body, using more explosive force production from the lower body with some help from the upper body
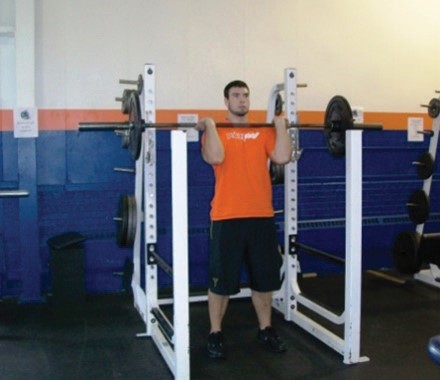
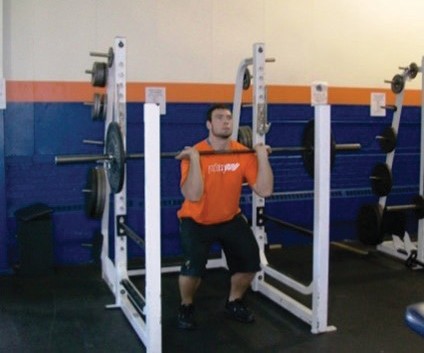
Push Jerk
Starting position – Shoulder Press-In Front
Slightly dip the hips down and back while slightly bending the knees
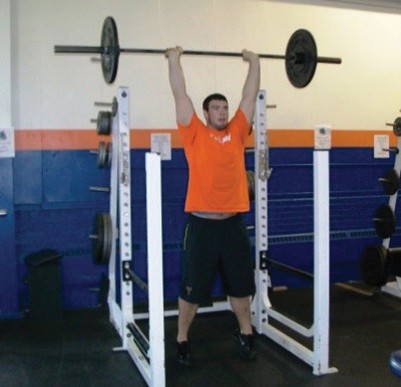
Immediately extend the legs, explosively pushing the bar upward and slightly back, tucking the chin out of the way
Once the bar passes the head, return the head to its original position
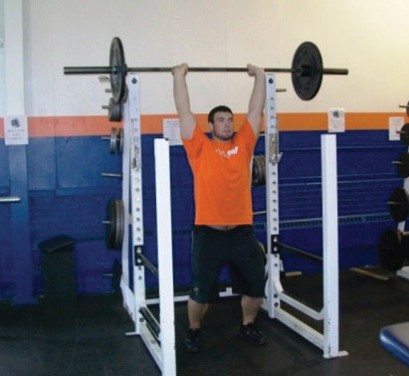
Finishing the lift by pressing the bar with the shoulders
Allow the heels to return to the ground
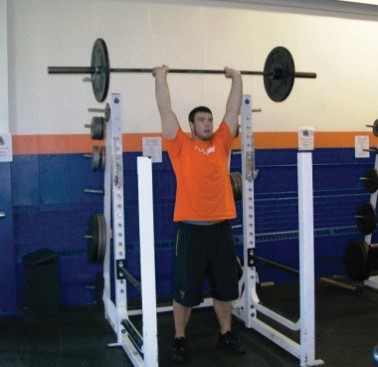
Dip with knees slightly bent to absorb impact of bar coming down (getting under bar)
Lock the elbows out with the bar right behind the ears and straighten legs out to standing position
Figure 6.141: Push Jerk Starting Position
Figure 6.142: Push Jerk Hip Dip Position
Figure 6.143: Jerk Extension Position
Figure 6.144: Push Jerk Catch Position
Figure 6.145: Push Jerk Finish Position
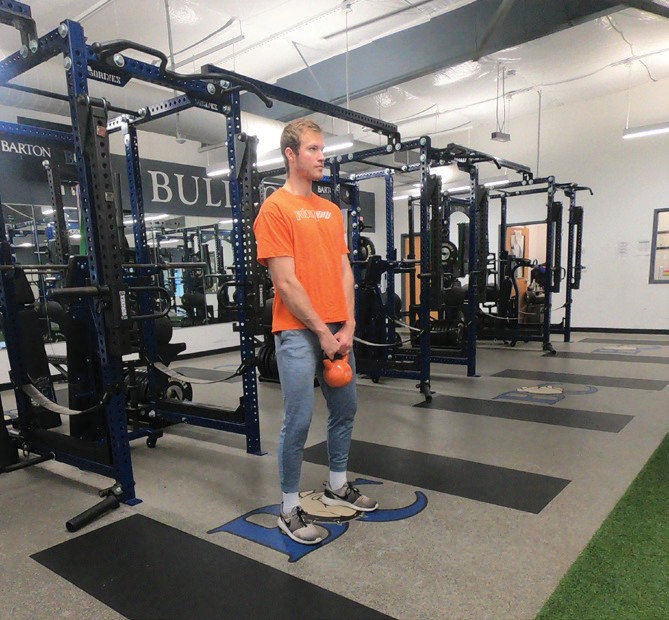
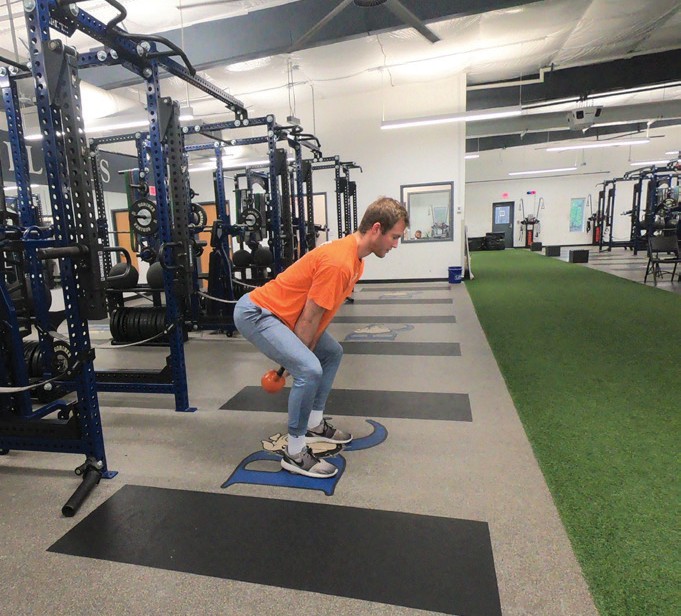
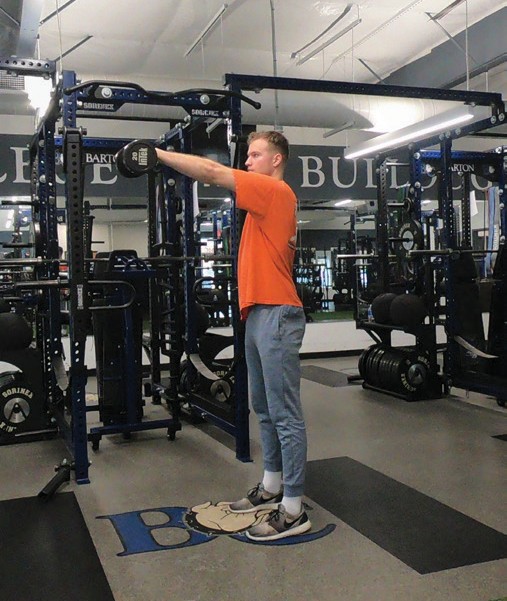
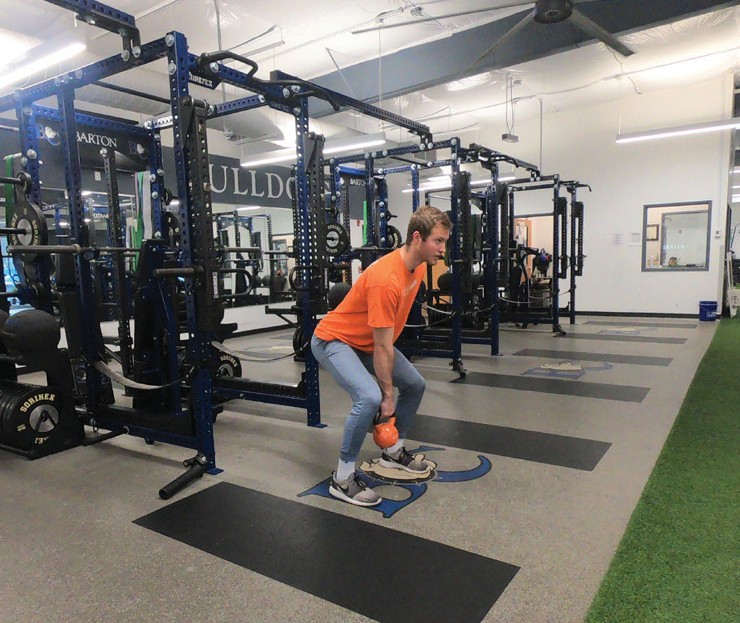
Kettlebell/Dumbbell Swings
Bend knees so that kettlebell/dumbbell is aligned with middle of upper thigh
Lean trunk forward so that chest is over kettlebell/dumbbell (cover weight)
Explosively pop hips forward as you triple extend
Figure 6.146: Kettlebell Swing Bottom Position
Figure 6.147: Kettlebell Swing Power Position
Figure 6.148: Kettlebell Swing Top Position
Figure 6.149: Dumbbell Swing Starting Position
Figure 6.150: Dumbbell Swing Power Position
Figure 6.151: Dumbbell Swing Triple Extension Position
Figure 6.152: Dumbbell Finishing Position
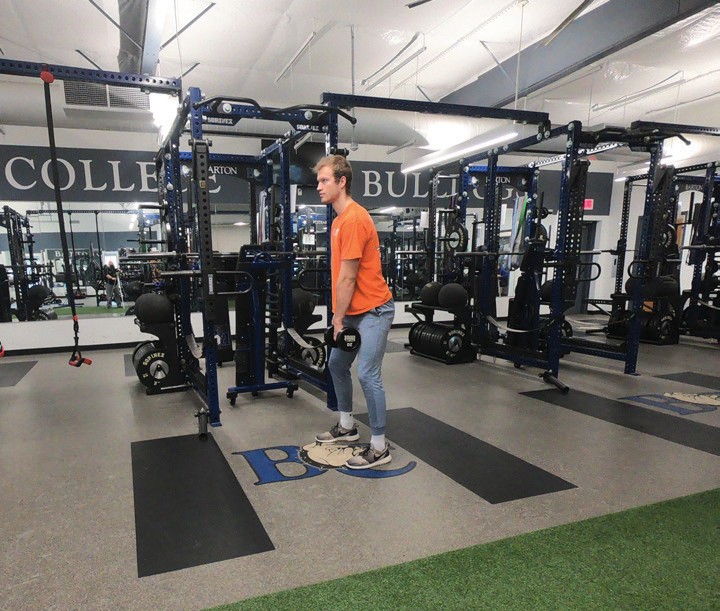
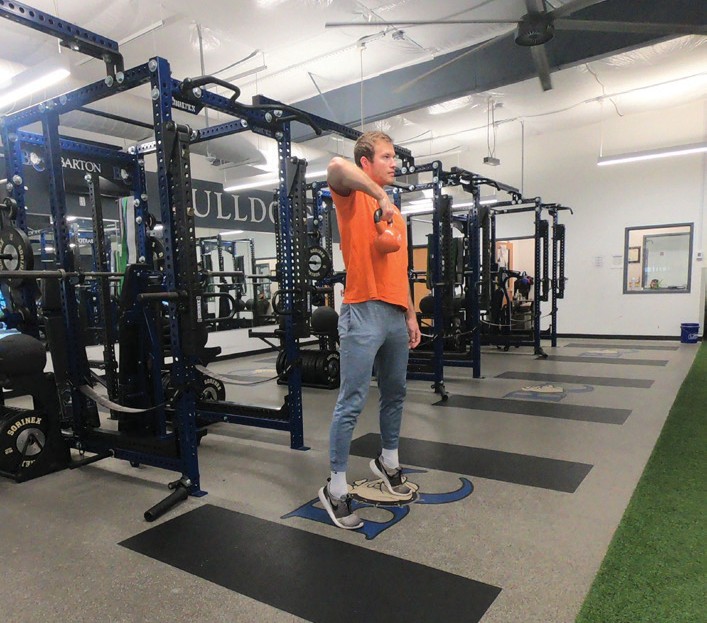
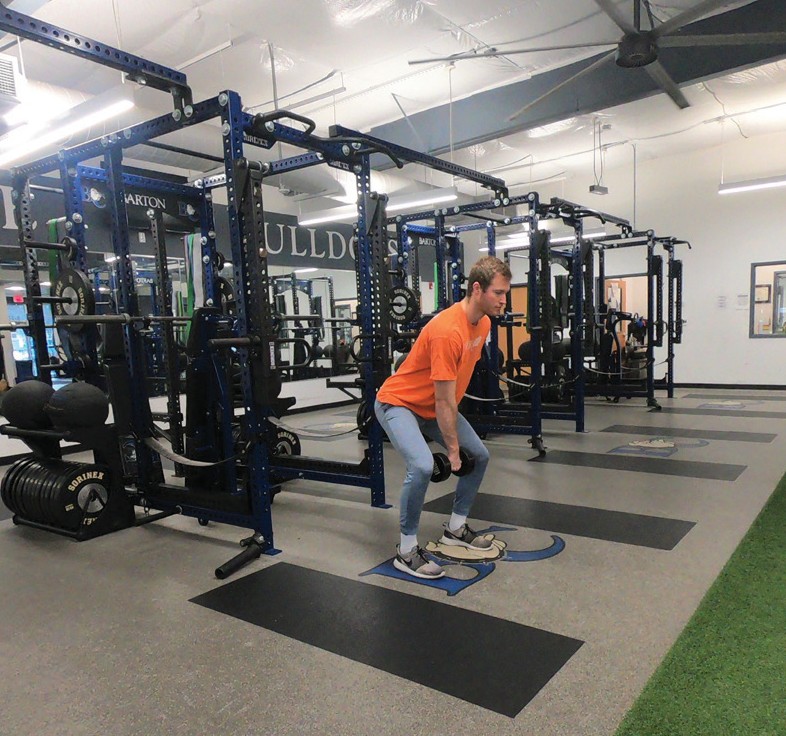
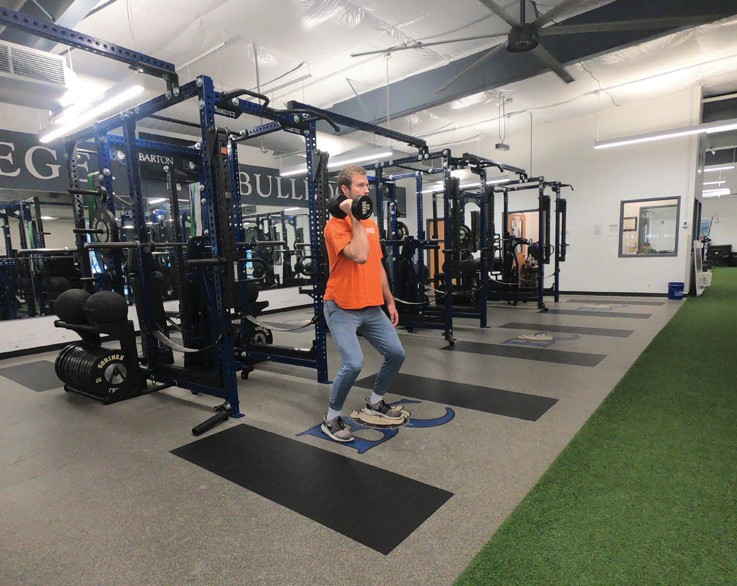
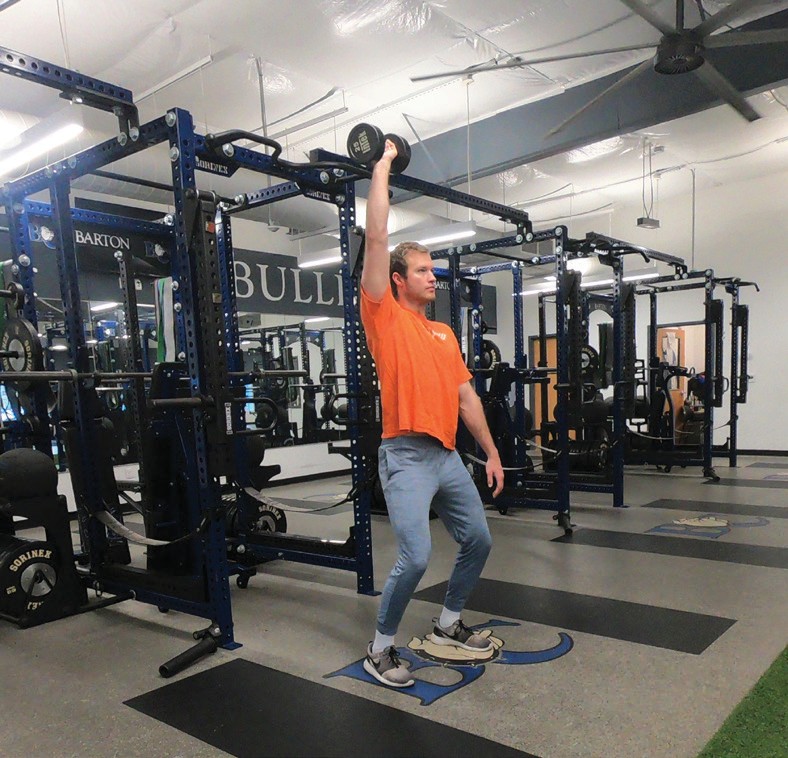
Kettlebell/Dumbbell Clean
Lean trunk forward so that chest is over kettlebell/dumbbell (cover weight)
Explosively pop hips forward as you triple extend
Continue to accelerate (introducing the upper body) the kettlebell/dumbbell by aggressively shrugging the shoulders
Figure 6.153: Kettlebell Snatch Bottom Position
Figure 6.154: Kettlebell Snatch Pull Position
Figure 6.155: Kettlebell Snatch Receiving Position
Figure 6.156: Kettlebell Snatch Top Position
Figure 6.157: Dumbbell Snatch Bottom Position
Figure 6.158: Dumbbell Snatch Pull Position
Figure 6.159: Dumbbell Snatch Receiving Position
Figure 6.160: Dumbbell Snatch Top Position
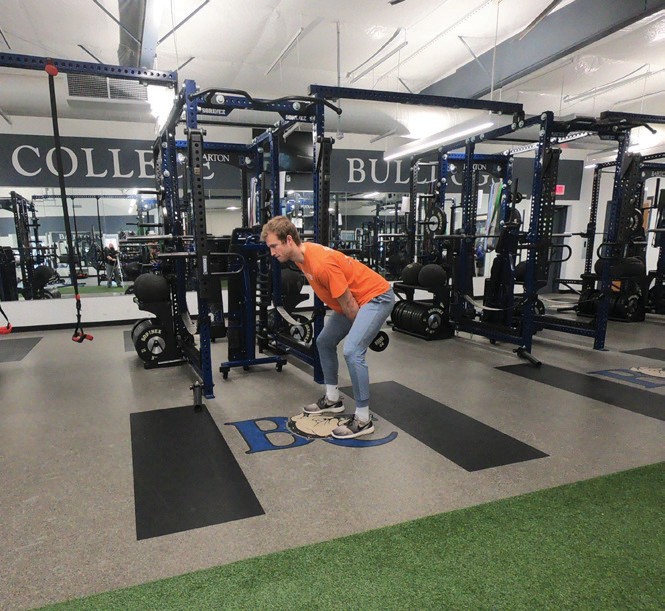
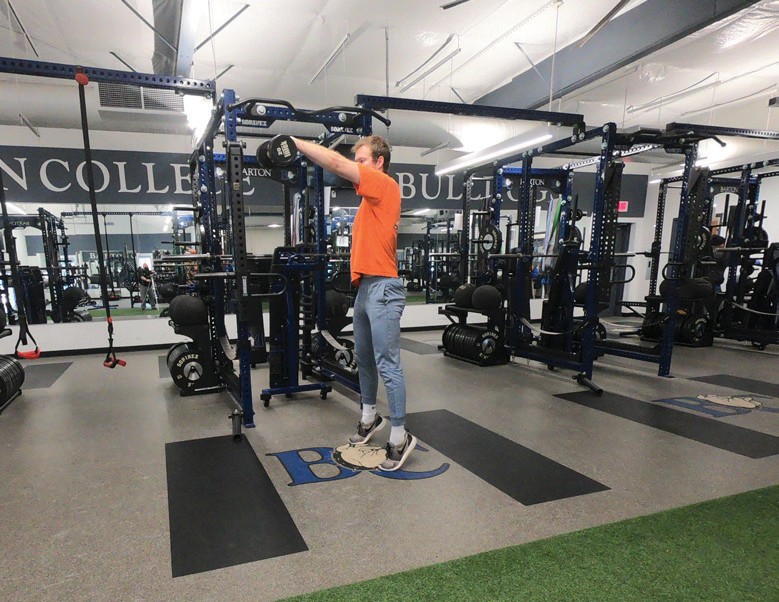
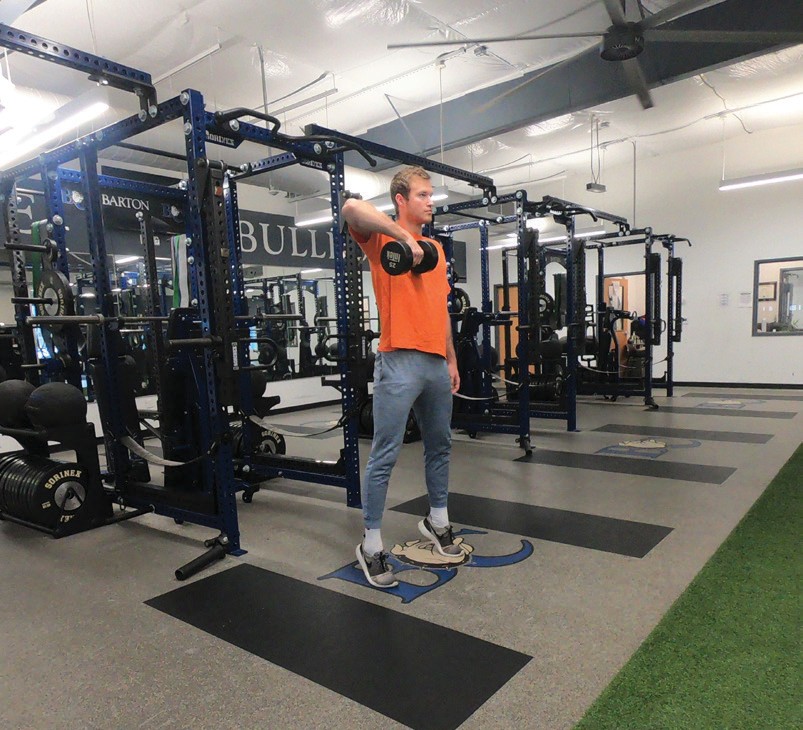
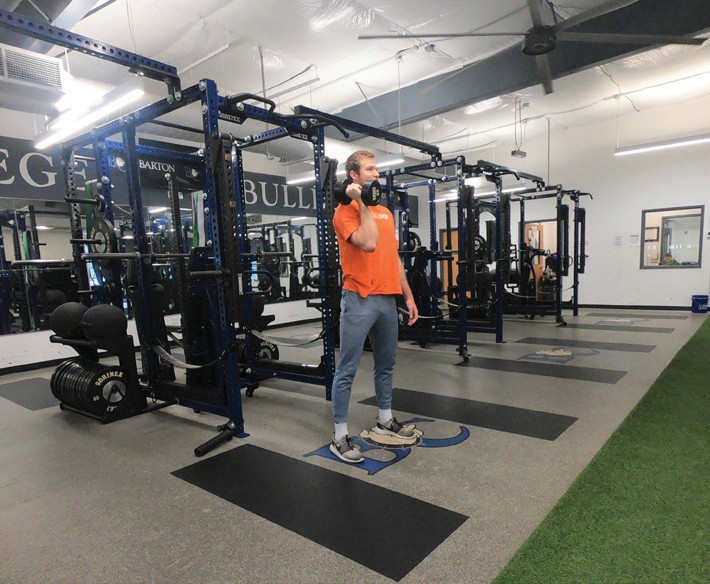
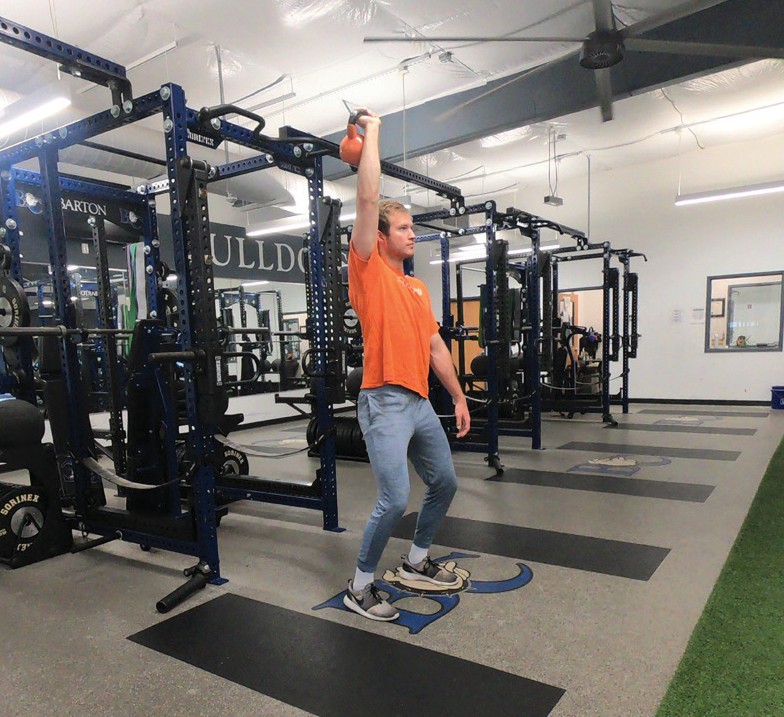
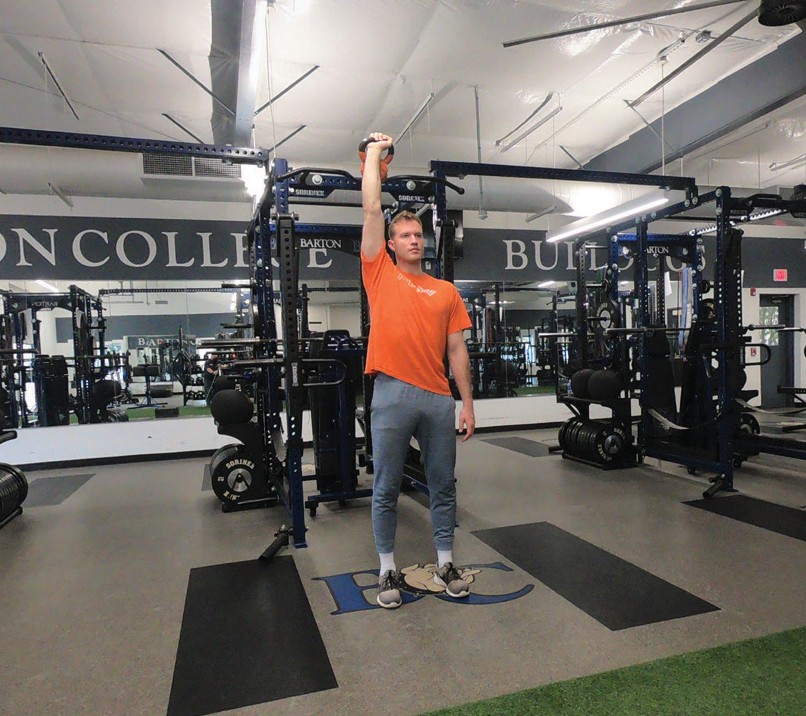
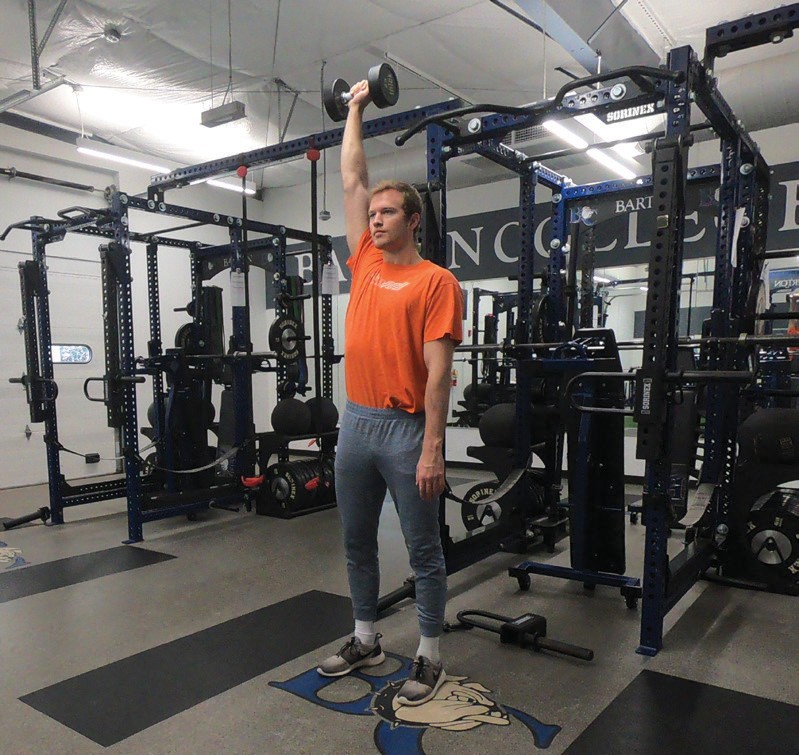
Kettlebell/Dumbbell Snatch
Bend knees so that kettlebell/dumbbell is aligned with middle of upper thigh
Lean trunk forward so that chest is over kettlebell/dumbbell (cover weight)
Explosively pop hips forward as you triple extend
Figure 6.161: Kettlebell Snatch Bottom Position
Figure 6.162: Kettlebell Snatch Pull Position
Figure 6.163: Kettlebell Snatch Receiving Position