Chapter 06 – Part 08: STRENGTH DEVELOPMENT & LIFTING TECHNIQUES
06
CHAPTER
STRENGTH DEVELOPMENT & LIFTING TECHNIQUES
Part 8: Suspension Training Techniques
Suspension Training Basics
Body position and the base used can influence the difficulty of the exercise. Changing positioning is a great way to vary the intensity of suspension exercises and allows individuals at different strength and fitness levels to modify exercises to suit their needs and abilities. When combining vibration with suspension training, making the exercise more difficult intensifies the vibration effect on the targeted muscles.
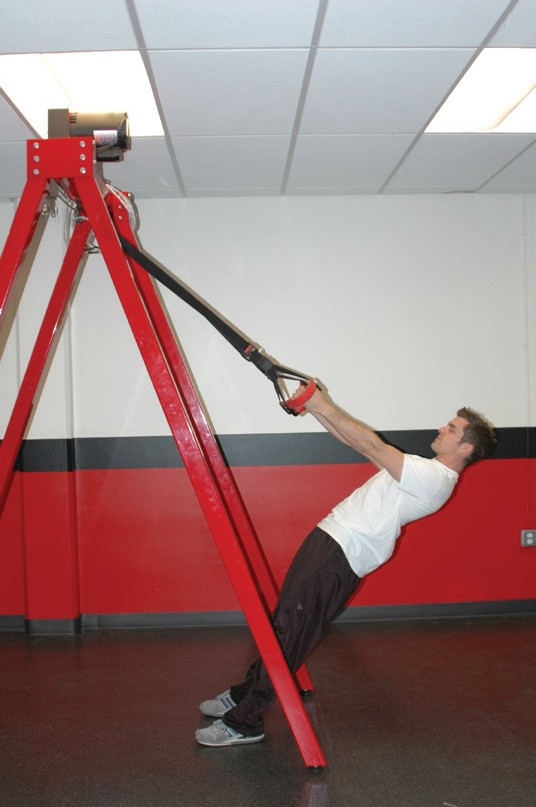
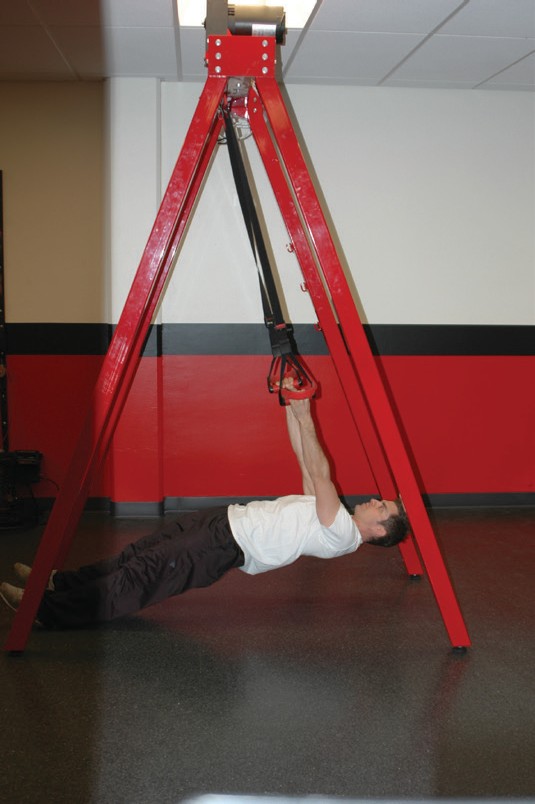
Body Angle
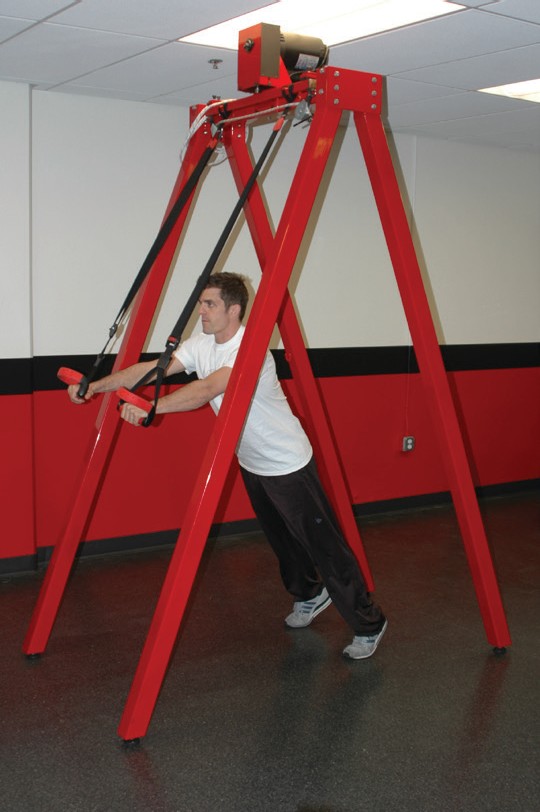
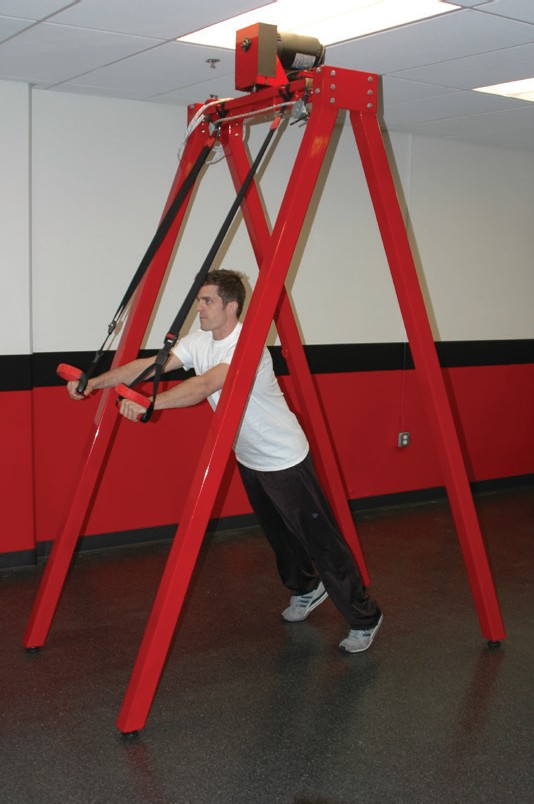
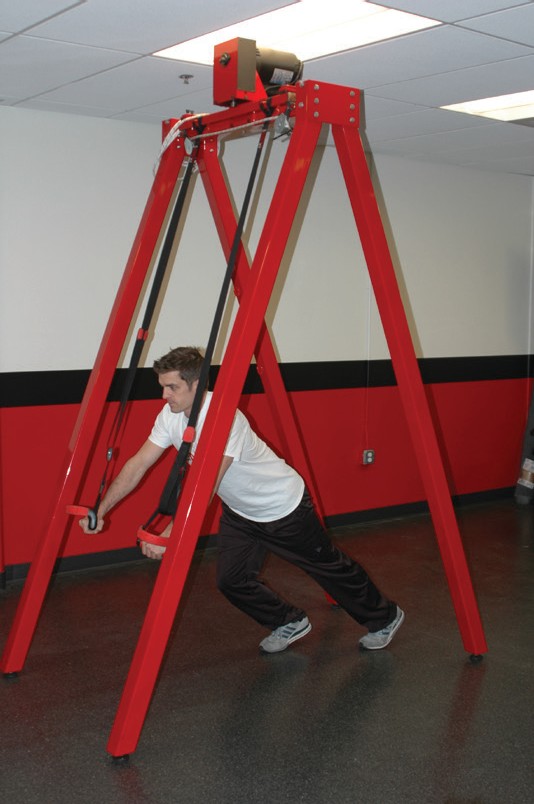
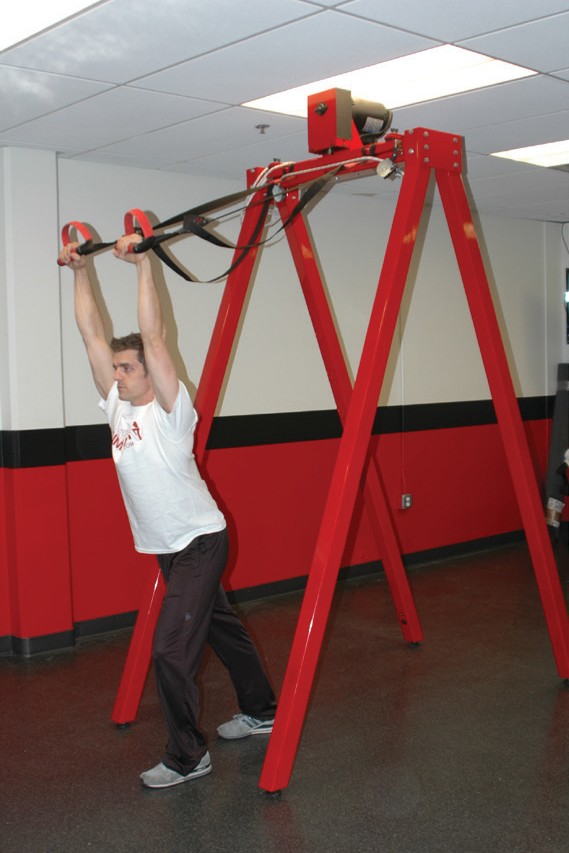
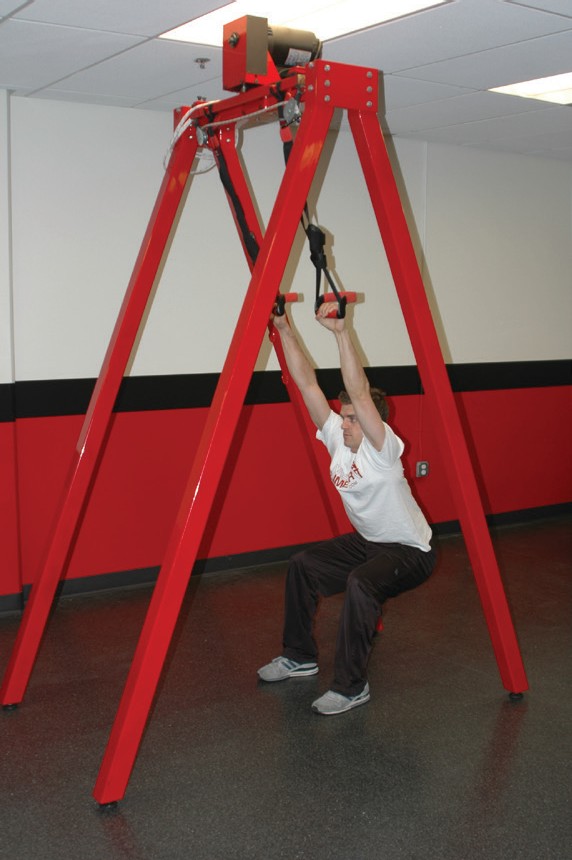
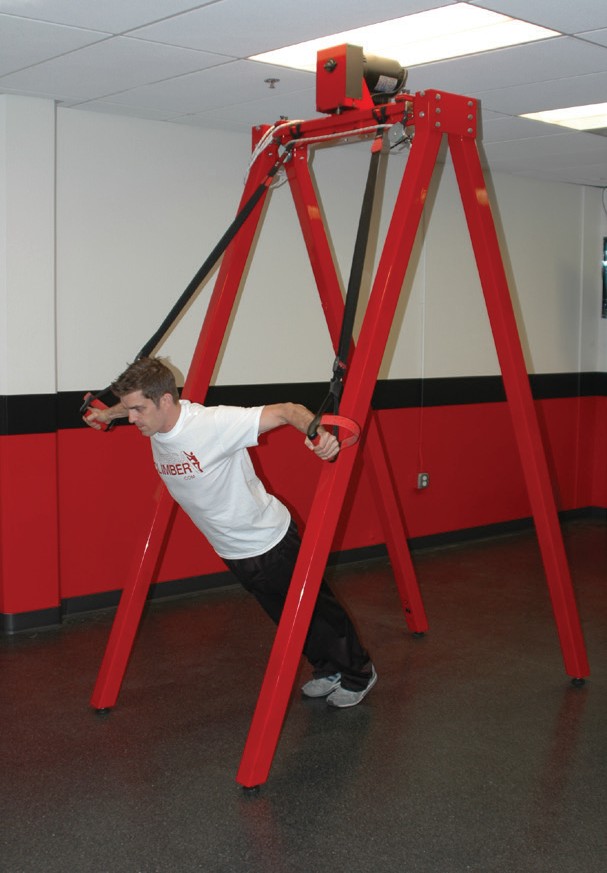
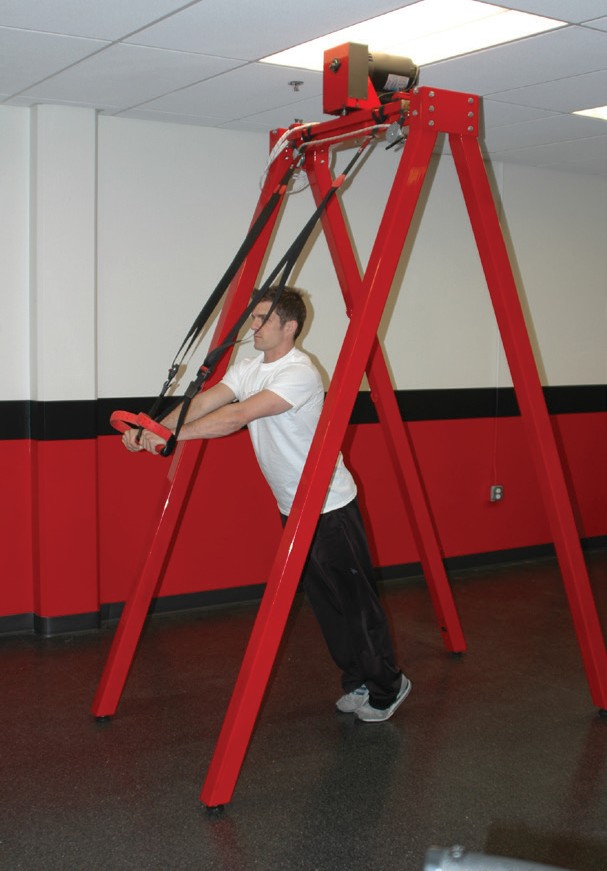
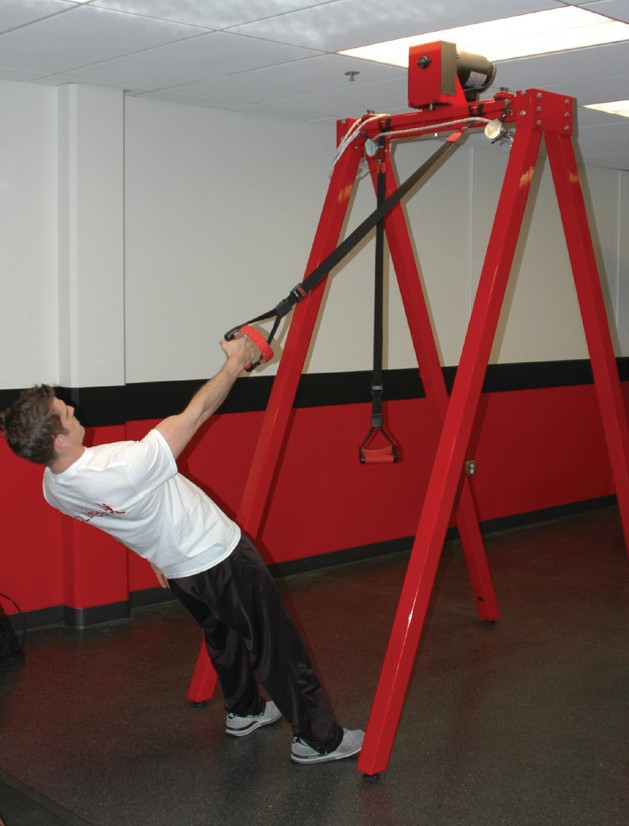
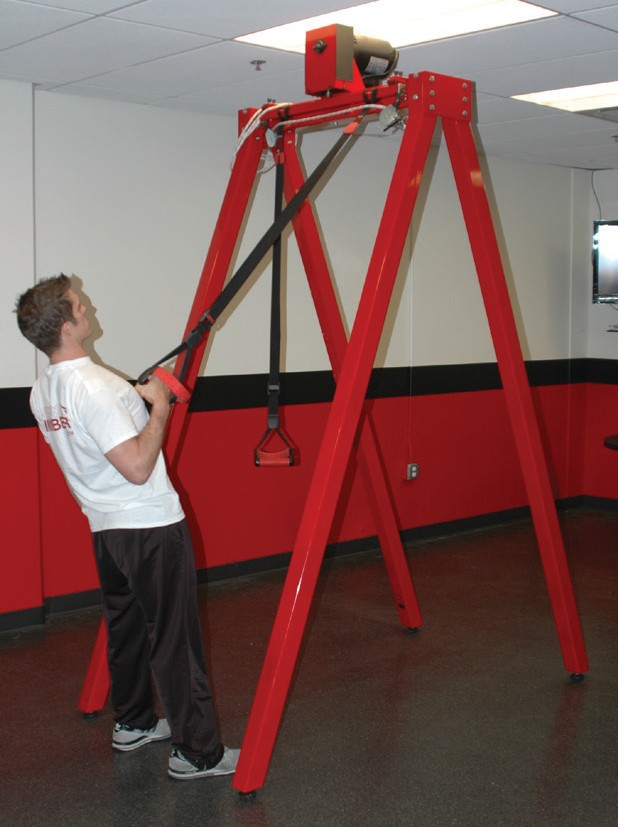
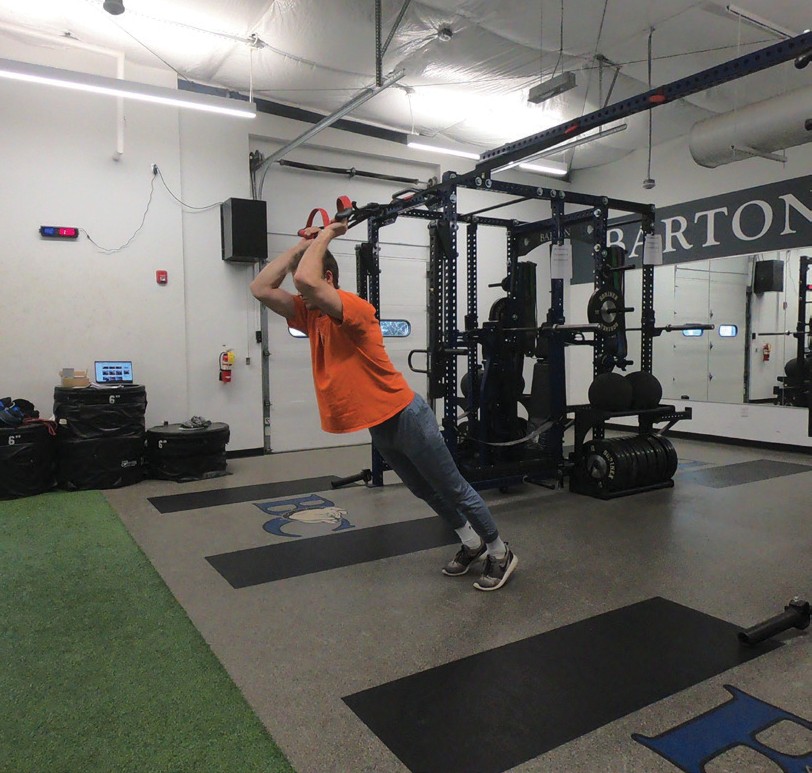
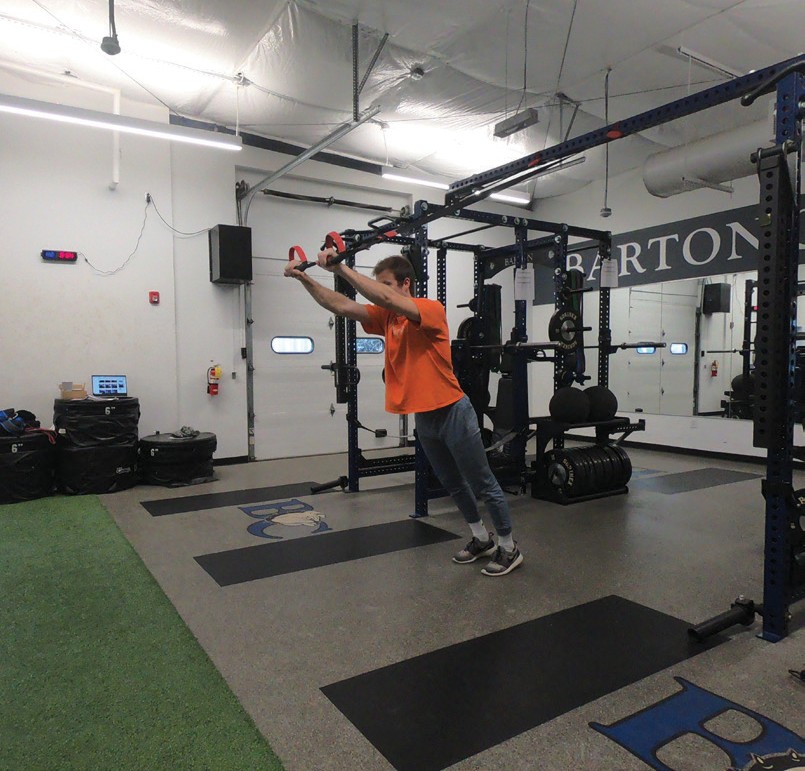
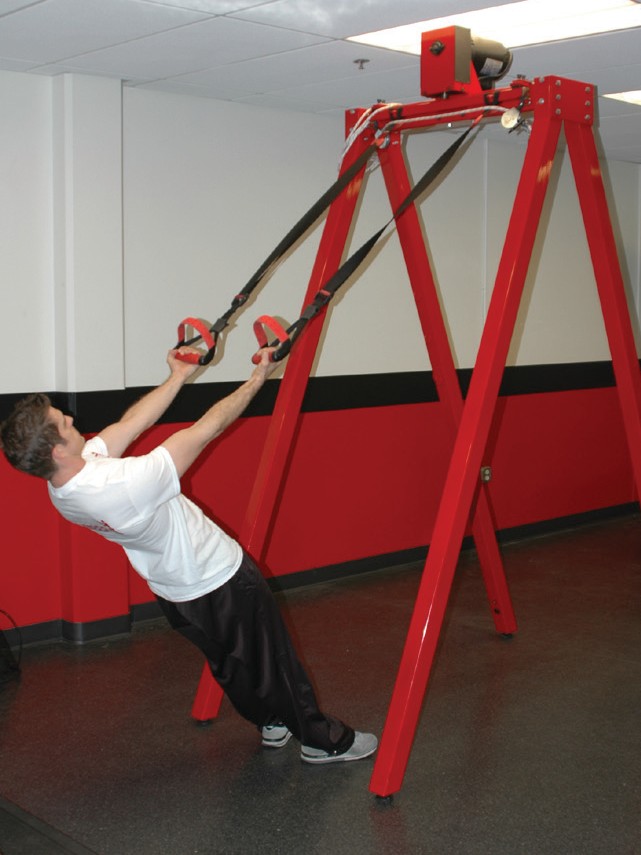
When standing, changing the angle of your body changes the amount of body weight (resistance) that is used in the exercise. For pulling exercises, standing with feet farther away from the point where the suspension ropes are anchored (standing up straighter) lessens the resistance used, making the exercise easier. Placing the feet closer in line with the anchor point and leaning farther back increases the resistance used, making the exercise harder.
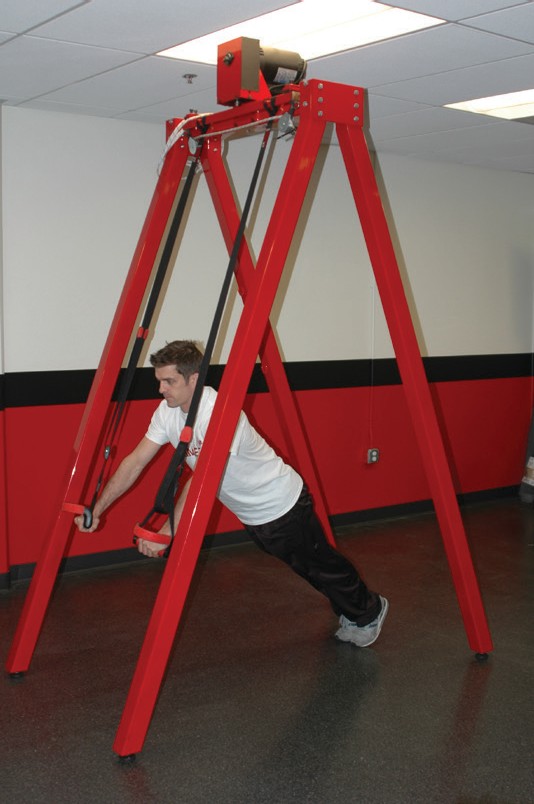
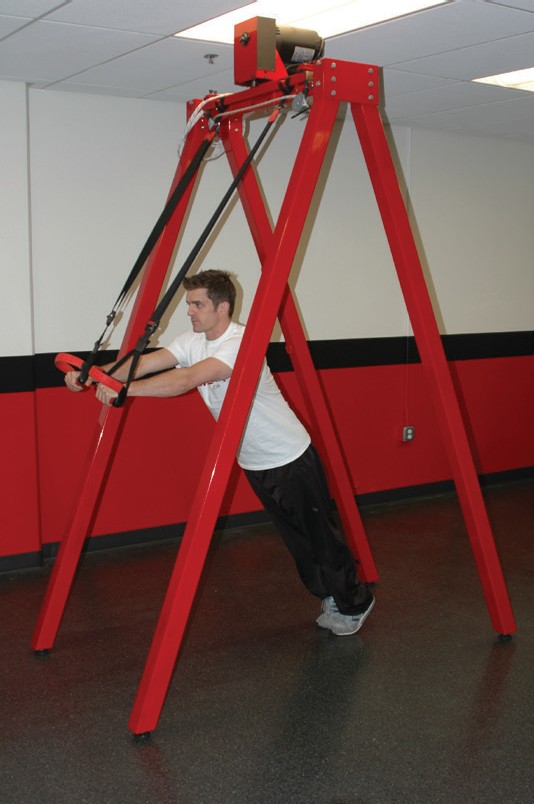
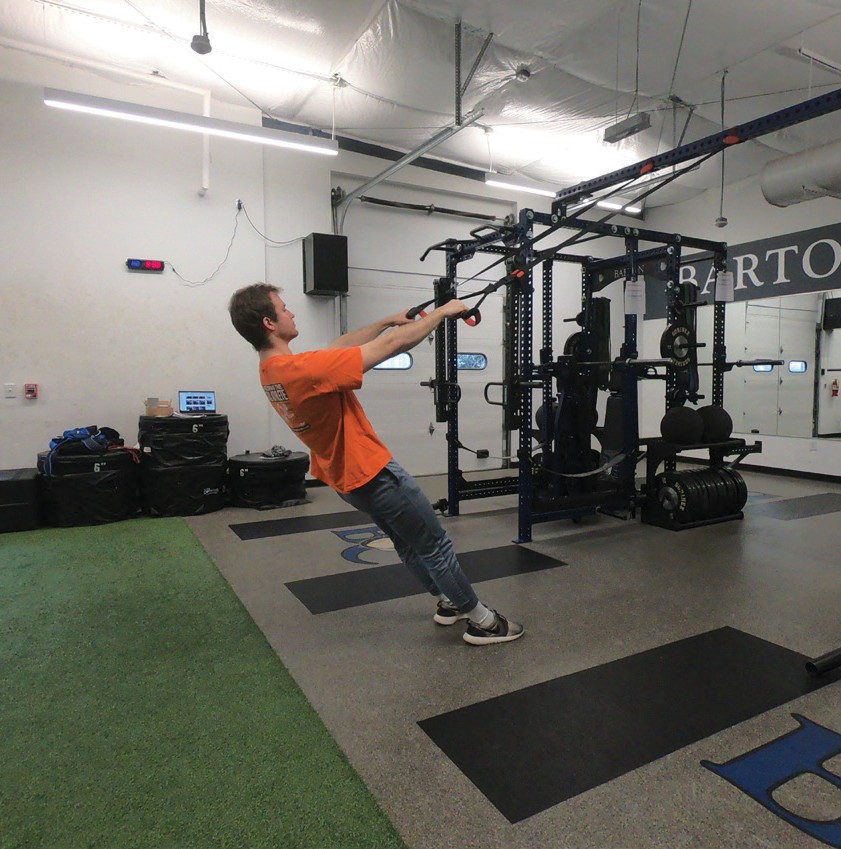
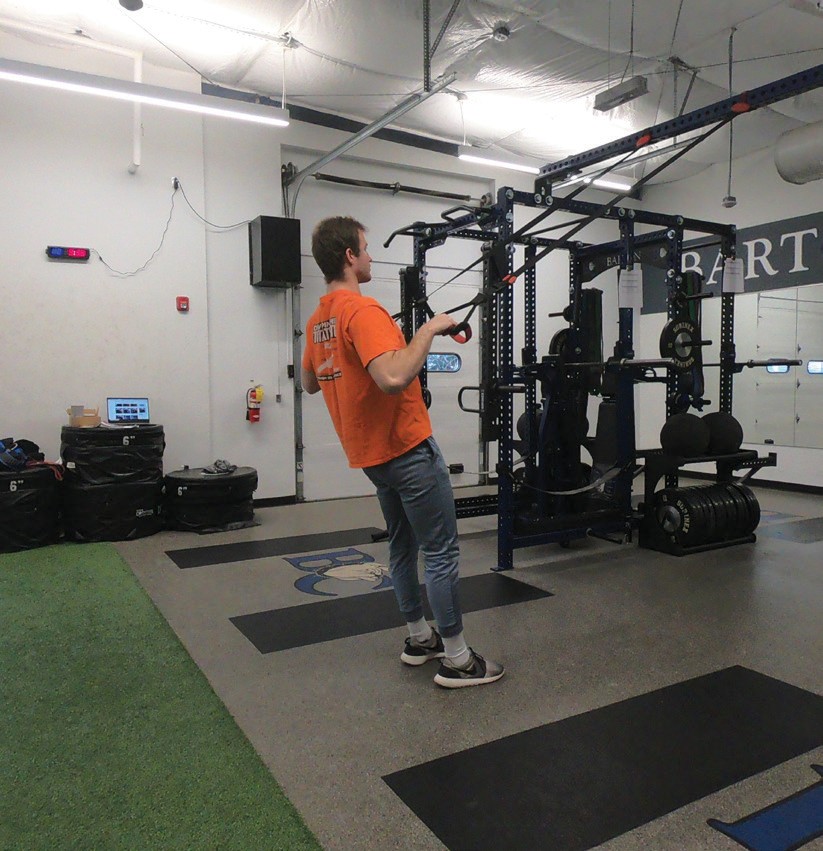
For pressing exercises, placing your feet closer to the anchor point and using a shorter strap/rope length (standing up straighter) will lessen the resistance used, making the exercise easier. By extending the strap/rope length and placing your feet farther away from the anchor point, you increase your body angle, increasing the resistance used and making the exercise harder.
Figure 6.287: Pulling movement with feet closer (less body lean)
Figure 6.288: Pulling movement with feet farther away (more body lean)
Figure 6.289: Pressing movement with feet closer (less body lean)
Figure 6.290: Pressing movement with feet farther away (more body lean)
Video 4.1
Video 4.1
Changing the Base of Support
Base Width
A second way to modify the difficulty of a suspension exercise is changing your base of support. Placing your feet apart and widening your base makes you more stable and lessens the difficulty of the exercise. To make the exercise more difficult, you can lessen your stability by bringing your feet together. The exercise can be progressed even further by balancing on one foot instead of two. This increases the instability, making the exercise much harder to perform. The less stable you are, the more muscles and balance you need to use in performing the exercise.
Figure 6.291: Wider, more stable base
Figure 6.292: Narrower, less stable base
Length of Stance
Similar to changing the width of your stance, changing the length of your stance also changes your stability. Performing exercises with a stagger stance provides more stability, making the exercise less difficult. As you shorten the distance your feet are staggered, you become less stable, increasing the difficulty of the exercise. Having feet together is the most difficult form of this modification.
Figure 6.293: Staggered, more stable base
Changing Starting Position (Floor Exercises)
Lining up your feet directly under the anchor point lessens the amount of body weight resistance you use, making the exercise easier to perform. The farther away your feet are positioned from the anchor point, the more body weight resistance you use, which makes the exercise more difficult.
Figure 6.294: Feet under the anchor point
Figure 6.295: Feet farther away from the anchor point
Changing Your Center of Gravity (Floor Exercises)
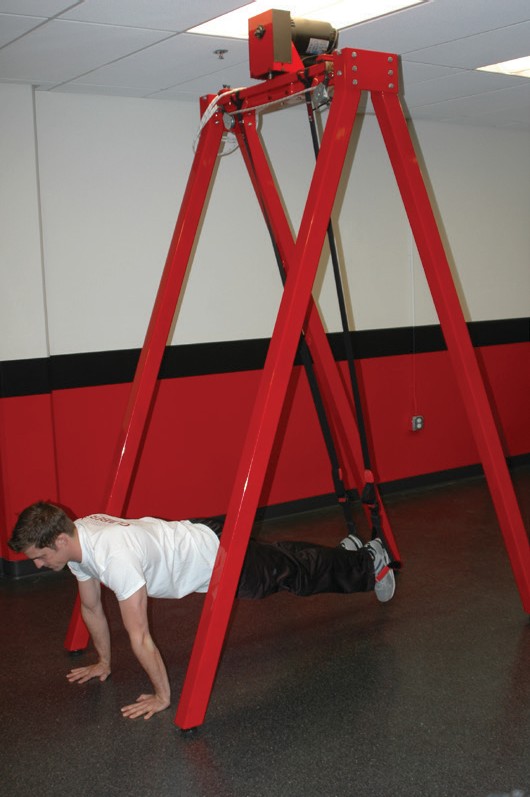
Floor exercises, such as planks, can be made easier or harder depending on your center of gravity. Exercises are easier to perform when you support your body with your forearms. When you support the weight of your body on your hands, you are less stable, which increases the difficulty of the exercise.
Figure 6.296: Supporting your body weight on your forearms (easier)
Figure 6.297: Supporting your body weight on your hands (harder)
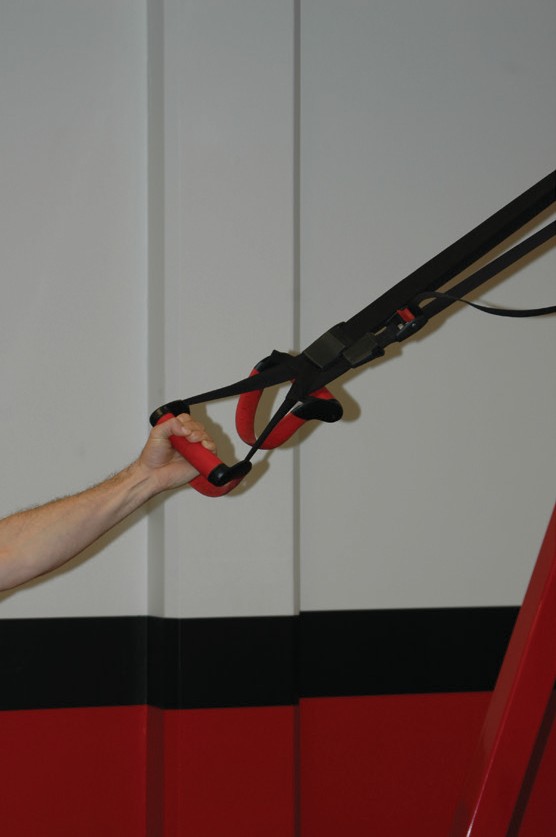
Single Handle Configuration
You can change the two handles into one handle by aligning the two handles with one hand above the other. Feed the bottom handle through the triangle of the top handle and then take the handle that is now on the bottom and feed it through the triangle on the top handle. Tug on the handles to tighten the two together and to make sure the handles are adjusted correctly.
Figure 6.298:
Suspension Stretching Exercises
Static passive exercises place a muscle in an extended static stretching position.
Quad Stretch
Targeted Muscle: Quadriceps (front of thigh)
Attachment: Foot/ankle
Put the toe of one foot into one of the handles so the handle rests against the front of your ankle joint.
Shorten the suspension strap/rope so your foot is elevated with your flexed knee pointing downward and your heel closer to hip height (or as high as comfortable).
You may want to hold the other strap/rope or the machine to balance yourself.
Bend the knee of your standing leg to lower your hips, feeling a stretch in your quadriceps (front of thigh).
The more you bend the standing knee, the more you will feel the stretch.
Do not stretch to the point of feeling discomfort or pain. If you feel any pain, immediately release the stretch. Hold a comfortable stretch for 20 to 30 seconds.
Figure 6.299:
Chest Stretch
Targeted Muscle: Pectoralis major (chest)
Secondary Muscle: Deltoids (shoulder)
Attachment: Handles
Stand with the suspension anchor point behind you and lift your arms to shoulder height with your palms facing forward.
Step forward and stop when you feel a stretch through your chest.
To accentuate the stretch, lean your weight forward more.
Do not stretch to the point of feeling discomfort or pain.
If you feel any pain, immediately release the stretch. Hold a comfortable stretch for 20 to 30 seconds.
Figure 6.300:
Video 7.71
Shoulder Stretch
Targeted Muscle: Deltoids (shoulder)
Attachment: Handles
Stand with the suspension anchor point behind you and lift your arms to shoulder height, reaching straight ahead.
Raise your arms straight up as you step forward with one leg.
With your hands directly over your head and your palms facing forward, lean your body forward to initiate a stretch in your shoulders.
Do not stretch to the point of feeling discomfort or If you feel any pain, immediately release the stretch.
Hold a comfortable stretch for 20 to 30 seconds.
Figure 6.301:
Lat Stretch
Targeted Muscle: Latissimus dorsi (back)
Attachment: Handles
Stand facing toward the anchor point and step back until your arms are fully extended in front of your chest and the straps/ropes have no slack.
With your feet shoulder-width apart, bend your knees as you shift your weight back like you are sitting in a chair.
Let the straps/ropes pull at your arms as you feel the muscles stretching across your back.
Do not stretch to the point of feeling discomfort or pain.
If you feel any pain, immediately release the stretch. Hold a comfortable stretch for 20 to 30 seconds.
Figure 6.302:
Suspension Stretching Exercises
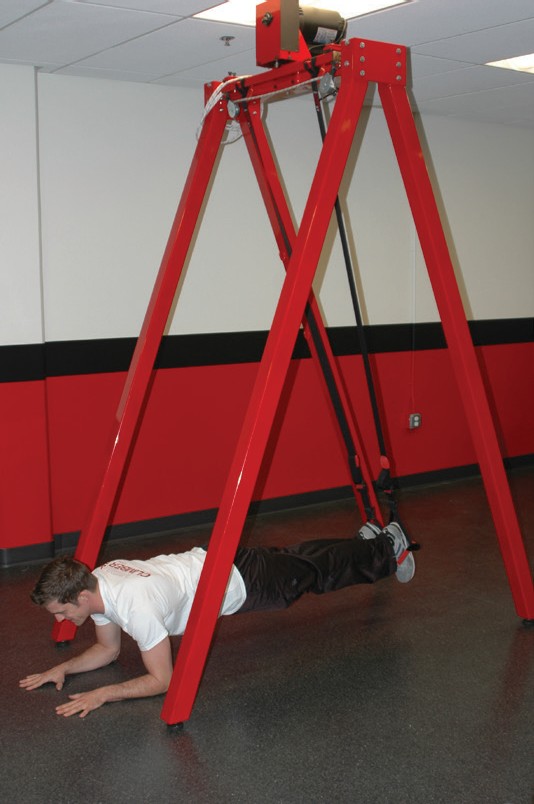
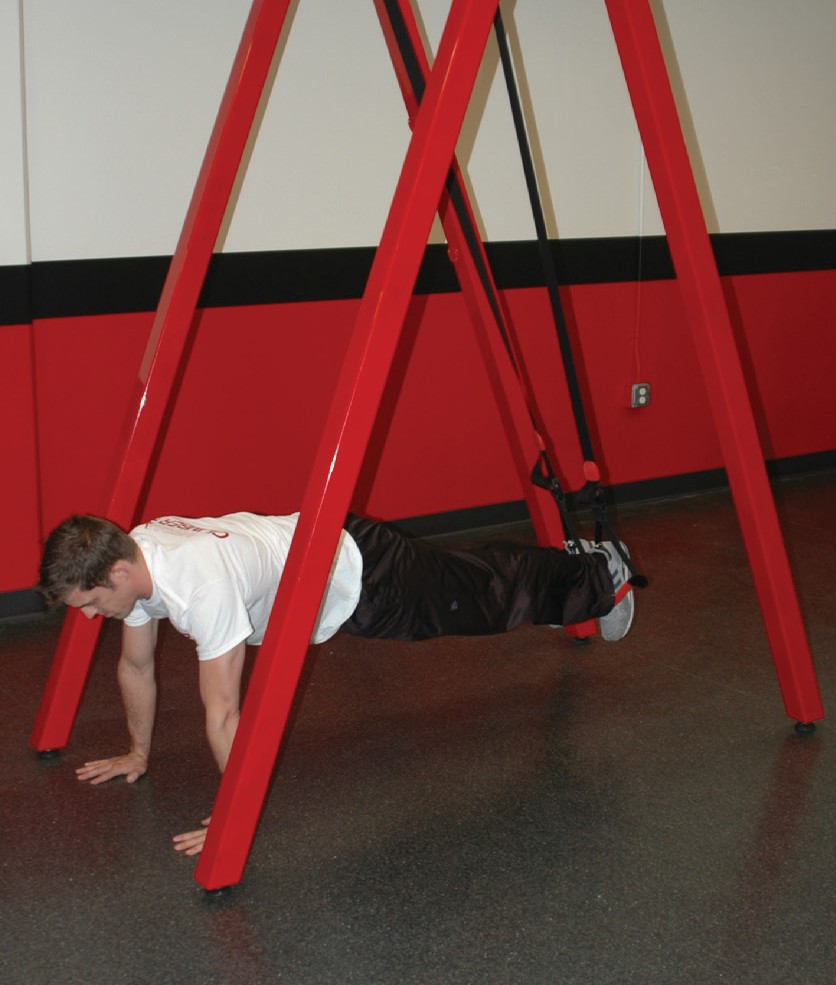
Suspension Push Up
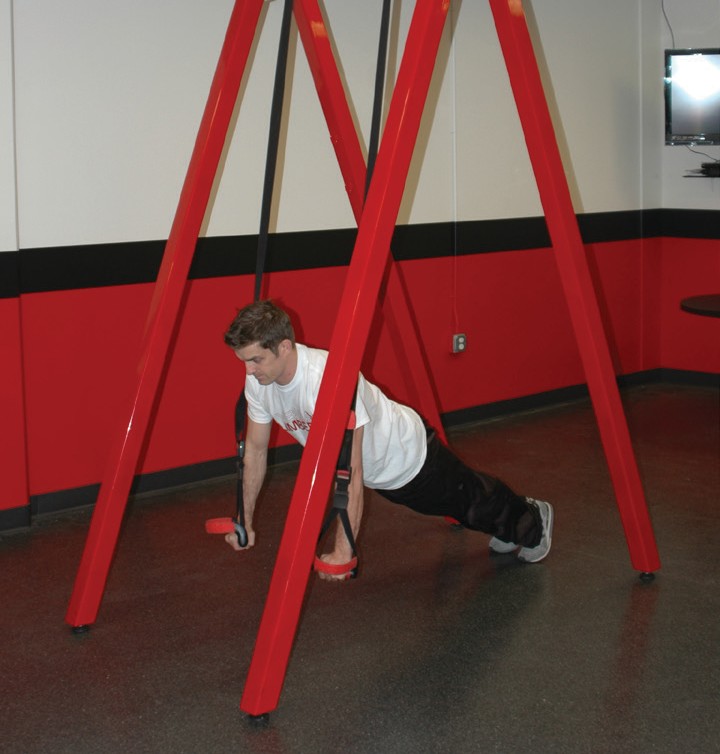
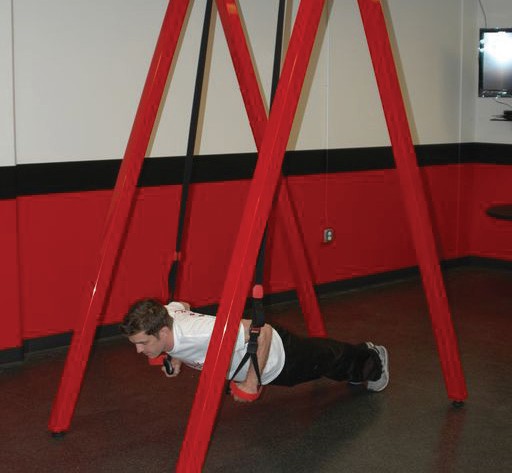
Facing away from the anchor point, lean your body forward with a staggered stance and lower your chest toward your hands like you are doing a push up.
Perform a push-up but lower your chest to the height of your hands and press up to just short of fully extending the arms.
Having the hands slightly higher than during a standard push up (more toward the shoulders) will help direct the straps/ropes out of your way.
Perform the exercise in a slow, controlled manner.
Increasing the body angle, narrowing the stance or using a one-foot stance will make the exercise more difficult.
Figure 6.303: Top position for the suspension push up
Figure 6.304: Bottom position for the suspension push up
Video 6.72
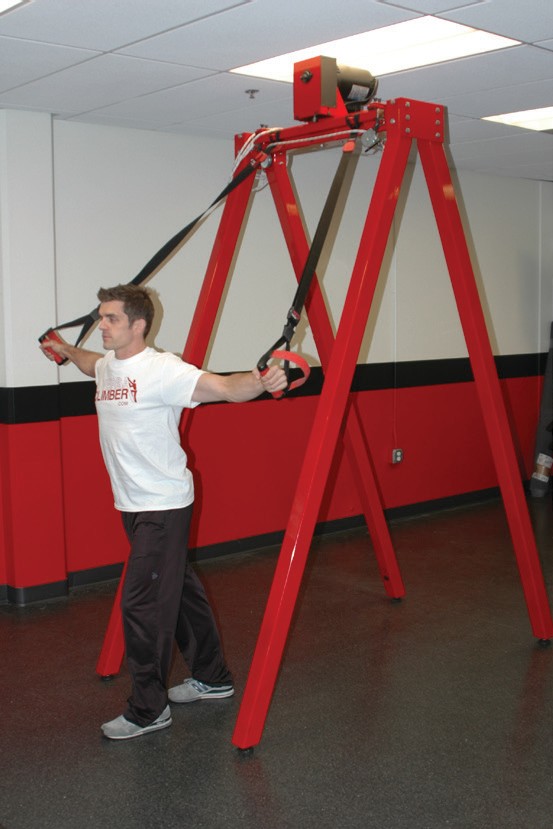
Chest Fly
Facing away from the anchor point, lean your body forward.
Starting with your hands extended straight in front of you with your palms facing together, lower your body as you horizontally abduct (widen out) your arms at shoulder height, keeping your elbows almost completely straight.
Perform a chest fly by lowering yourself by fully abducting your arms to be even with your shoulders and then horizontally adduct the arms together back to the starting point.
Try to maintain the same arm angle (slight elbow bend) throughout the whole exercise.
Perform the exercise in a slow, controlled manner.
Increasing the body angle, narrowing the stance or using a one-foot stance will make the exercise more difficult.
Figure 6.305: Starting position for the chest fly
Figure 6.306: Finishing position for the chest fly
Video 6.73
Row
Facing the anchor point with your feet staggered and shoulder width apart, start with your hands even with your chest and lean your weight back as you extend your arms.
When performing the row, lower your body by extending your arms fully and then pull your body up until your hands are even with your chest.
Perform the exercise in a slow, controlled manner.
Increasing the body angle, narrowing the stance or using a one-foot stance will make the exercise more difficult.
Figure 6.307: Starting position for the row
Figure 6.308: Finishing position for the row
Video 6.74
One-Arm Row
The one-arm row is a more advanced version of the basic row.
Using just one arm increases the resistance, which increases the challenge to the body. The one-arm row utilizes the single-handle configuration.
To set up the single-handle configuration, refer to the one handle configuration instructions earlier in this chapter (see Insert figure 3-12).
Facing the anchor point with your feet staggered and shoulder width apart, start with your hands even with your chest and lean your weight back as you extend your arms.
When performing the row, lower your body by extending your arms fully and then pull your body up until your hands are even with your chest.
Perform the exercise in a slow, controlled manner.
Increasing the body angle, narrowing the stance or using a one-foot stance will make the exercise more difficult.
Figure 6.309: Starting position for the one-arm row
Figure 6.310: Finishing position for the one-arm row
Video 6.75
Dip
Standing under the anchor point with your arms at your side and your palms facing in, hold the handles just outside your shoulders (adjust the strap/rope so the handles are below your hips).
Walk your feet slightly forward or back (placing your feet behind you may be more comfortable for your shoulders), shifting the remainder of your body weight on the handles.
Dips are performed by lowering your hips as you bend your elbows to a 90 degree angle and then pressing your body back up to the starting position.
To keep pressure on the triceps, keep the elbows in Do not let the elbows flare out to the sides.
Perform the exercise in a slow, controlled manner.
The farther you place your feet in front or behind your hips, the more body weight resistance you will use.
Figure 6.311: Starting position for the dip
Figure 6.312: Bottom position for the dip
Triceps Extension
Standing under the anchor point, extend your arms out at head height.
Lean your body forward so the straps/ropes are taut.
To perform the full triceps extension, keep your hand position stable and lower your body as you bend your elbows, so your hands are even with your forehead and then push your body back to the starting position by extending your arms. To keep pressure on the triceps, keep the elbows in tight.
Do not let the elbows flare out to the sides.
Perform the exercise in a slow, controlled manner.
Increasing the body angle, narrowing the stance or using a one-foot stance will make the exercise more difficult.
Figure 6.313: Starting position for the triceps extension
Figure 6.314: Bottom position for the triceps extension
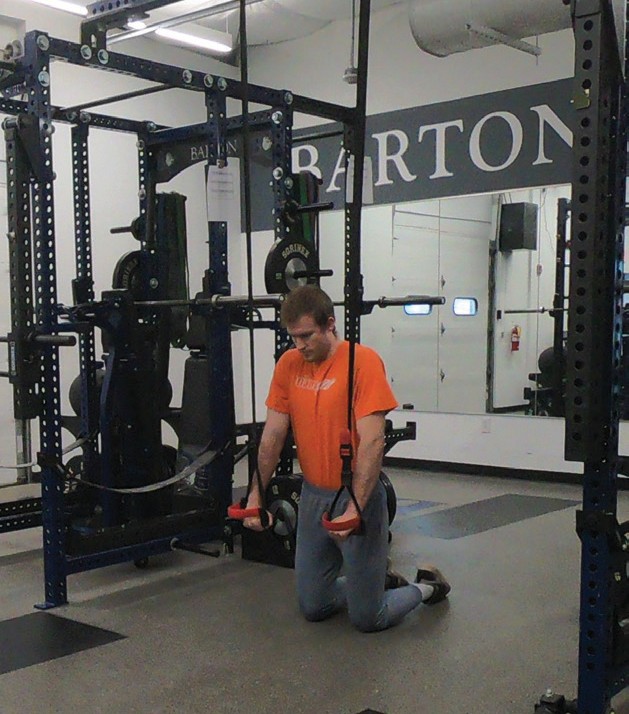
Biceps Curl
Facing the anchor point with your feet staggered and shoulder-width apart, start with your hands even with your chest and lean your weight back as you extend your arms. With your palms facing up, flex your elbows, bringing your hands to your chin as you pull your body up.
Then, extend your arms as you lower your body back to the starting position.
To keep pressure on the biceps, keep the elbows in tight.
Do not let the elbows flare out to the sides.
Perform the exercise in a slow, controlled manner.
Increasing the body angle, narrowing the stance or using a one-foot stance will make the exercise more difficult.
Figure 6.315: Starting position for the biceps curl
Figure 6.316: Finishing position for the biceps curl
Video 6.76
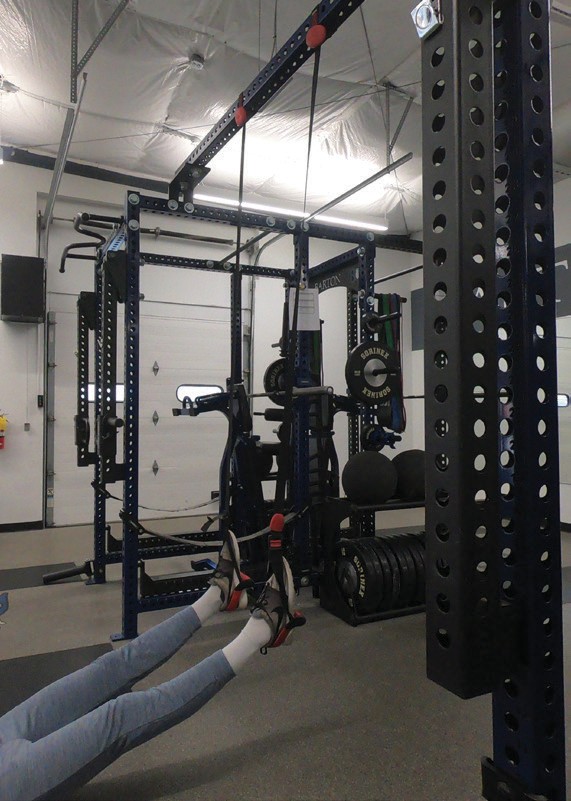
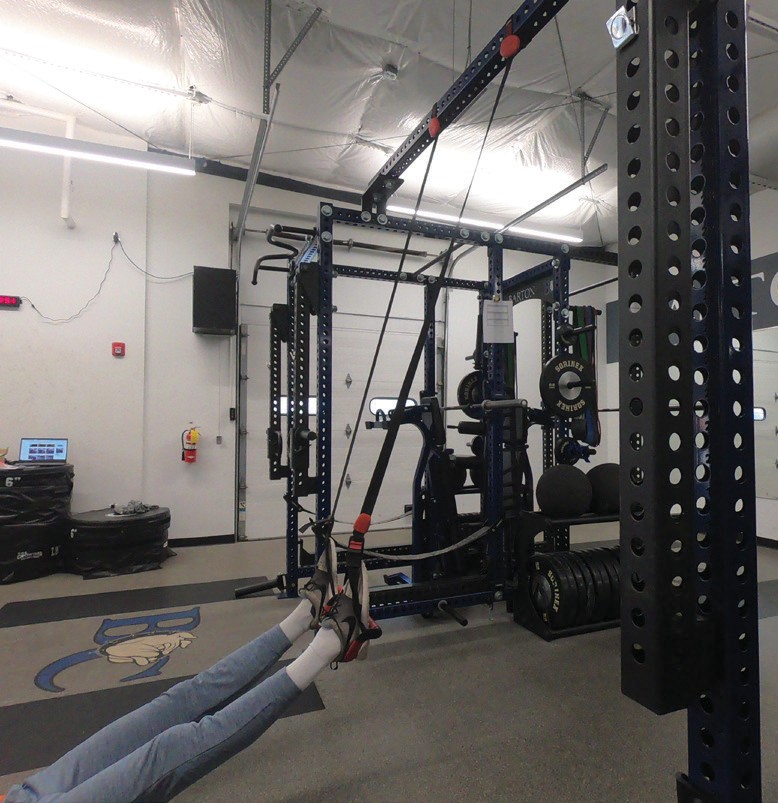
Utilizing the Handles for Core and Lower-Body Movements
Heels in the Handles (Exercises Facing Upward)
Extend the straps/ropes to about 8 inches off the ground. Sitting close to the handles and facing the straps/ropes, steady the handles with your hands and then roll back slightly, bringing your knees to your chest, and place your heels into the handles. (Some handles may have an additional loop below the hand grips for your heels.) As you lay back, push your heels down into the handles and extend your legs.
Figure 6.317:
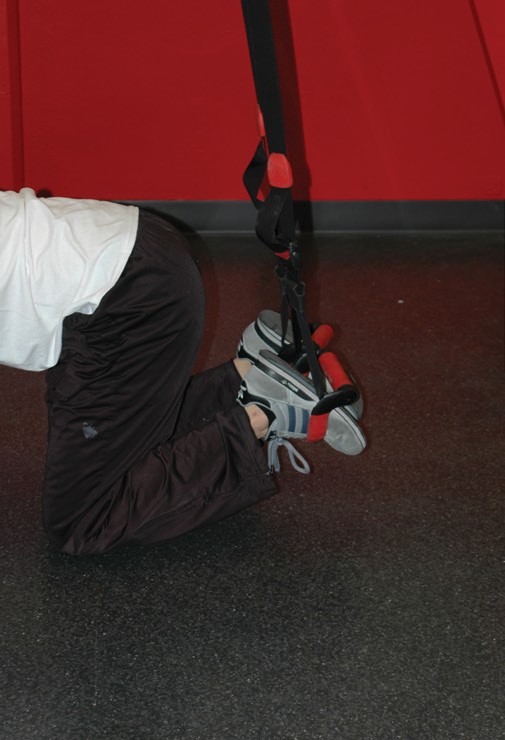
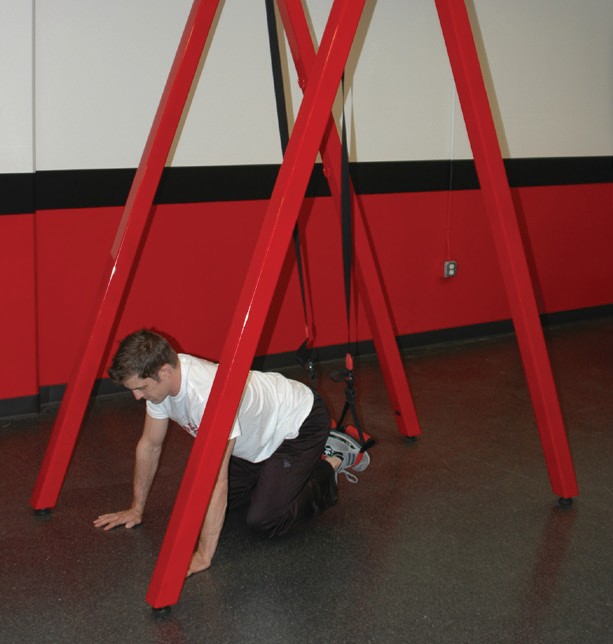
Toes in the Handles (Exercises Facing Downward)
Extend the straps/ropes to about 8 inches off the ground. Sitting close to the handles and facing the straps/ropes, grab the right handle with your right hand and cross your left foot over the top of your right leg, putting your left toes into the handle. (Some handles may have an additional loop below the hand grips for your toes/heels). Then, place your right toes in the left handle. Roll over, bringing your left shoulder over the top. Let your feet rotate in the handles as you rotate into the plank position. Your feet should now be positioned so the tops of your feet are resting against the handles.
Figure 6.318:
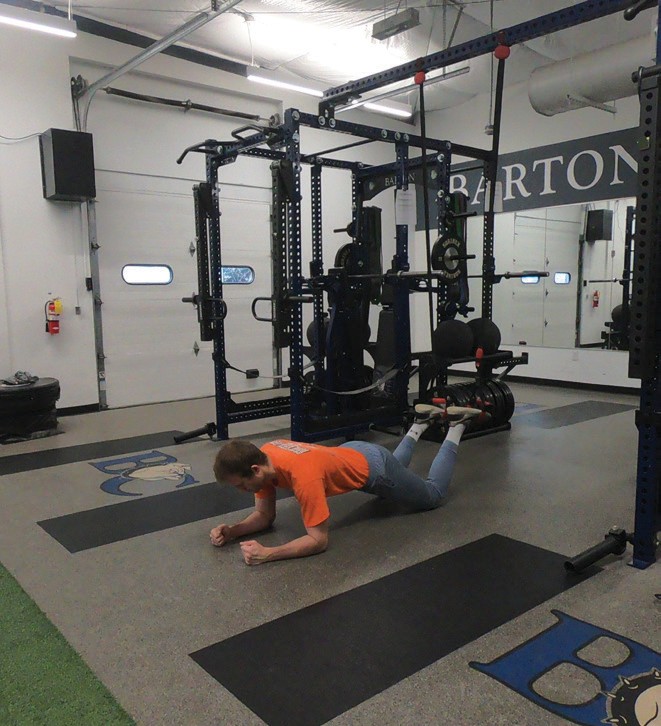
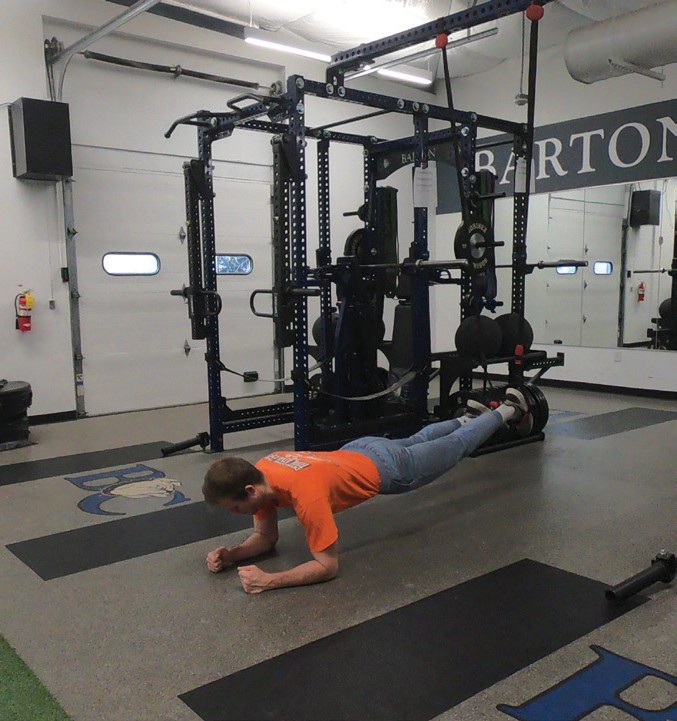
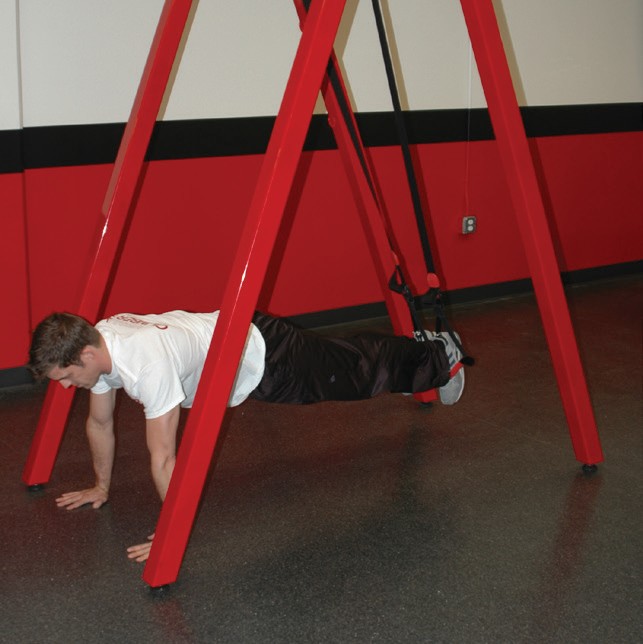
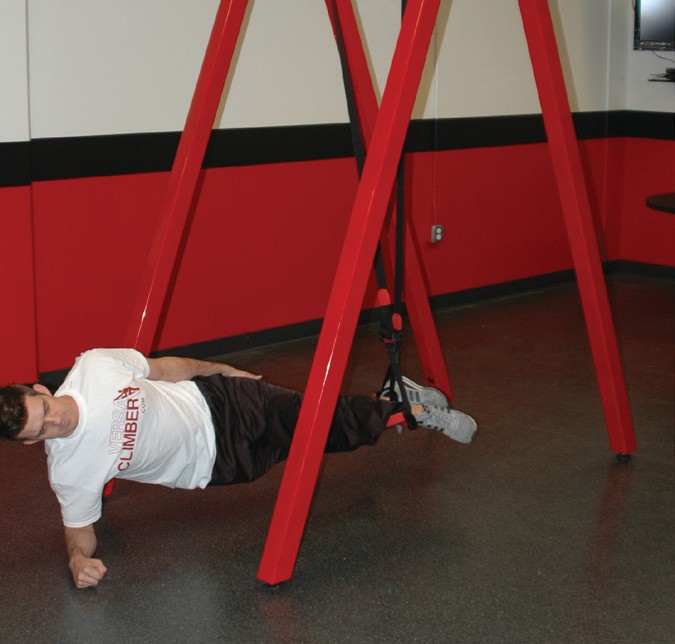
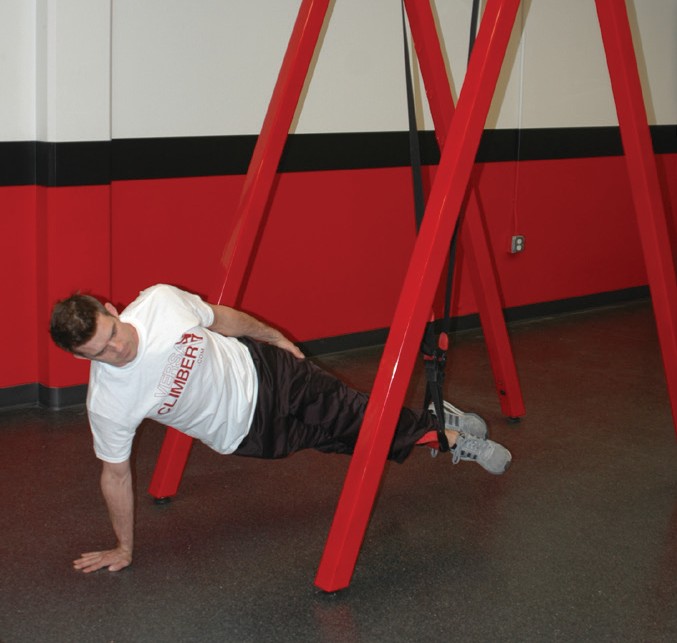
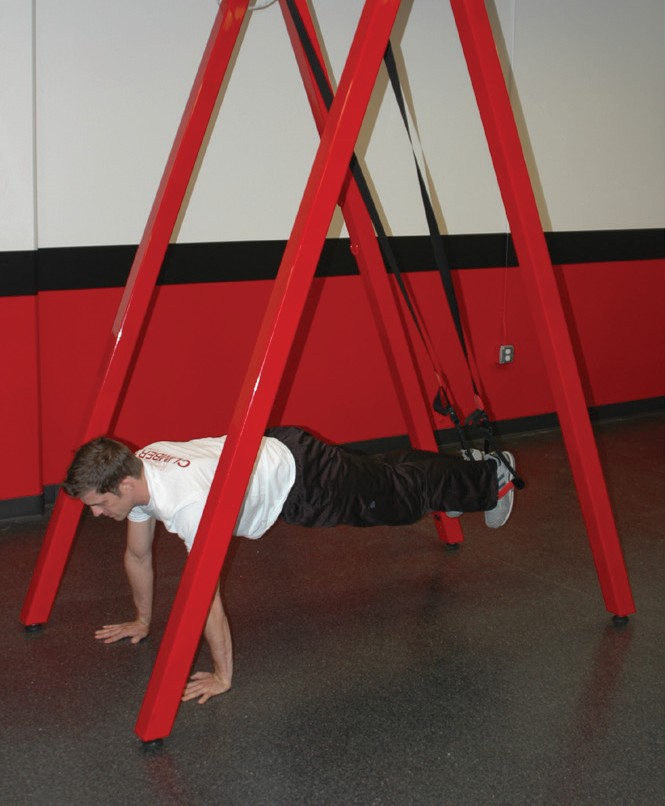
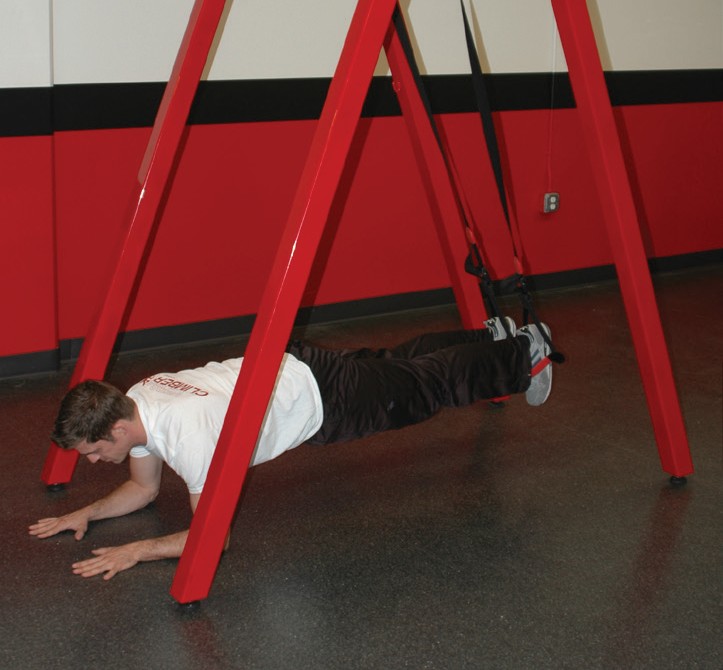
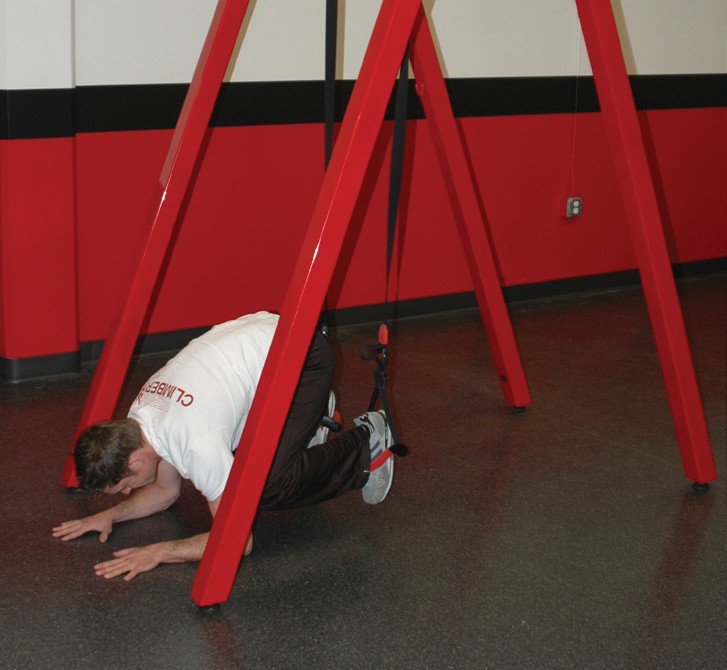
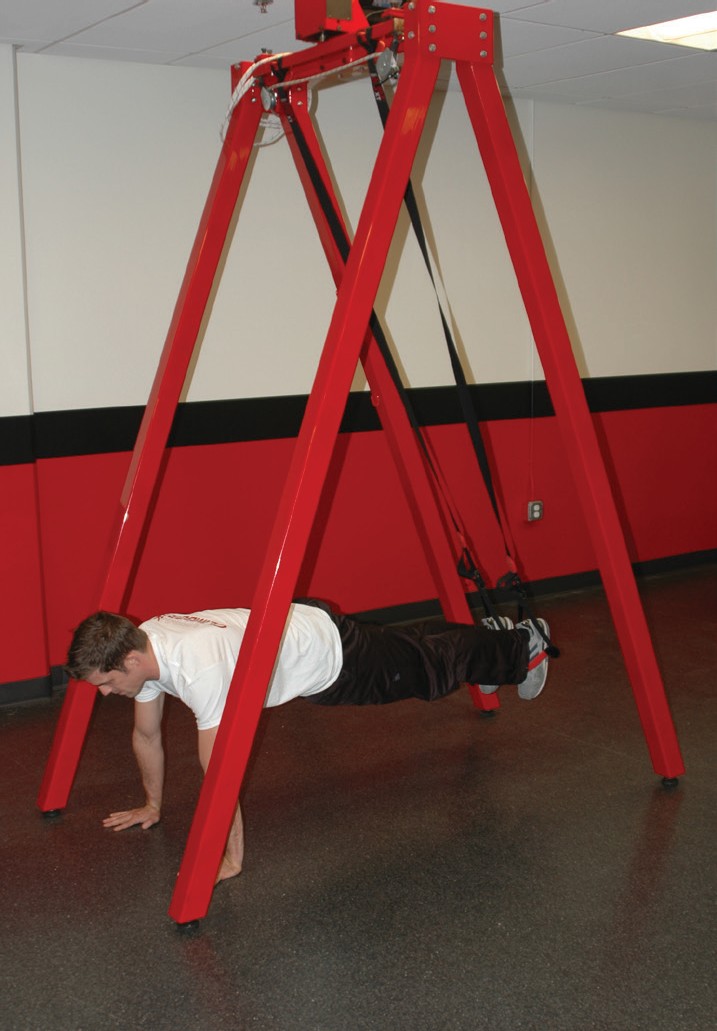
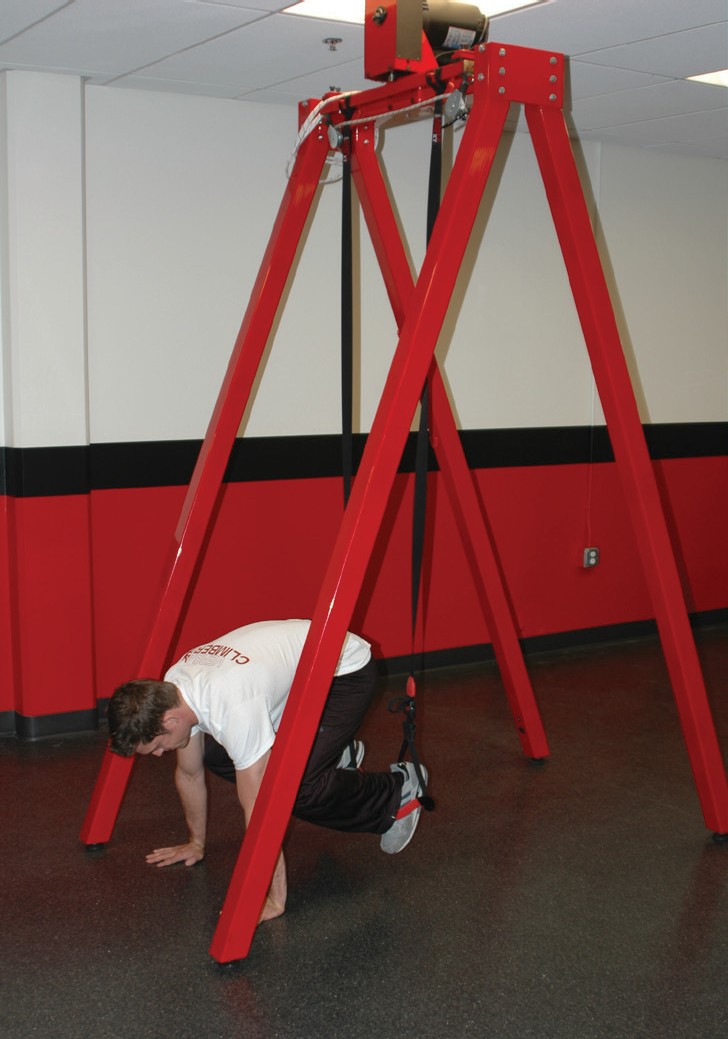
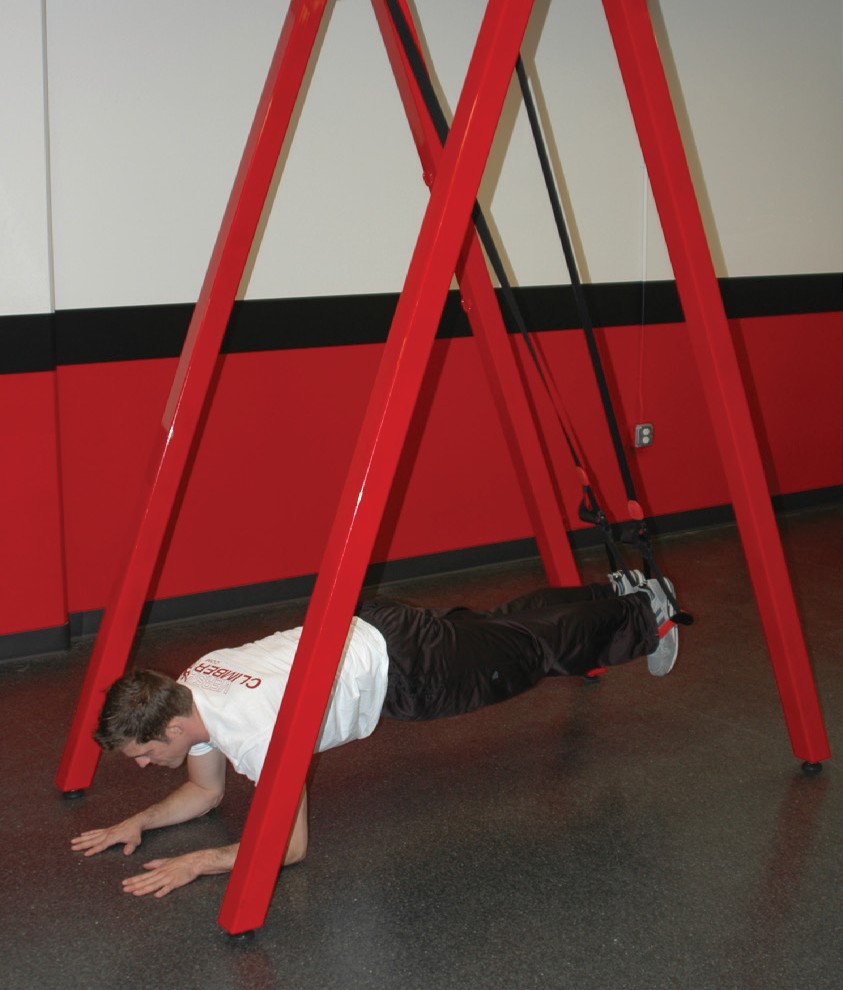
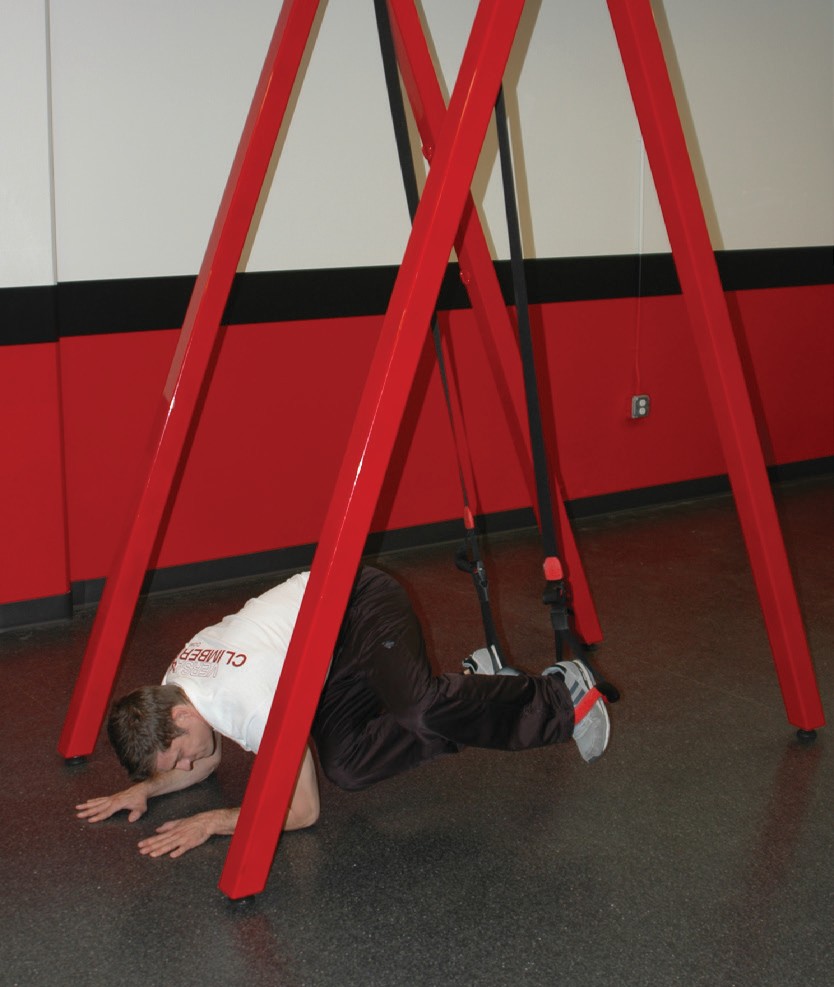
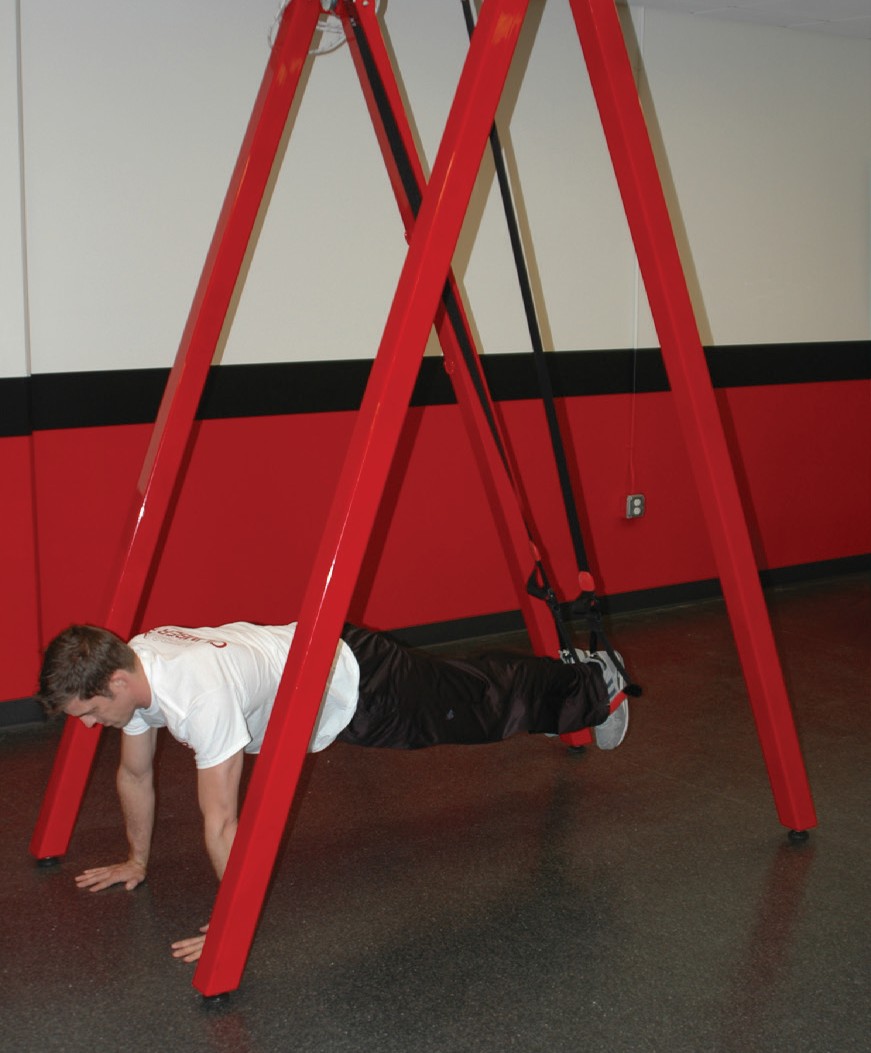
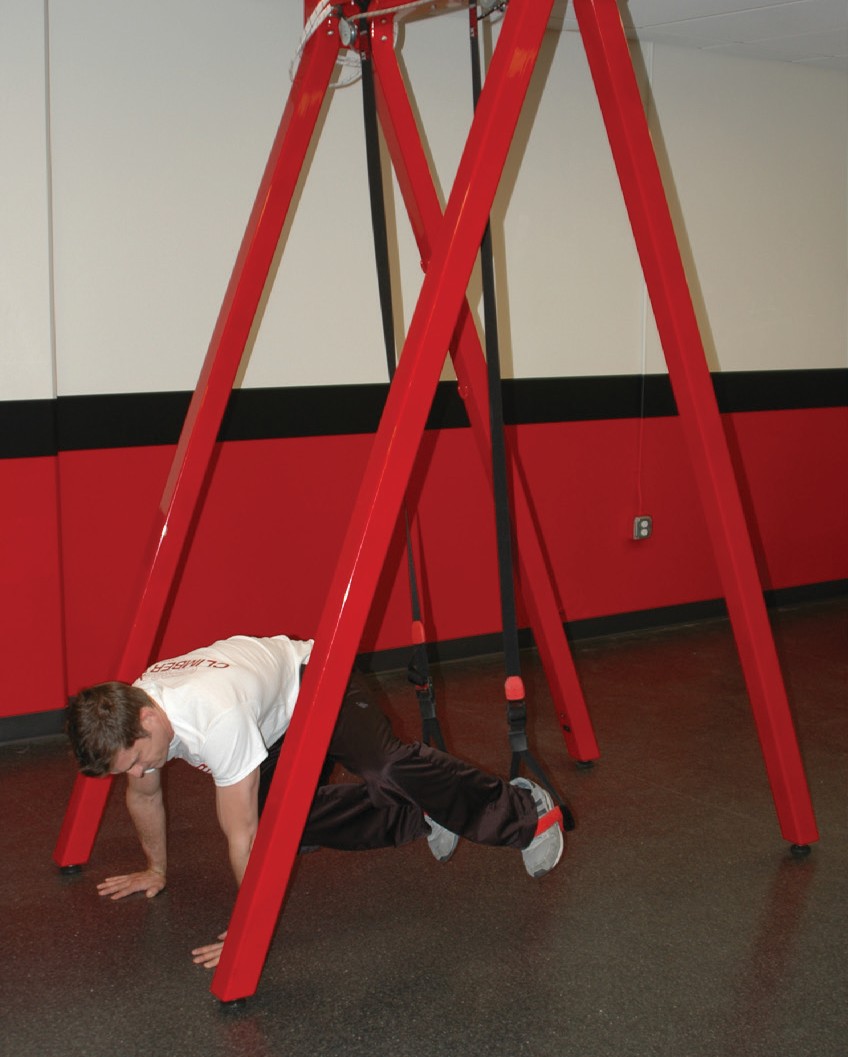
Front Plank
Targeted Muscle: Abdominals
Attachment: Foot/ankle
Extend the straps/ropes to about 8 inches off the ground.
Position your toes in the handles as described at the beginning of the core/lower-body section.
Start out in the resting position with your knees and forearms resting on the ground.
Consciously think about keeping your abdominal muscles tight while keeping good posture, maintaining a straight line from your ankles through your hips to your shoulders.
To make the exercise more difficult, perform the exercise on your hands with your arms extended instead of on your forearms.
Figure 6.319: Front plank resting position (forearm base)
Figure 6.320: Front plank (forearm base)
Figure 6.321: Front plank resting position (from knees, arms extended base)
Figure 6.322: Front plank (arms extended base)
Side Plank
Targeted Muscle: Obliques (side abdominals)
Attachment: Foot/ankle
Extend the straps/ropes to about 8 inches off the ground. Position your toes in the handles as described at the beginning of the core/lower-body section.
Start in the resting position turned to one side with your hip resting on the ground and with your feet offset (top leg forward) and your body resting on your forearms.
Engage your oblique muscles by lifting your hip up in the air, maintaining a straight line through the center of your Keep your body stable, resting your top hand on your hip.
To make the exercise tougher, raise your top arm straight in the air.
To further increase the intensity of the exercise, balance on one hand with an arm extended in- stead of resting your weight on your forearms.
The most difficult variation involves balancing on your straight arm and extending your top arm straight up in the air.
Perform this exercise equally on both sides.
Figure 6.323: Side plank (forearm base)
Figure 6.324: Side plank (arm extended base)
Video 6.77
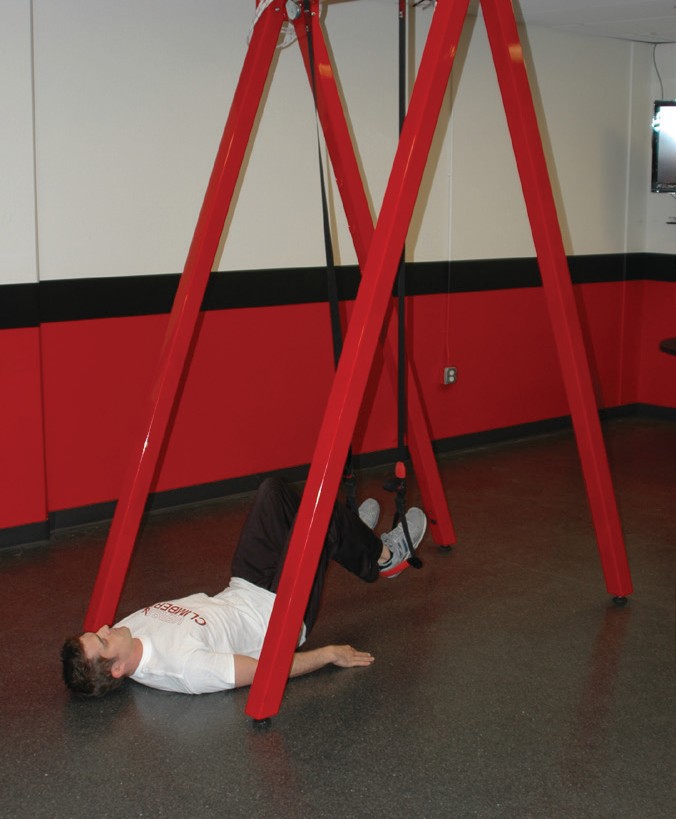
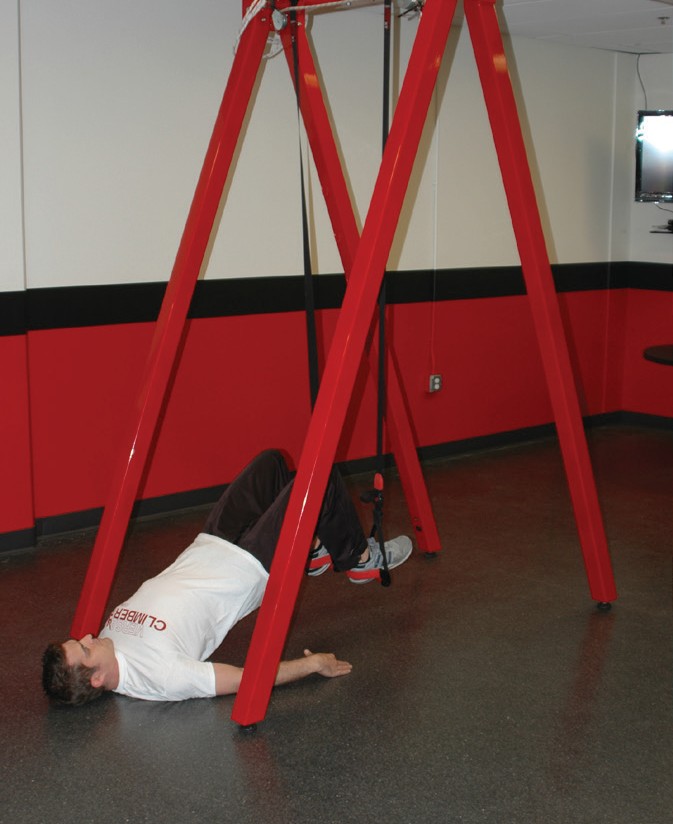
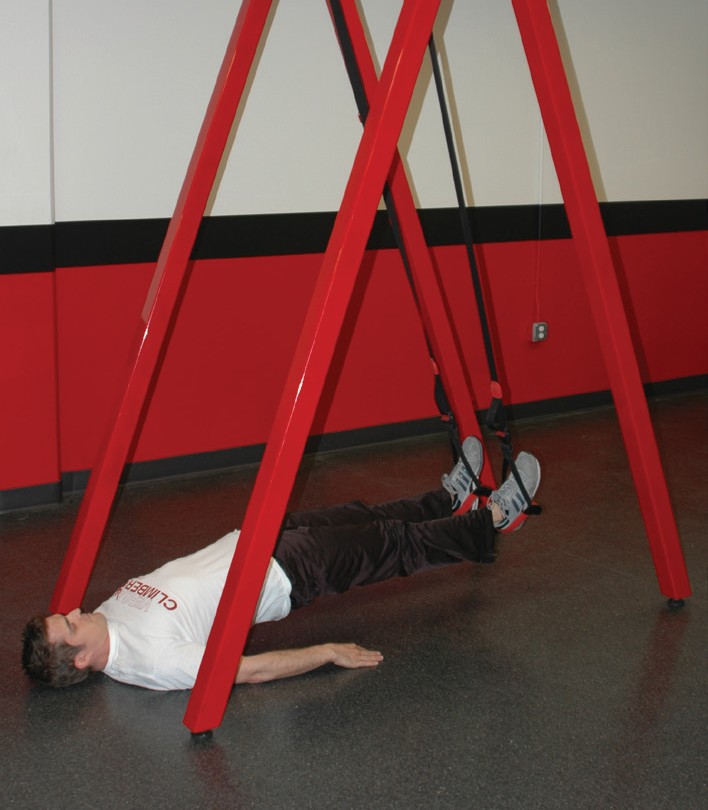
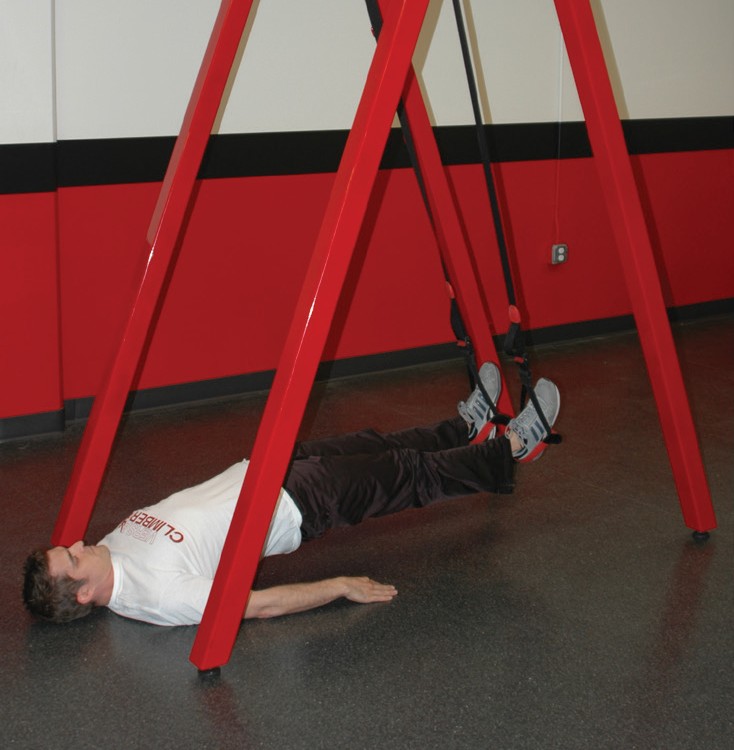
Glute Bridge
Targeted Muscle: Gluteus maximus
Attachment: Foot/ankle
Extend the straps/ropes to about 8 inches off the ground.
Position your heels in the handles as described at the beginning of the core/lower-body section.
Start in the resting position with your knees bent at 90 degrees and lying with your hips and back on the ground.
With feet suspended and knees bent, lift your hips off the ground.
Think about tightening your abdominals and gluteus maximus as you maintain a straight line from your shoulders through your hips to your knees.
Figure 6.325: Starting position for the glute bridge
Figure 6.326: Finishing position for the glute bridge
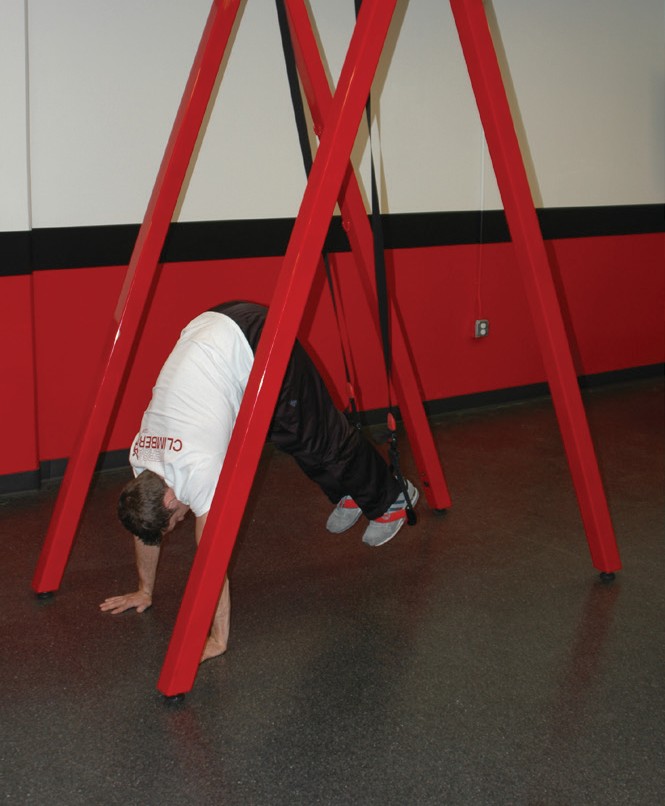
Pike-Ups
Targeted Muscle: Abdominals
Attachment: Foot/ankle
To perform the pike-up, start in the front plank resting position on your knees with your arms extended and your hands on the ground.
Lift your knees up into the extended arm front plank position and execute the pike by raising your hips up while keeping your legs straight.
Your hips will rise up higher as your feet move closer toward your hands.
Pause for a second or two at the top of the pike (where your hips are at their highest point) and then slowly in a controlled manner lower your hips while keeping your legs straight to the arms extended front plank starting position.
Figure 6.327: Starting position for the pike-up (extended arms front plank position)
Figure 6.328: Top position for the pike-up (high hip position)
Video 6.78
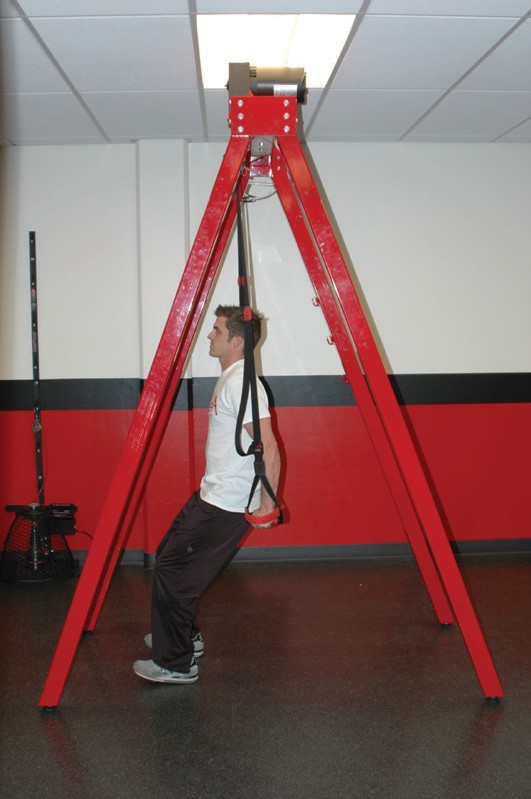
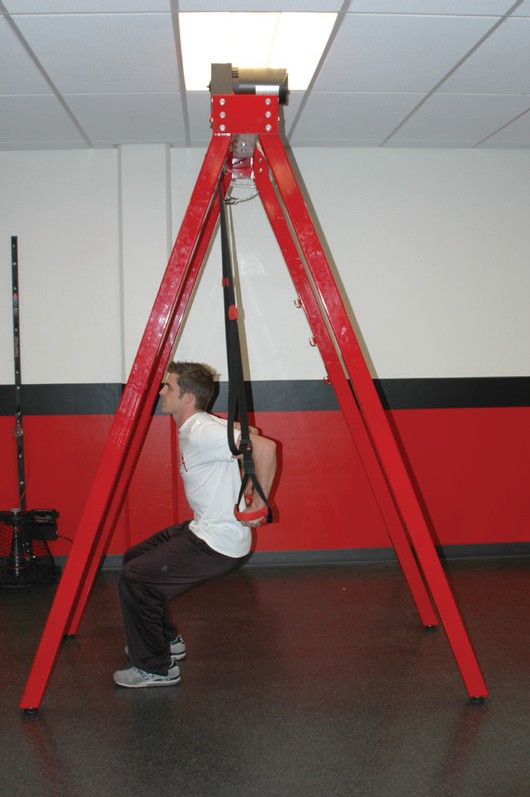
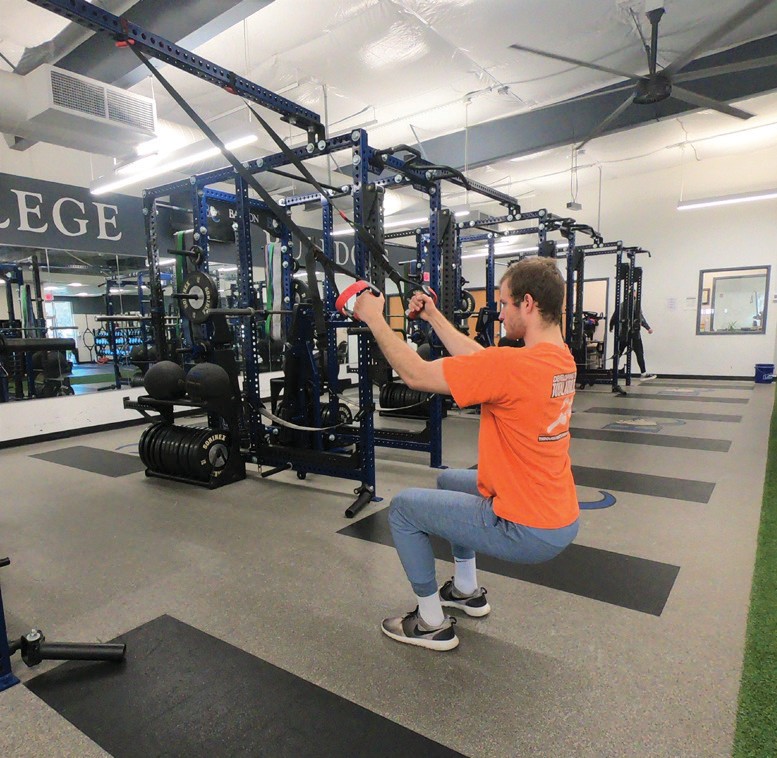
Squat
Stand with your arms extended, with your feet placed shoulder width apart and holding the handles for balance.
To perform the squat, keep your chest up and your head facing straight ahead.
Bend your knees and hips as if you are sitting back into a chair.
Lower your hips until your upper thigh is parallel to the floor (knees should be at about 90 degrees).
Keep your chest up, leaning forward slightly, and stick your hips back as you squat to keep your balance and not fall back.
Shifting your hips back will also allow your knees to remain over your toes in a safe position.
After squatting down to 90 degrees, pause and then extend your knees and hips to return to a standing position.
Figure 6.329: Suspension squat top position
Figure 6.330: Suspension squat bottom position
Video 6.79
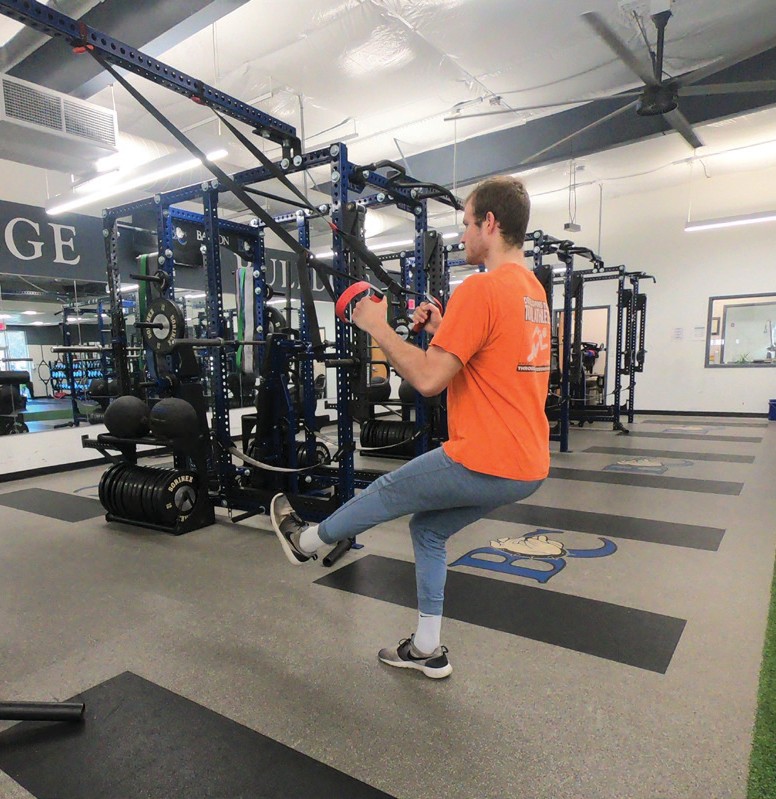
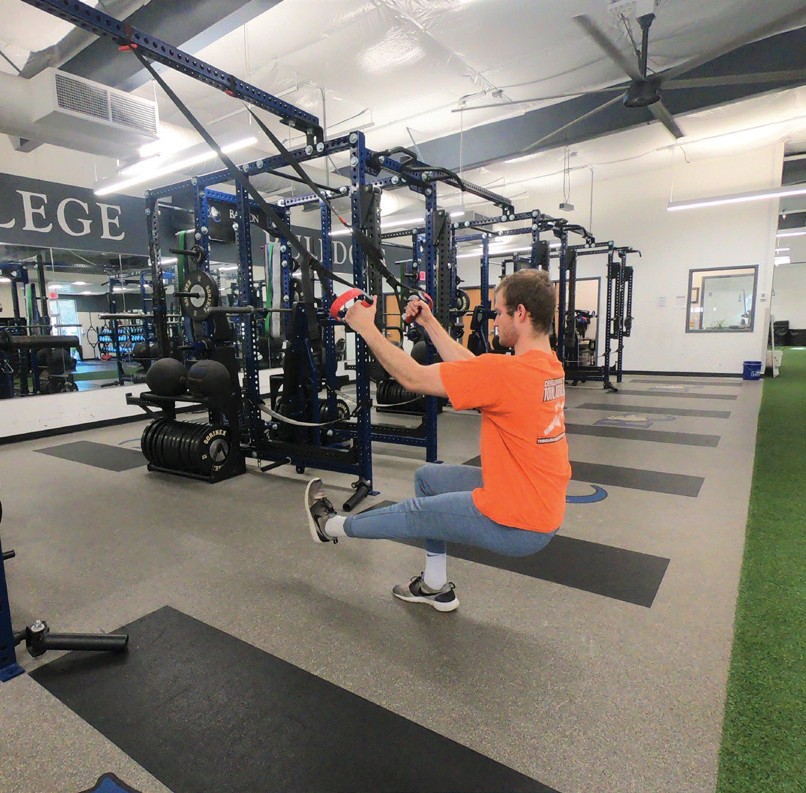
Single-leg Squat
Stand with your arms extended, with your feet placed shoulder-width apart and holding the handles for balance.
To perform the single-leg squat, keep your chest up and your head facing straight ahead.
Straighten one leg out in front and bend the knee and hip of the stance leg as if you are sitting back into a chair.
Lower your hip until your upper thigh is parallel to the floor (knee should be at about 90- degrees).
Keep your chest up, leaning forward slightly, and stick your hips back as you squat to keep your balance and not fall back.
Shifting your hips back will also allow your knees to remain over your toes in a safe position.
After squatting down to 90 degrees, pause and then extend your knee and hip to return to a standing position.
Figure 6.331: Suspension single-leg squat top position
Figure 6.332: Suspension single-leg squat bottom position
Video 6.80
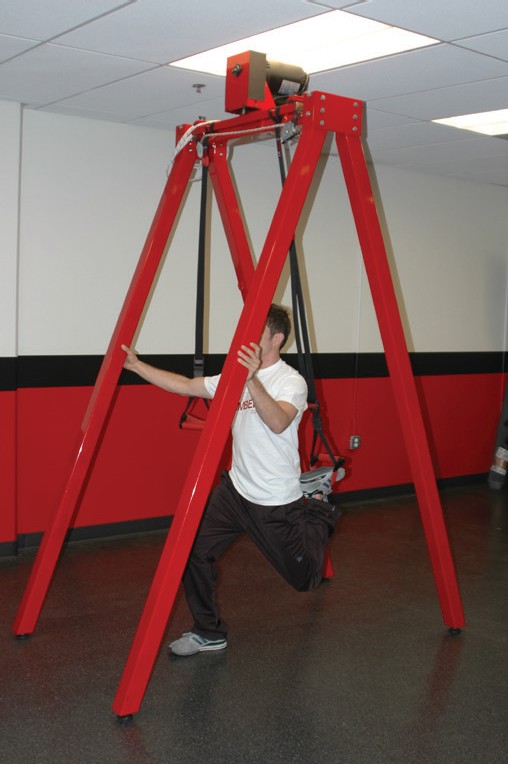
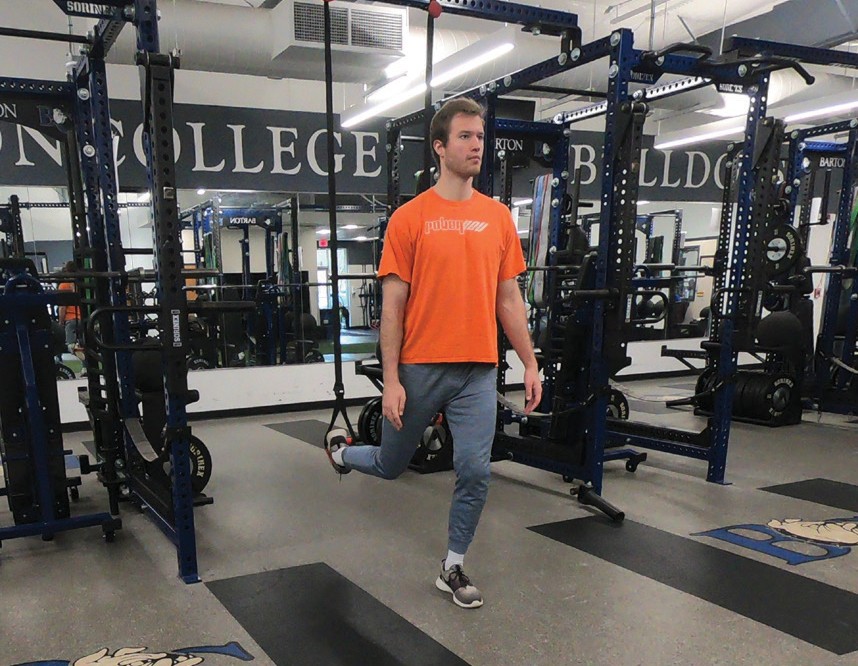
Rear Elevated Split Squat
Attachment: Foot/ankle
Extend the straps/ropes to a comfortable position off the ground for the rear leg.
Position your toes in the handles as described at the beginning of the core/lower-body section.
With the rear leg supported in the handle, position the front foot far enough forward that, when the back leg is lowered to the floor, the front knee does not extend out in front of the toes.
Bending the front knee, drop the hips straight down into 90-degree bend of both front and back legs.
Push up on the front leg, extending the knees and hips back to the starting position.
If needed, something like a wooden dowel can be used for balance, just be sure to keep the emphasis on the leg muscle.
Figure 6.333: Suspension rear elevated split squat top position
Figure 6.334: Suspension rear elevated split squat bottom position
Video 6.81
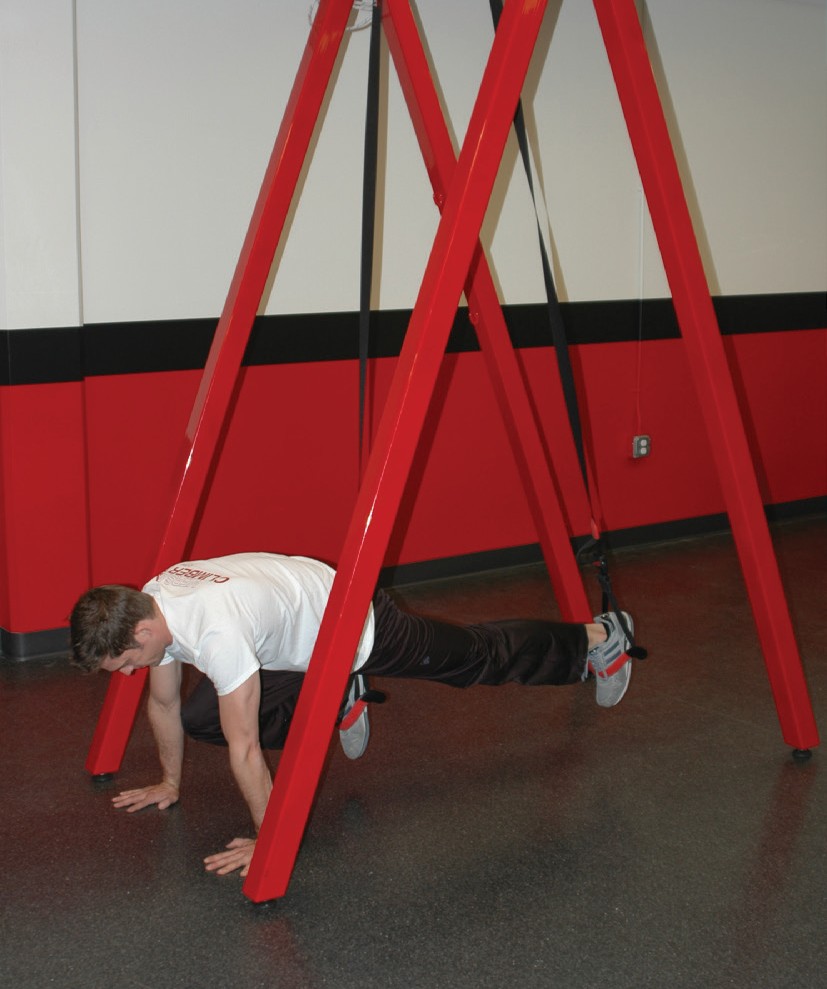
Knees to Elbows
Targeted Muscle: Hip flexors/abdominals
Attachment: Foot/ankle
Extend the straps/ropes to about 8 inches off the ground.
Position your toes in the handles as described at the beginning of the core/lower-body section.
Start out in the resting position similar to the front plank, with your knees and your forearms on the ground.
Lift your knees off the ground and then bend your knees, bringing your knees forward toward your elbows, tucking your knees to your chest.
Then, extend your legs out straight into the front plank position.
Keep your abdominals tight as you tuck your knees forward and then extend your legs out straight in a slow, controlled manner.
To make the exercise more difficult, start from your hands with your arms extended instead of from your forearms.
Figure 6.335: Starting position for the knees to elbows (forearms front plank position)
Figure 6.336: Finishing position for the knees to elbows (knee tuck position)
Figure 6.337: Starting position for the extended knees to elbows (extended arms front plank position)
Figure 6.338: Finishing position for the extended knees to elbows (knee tuck position)
Video 6.82
Twisting Knees to Elbows
Targeted Muscle: Hip flexors/abdominals and obliques
Attachment: Foot/ankle
Extend the straps/ropes to about 8 inches off the ground.
Position your toes in the handles as described at the beginning of the core/lower-body section.
Start out in the resting position similar to the front plank, with your knees and your forearms on the ground.
To involve the oblique muscles, add in a twist by bringing your knees to one side.
Lift your knees off the ground and then bend them, bringing your knees forward toward your elbow on one side, tucking your knees into the outside of your elbow.
Then, extend your legs out straight into the front plank position.
Keep your abdominals tight as you twist and tuck your knees forward and then extend your legs out straight in a slow, controlled manner.
Perform the exercise by alternating repetitions to each side.
To make the exercise more difficult, start from your hands with your arms extended instead of from your forearms.
Figure 6.339: Starting position for the twisting knees to elbows (forearms front plank position)
Figure 6.340: Finishing position for the twisting knees to elbows (twisting knee tuck position)
Figure 6.341: Starting position for the extended twisting knees to elbows (extended arms front plank position)
Figure 6.342: Finishing position for the extended knees to elbows (knee tuck position)
Video 6.83
Video 6.84
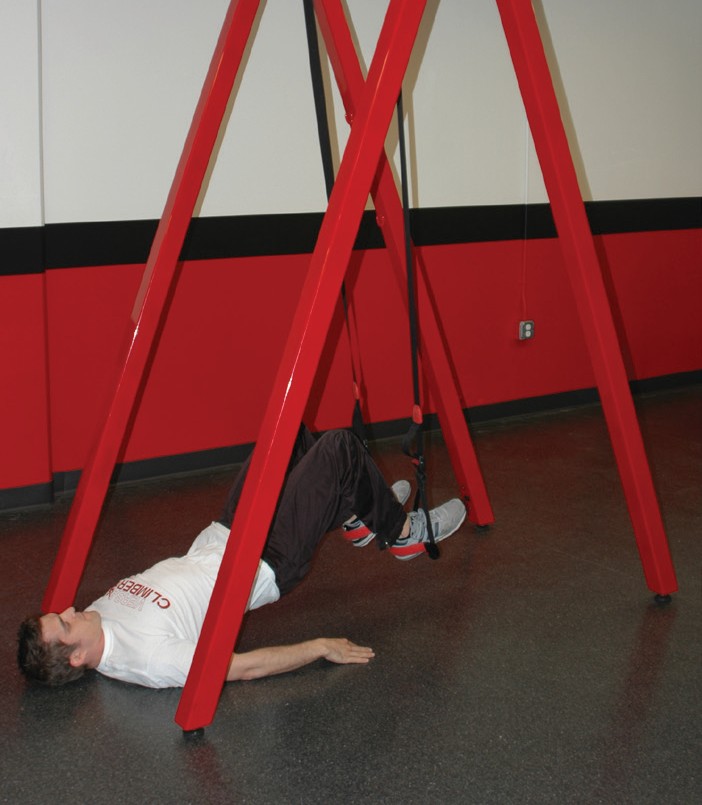
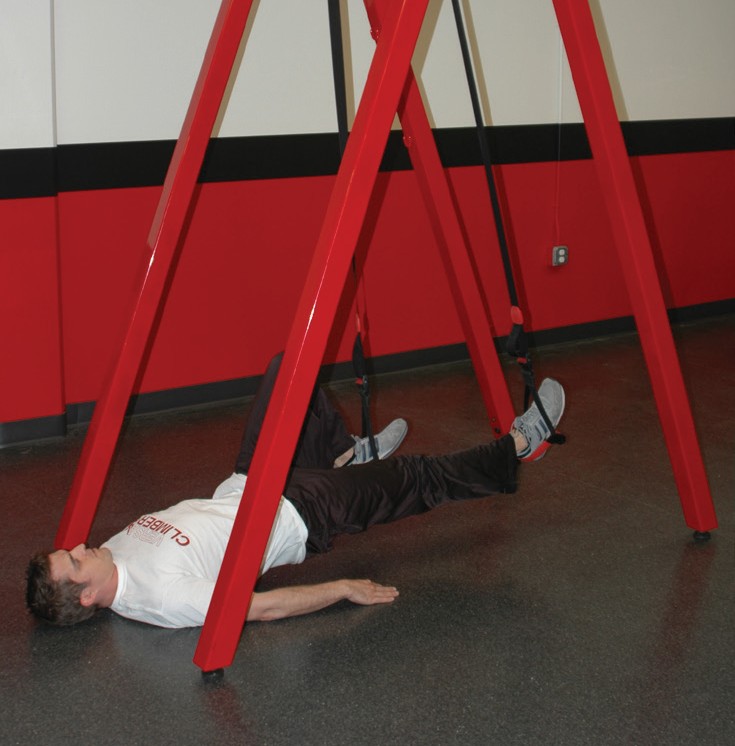
Leg/Hamstring Curl
Targeted Muscle: Hamstrings (back of thigh)
Attachment: Foot/ankle
The leg/hamstring curl movement is opposite to the knees-to-elbows movement.
Extend the straps/ropes to about 8 inches off the ground. Position your heels in the handles as described at the beginning of the core/lower-body section.
The resting position is like the glute bridge resting position with knees bent at 90 degrees and your body lying with your hips and back on the ground.
Lift your hips off the ground like in the glute bridge exercise.
Keeping your abdominal and gluteus maximus muscles tight, extend your legs out straight in a slow and controlled manner.
As you keep the hips elevated, engage the hamstring muscles to bend your knees as you return to the resting bridge position.
Figure 6.343: Starting position for the leg/hamstring (legs straight position)
Figure 6.344: Finishing position for the leg/hamstring
Video 6.85
Runners (Face Down)
Targeted Muscle: Hip flexors/abdominals
Attachment: Foot/ankle
Facedown runners are similar to the knees-to-elbows exercise, except the emphasis is placed on one leg instead of both legs.
Start facing down with your knees resting on the ground and then lift your knees up and extend your legs into the front plank position.
Keeping your toes flexed toward your shin, bend one knee, bringing your knee forward toward your chest as far as you can.
To perform the exercise, keep your hips elevated and alternate legs in a running-type motion. Try to keep your upper body stable on the ground and concentrate on not rotating from side to side.
To add more emphasis on hip flexors/abdominals, the movement can be slowed down with pauses between alternating the positions of the leg.
Figure 6.345: Starting position for the runners (face down) (front plank/legs straight position)
Figure 6.346: Finishing position for the runners (face down)
Video 6.86
Runners (Face Up)
Targeted Muscle: Hamstrings (back of thigh)
Attachment: Foot/ankle
Face up runners are similar to the leg/hamstring curl exercise, except the emphasis is placed on one leg instead of both legs.
Start facing up, with your legs extended, and elevate your hips off the ground to help engage the muscles.
Keeping your toes flexed toward your shin, bend one knee, bringing your heel back toward your glutes as far as you can.
To perform the exercise, keep your hips elevated and alternate legs in a running-type motion.
Try to keep your upper body stable on the ground and concentrate on not rotating from side to side.
To make the exercise easier if needed, you can actually rest your hips lightly on the ground to lessen the load placed on the hamstrings.
To add more emphasis on hamstrings, the movement can be slowed down with pauses between alternating the positions of the leg.
Figure 6.347: Starting position for the runners (face up) (legs straight position)
Figure 6.348: Finishing position for the runners (face up)
Video 6.88
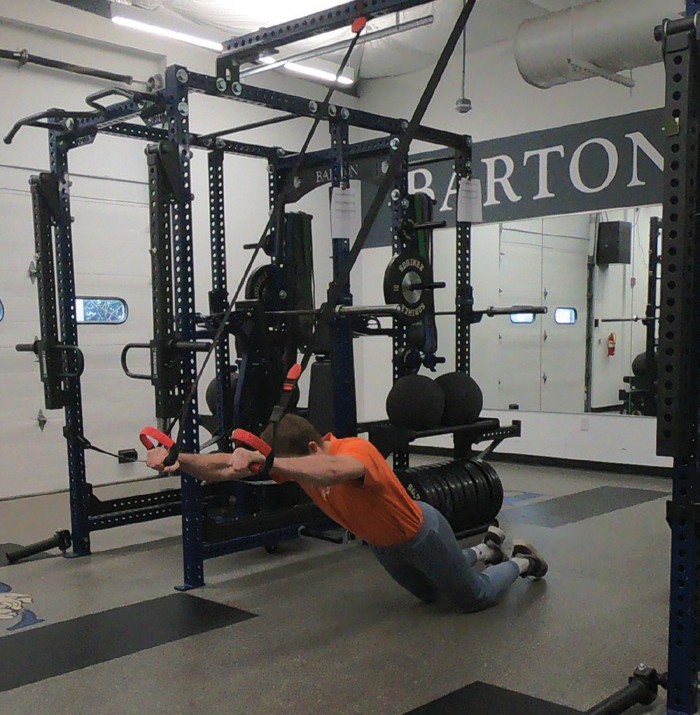
Fall Out
Targeted Muscle: Abdominals
Secondary Muscles: Deltoids (shoulders) and triceps brachii (back of upper arm)
Attachment: Handles
Stand with your feet shoulder-width Facing away from the anchor point, grab the handles with your arms at your side.
Leaning your body-weight forward slowly, raise your arms to make a straight line from your hands to your ankles.
Keeping your arms straight and abdominals tight, pull your arms down to the starting position.
To make the exercise harder, start from your knees as you face away from the anchor point.
To further increase the exercise intensity, perform the exercise from your knees while facing the anchor point.
Figure 6.349: Starting position for the fall out
Figure 6.350: Finishing position for the fall out
References:
Sections in this chapter are adapted from my previously published books:
Dornemann, M. POWERREV Youth Athletic Development Program: Building Champions in Sports and in Life. Ronkonkoma, NY: Linus, 2015.
Dornemann, T. M. and A. Mikheev. Russian Vibration Training: The Mikheev Method. Monterey, CA: Healthy Learning, 2013.