


Chapter 09: Speech Support
Speech Support
First things first, a declarative statement; “Support strengthens your speech.”
There are approximately seven different types or forms of support for your speech: facts (scientific and historical), statistics, testimony & quotations, examples, compare & contrast, descriptions and definitions, and interview.
PART 1
However, for support to be effective, it should specify, clarify, add weight, be appropriate, and be of interest.
- Specify – effective support should be specific or give specific examples.
For example, in the following speech statement below:
“Many basketball players drafted right out of high school were able to enjoy success at the professional level in the NBA”
The topic/statement begs for specific support. Here is how you can specify or give specific examples as effective support:
“Lebron James, Kobe Bryant, Kevin Garnett, Tracy McGrady, and Dwight Howard are examples of basketball players drafted right out of high school who excelled in the NBA.”
- Clarify – effective support should clarify your ideas: – explain or give reasons why.
This statement: “cell phone usage has affected our communication skills”.
The statement is clarified further by the explanation below:
“Interpersonal conversations benefit from visual cues such as body language and facial expressions, these cues are impossible to replicate on a cell phone, and because of this, listeners miss out on valuable nonverbal cues during phone conversations, which leads to the deterioration of our communication skills.”
- Add Weight– effective support should add weight to the speech with the use of credible statistics, expert opinion, and/or testimony.
In a story entitled “Provisional State of the Global Climate in 2022”, about global warming, the World Meteorological Organization (WMO) used statistical data to show how the impacts of global warming are becoming more dramatic.
- Be Appropriate – the audience must be able to relate to the supportive material, but the supportive material must be relevant to the point being A point may require you to provide visual support or material support, which can include statistics, quotations, or a physical object.
- Be of Interest – sometimes, the speaker needs to generate interest for the topic and speech, which is done by relating the topic to the audience’s At other times, the topic itself should create interest; the listeners should care and be emotionally and/or intellectually involved in the material.
Forms of Support that could be utilized for your speech
Facts – a fact is anything that can be proven true. Factual support must include research and testimony. This type of support is undisputable because it holds up to scrutiny and criticism.
- Facts are verifiable evidence that clarify the main points, indicate your knowledge of the, subject and define your point.
Statistics – this is the collection of numerical information that has been analyzed and interpreted.
- You can use statistical information to quantify the information being presented. In presenting the data, you must be careful to state your sources and explain what the numbers mean in a clear, easy to grasp way.
Testimony & Quotations – Testimony either from experts or peers in the field helps your credibility when used as support or evidence for your main points.
- For the testimony to be credible, use qualified individuals (expert testimony) who can validate your point and add weight because they are supposed to be acknowledged authorities in their field.
Peer testimony is provided by individuals who may have had personal experiences with the subject matter and can provide a personal viewpoint on the issues. Remember, testimony is merely support, and that time must be incorporated into the speaker’s overall allotted time.
- Use testimony from qualified and unbiased
Quotations are like testimony, except you are representing the words of the quoted once you quote accurately. If you choose to paraphrase, paraphrase, don’t quote.
Quote recognized sources to bolster your credibility, and identify and give credit to the people you quote or paraphrase.
Examples – examples are perhaps the most commonly used form of support. These are statements that support a point with an illustration, story, or reference. Examples are used to clarify reinforce, and personalize your ideas.
Three types of examples are:
- A Brief example – this is also called a specific instance which is used to illustrate a point.
The speaker might say “for instance” and give the instance of the example.
- An Extended example – this is a more detailed illustration, narrative, or anecdote that tells a story.
- A Hypothetical example – this is a non-factual and imaginary story that helps to relate a general principle or hypothesis.
You (the speaker) are creating a realistic scenario that relates directly to your audience.
Compare & Contrast – comparing involves identifying similarities differences in things, ideas, events, objects, and/or people, while contrasting involves comparing things, ideas, events, objects, or people to specifically highlight their differences.
- Comparisons are generally within the same category.
- Contrasts are generally in different categories.
Descriptions – this is providing information that appeals to your audience’s senses. The information is shaped by your word choices, tones, shapes, and imagery.
- When describing, your senses must be engaged; these are your vision, taste, touch, smell, and The more engaged they are, the more vivid the descriptions are perceived to be.
- You must answer the over-hanging questions of the story, and these are: who, what, where, when, and Answers to these W’s provide the story details, enlarge the story, and make the support concrete.
Definitions – this is a statement that explains through clarification, using one or a few words, what the meaning is of what you are trying to say.
- When used as support, definitions help to clarify meanings.
Interviews – this is usually a face-to-face meeting with others for a specific and important reason.
The current technological landscape allows us to conduct interviews virtually and by phone; either way, the stages and the interview process remain pretty much the same.
Assuming it is your production and you are conducting the interview:
- Request the interview – once you have found a candidate to interview, whether it’s for employment, entertainment, or informational purposes, you will have to formally request the interview. A formal interview request involves writing a letter or sending an email request to the potential candidate, specifying the reasons for the interview request.
- Schedule the interview – once an agreement is solidified, a convenient date, time, and place for all parties to meet for the interview must be arranged and scheduled.
- Advance questions list – depending on the type of interview being planned for, a list of the potential questions/topics or areas of discussion to be covered should be shared with the interviewee.
In general, prior to the interview, your research on the candidate to be interviewed should reveal pertinent information and help to shape some of the questions you plan on asking. Practice and time your interview; you never want to go beyond the time frame agreed on.
- The Interview will be divided into three parts:
- The opening – depending on the type and formality of the interview, the credentials of the interviewee should be reiterated. The opening is where you make sure the interviewee is relaxed and comfortable; thank the candidate for appearing and indulge them in small talk unrelated to the interview itself; this allows everyone to relax and loosen up. Questions could be general and open ended in the beginning as a warm up.
- The body – you need to prepare a list of questions and probe questions based on the length of the interview planned. For a 30-minute interview, approximately 7 questions and probe questions (3 ½ minutes per question and probe).
- The Interview will be divided into three parts:
The most important questions should be the first set of questions to ask; if any of those questions require follow up or probe questions, address them. Make sure you listen well, rarely interrupt, and let your interviewee speak.
- The close – the wrap up of the interview can be achieved both verbally and non-verbally. Telegraph to the interviewee that the interview is about to You can use a clearing house question like, “Is there anything else you’d like to add?”, or ”Do you have any questions for me?.”
Throughout the interview, focus on the interviewee, avoid interrupting, and thank them at the end for granting you the interview.
The interview, if it’s original, can be edited, and parts of it could be inserted into speech presentations to make or support a point as appropriate.
PART 2
Visuals or Visual Aids
Students have asked whether it’s compulsory for them to use visual support for a speech, and my answer has been: if you can find credible ways to convince the audience of your argument, story, and main points other than with the use of a visual, then use it; however, visual images are more convincing, remain in our minds much longer, and sometimes say more than words alone can.
In a 2017 study published in the Harvard Gazette, Elinor Amit showed that people, even when prompted to use verbal thinking, create visual images to accompany their verbal inner speech. We think in pictures.
There are really no disadvantages to using visuals or visual aids as support, except if the visual images are inappropriate, confusing, or weak (they conflict with the message).
Advantages of Visuals or Visual Aids
- Adds Clarity – your messages are enhanced, heightened, and made clearer when the object or some representation of it is shown.
- Adds Interest – your presentation becomes more interesting to the audience when you display photos, graphs, charts, drawings, or other types of visuals.
- Adds Retention – visual images are more nagging than just hearing the verbal The visual images remain with the audience for a much longer period of time and help to reinforce the verbal message.
- Adds Persuasion – when visuals are used in a presentation as support, the speech appears to be more credible and the speaker appears to be better prepared and more professional; the culmination of all these perceptions seems to make the speech more persuasive.
- Shifts Attention – if given a choice between the speaker and visual images being shown by the speaker, audiences will focus on visual images, making it easier for the speaker to relax during the If the speaker is a novice and subject to stage fright, the visuals will help to combat the stage fright.
Kinds of Visual Aids you can use
- The Speaker– your body is a great visual aid; while you’re preparing your speech, think of ways you may be able to use your body to further enhance your Depending on the topic of your speech, you can become a visual display by dressing the part, becoming that character you’re describing, demonstrating an action or activity, or by role-playing.

Figure 9.1 :
Objects – It is always a good idea to have a live prop or the object if it can be obtained. Having a functioning object on hand allows you to use it to dramatize your point, giving your presentation more presence and appeal. Make sure you practice with the object beforehand and make sure the object is a legal one. Examples of appropriate objects are: a basketball, a baseball, or a baseball bat.

Figure 9.2 :
- Models – models are objects built to scale, and they are representative of another object. For example, a model house, plane, car, or boat. Models are useful when the actual object is too large or impractical to be brought indoors for the speech, like a house.
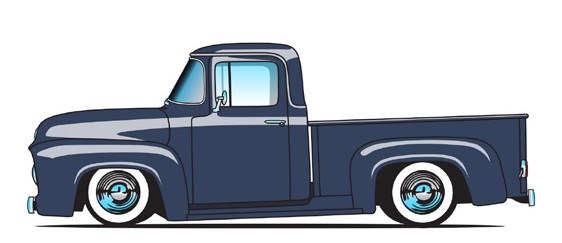
Figure 9.3 :
- Photographs – photos are useful to tell the story of a moment captured in time. Oversized enlargements used as slides is a dramatic way to display your photographs.

Para Sports in action, Shutter Stock photos
- Drawings – original drawings can add credibility and life to your presentation. If you plan on actually sketching an object during your presentation as a teaching demonstration, make sure it is planned properly, taking into consideration your speech time Contracting the steps might be a consideration.
If the artworks/drawings are being displayed live, oversized enlargements displayed properly within the space would be your best approach.

Figure 9.4 :

Figure 9.5 :
Graphs – graphs are useful for simplifying percentages and clarifying statistics. You can use line or pie graphs.
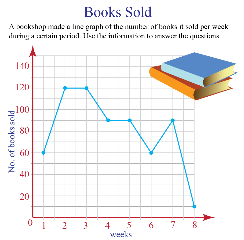
Figure 9.6 :
- Charts – charts are useful for summarizing large blocks of Your presentations appear to be more professional and better organized when you use this method to compare company data or companies in general.
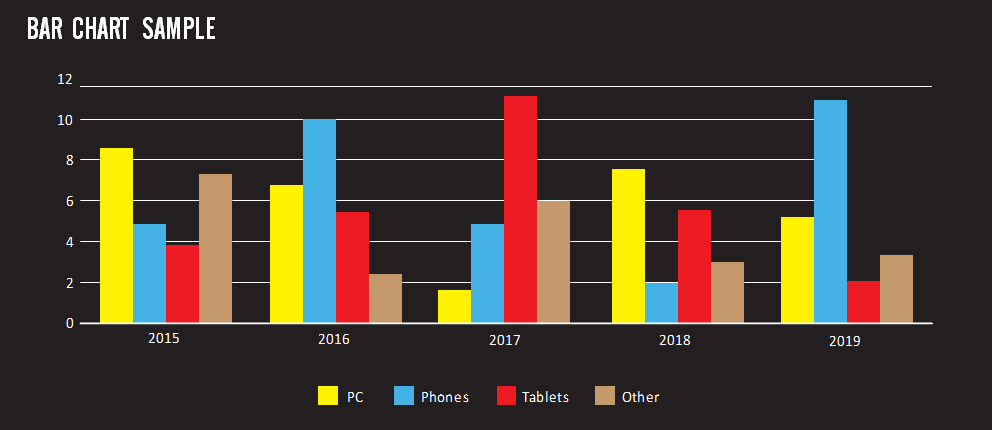
Figure 9.7 :
- Videos & Slides – using videos and slides in your speech presentations, if applied well, can have a powerful impact on the speech, replacing testimonials. The key is to make sure the videos are either recut or edited to only include segments pertinent to the point(s) being Make sure the video is cued to start at a specific point and make sure the scene is introduced properly to the audience prior to being shown.

Figure 9.8 :

Figure 9.9 :
- Multimedia Presentations – PowerPoint presentations are excellent multimedia presentations to use as support for your speech. The combination of audio and video supersedes having just one media source of support, and this greatly enhances your Avoid the trap of having slides with too much going on.
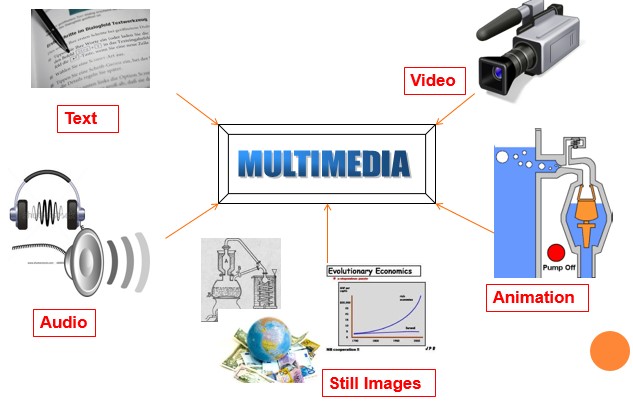
Figure 9.10 :
Guidelines for your Visual Aids Preparation
Preparing for your speech requires advance planning; so does preparing your visuals. Advance planning gives you more time to be creative. As you research and plan your main points, look for suitable support; at the top of your list should be visual support.
In preparing the visual aids, KISS: “Keep It Simply Simple”, and remember the three Bs- for the slide layout; the information shown should be Brief, Bold, and Bulleted.
- Avoid clutter – too much information on the visual slide, either too many images making the slide busy or too much information, creates clutter, and too much information for the audience to process.
- BIG is beautiful – the larger the slide captions and headings, the less chance there will be for clutter and the better chance for your slide information to be legible, easy to read, and process.
- BBB– Brief, Bold, Bulleted; use the 3-5 second rule for reading the slide statements. If reading any caption on your slide takes more than 3-5 seconds, then there are too many words, and you are not brief enough.
Using bold letters and easy-to-read fonts make it more likely that your slide will not be cluttered, and your audience will be able to easily see your captions and visuals.
Bulleted information helps you organize the data on your slide and prevents the use of too many different fonts and headings. Limit your fonts to two types, but no more than three; one for headings and another for the sub-headings and other captions.
- Apply Color carefully – the colors you choose should depend on your topic and the type of speech you are presenting. However, your background colors should not conflict with the captions or font Keep it simple; black on white or white on black fonts should be your first option on a neutral background.
We discussed using colors in an earlier discussion; for your visuals, what you wish your audience to focus on should stand out. Understanding the psychological and physical effect of certain colors should also guide your decision in choosing to incorporate certain colors in your presentation.
Presenting with your Visual Aids
- Your visual aids should always be presented or displayed where your audience can see them. If you’re using live displays, make sure they are set up in the most advantageous position on stage (if a stage is being used), in front of the room on desk, table, or on a stand. The layout of your display should be in the order in which you will discuss, demonstrate, or show them to your audience.
- Display your visual aids only while you are discussing them. This allows you to remain organized and for your audience to remain oriented and follow your speech content properly.
- Explain your visual aids clearly; don’t just show them and assume that the audience will understand how the visual relates to the topic and presentation.
- Avoid the temptation of passing your visual aids among the audience during your presentation. This leads to distraction, and you will also lose your audience’s attention and If you have handouts, it can wait until the end, or if you are using the handouts as part of your presentation, arrive early and place the handouts on the seats or at a designated area for your audience to retrieve when they enter the room.
- Remember who and what is important; the audience is important and what you have to impart to them is important. The visual aids are secondary support, so don’t speak to the visual aids, speak to the audience.
- Practice will allow you to get better at working with your visual aids, and enable you to maintain more than adequate audience eye contact. Practice enough so that the material becomes more familiar to you and you become more and more comfortable in your role.
PART 3
SUMMARY
From this discussion on speech support, you learned that support strengthens your speech and good support should give you more valuable information than you had previously; therefore, it should be specific, clarify, add weight, be appropriate, and be interesting.
The various forms of support include: facts (scientific and historical), statistics, testimony & quotations, examples, compare & contrast, descriptions, and definitions. You may use one or multiple sources of support; each support must add clarity to your topic and presentation and help to move the presentation to its next logical phase.
There are clear advantages to using visual and visual aids; they adds Clarity (enhanced messages), Interest (heightens audience attention), Retention (information gets stored in your long term memory), they are Persuasive (more speaker credibility), and they shift the audience’s focus (audience refocus).
There are several types of visuals aids you can use for support, including the speaker (your body), objects (any legal, tangible thing) models (objects made to scale), photographs (picture board/story), drawings (sketches), graphs (simplifies statistics) charts (compares blocks of data), videos & slides (moving/still images with sound or voice over), and multimedia presentations (simultaneous, multiple media presentations, including visual and audio recordings).
In preparing the visual aids, remember to keep it simply simple: KISS; therefore, avoid clutter on your slides, create legible, easy-to-read slides, remember-big is beautiful, incorporate the three Bs- slides should be brief, bold, and bulleted, and use color effectively; be easy on the eyes.
When presenting your visual aids, it should be presented or displayed where your audience can see them, and only while being discussed. Explain your visuals clearly, but speak to the audience, not the visuals, while doing so. Don’t pass anything around among the audience during your discussion, and practice until you’re comfortable with your material and yourself.
DISCUSSION QUESTIONS
- Was there a situation you can recall where you successfully used emotion and/ or Psychology to convince others to support an effort or cause you believed in but they had no interest in supporting? Discuss the cause and your approach.
- Discuss forms of support you find to be the most, and the least appealing. Give reasons for your support of one or the other.
- Discuss a situation where you were asked or required to provide support in the form of testimony, either as a witness in a court situation, for a class project like a presentation or a speech to help a classmate’s project, in a social situation to help a friend or family member, or to provide eye witness evidence. Discuss the situation, your role, and the outcome.