Chapter 06 – Part 07: STRENGTH DEVELOPMENT & LIFTING TECHNIQUES
06
CHAPTER
STRENGTH DEVELOPMENT & LIFTING TECHNIQUES
Part 7: Resistance Band Exercises
Fitness bands provide a self-contained source of resistance, referred to as dynamic progressive resistance, which does not rely on gravity or other external forces for resistance. To the body, and specifically the muscle, the source of the resistance is not as important. What is important is that the muscle is overloaded or pushed past its normal limits. Alter band resistance by using bands with different thickness. Thinner bands will have less resistance.
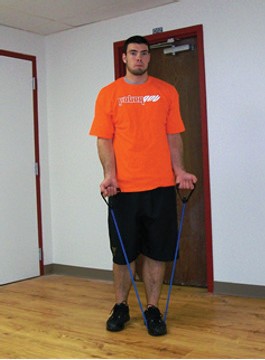
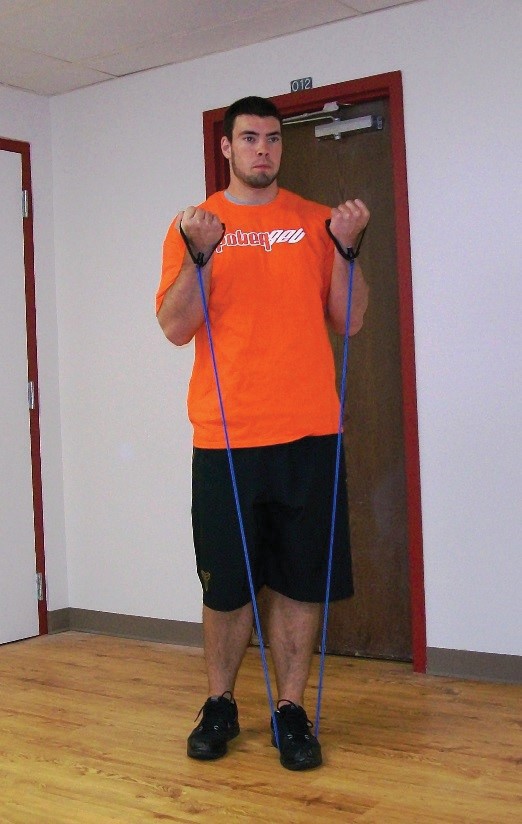
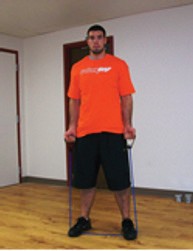
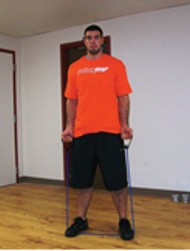
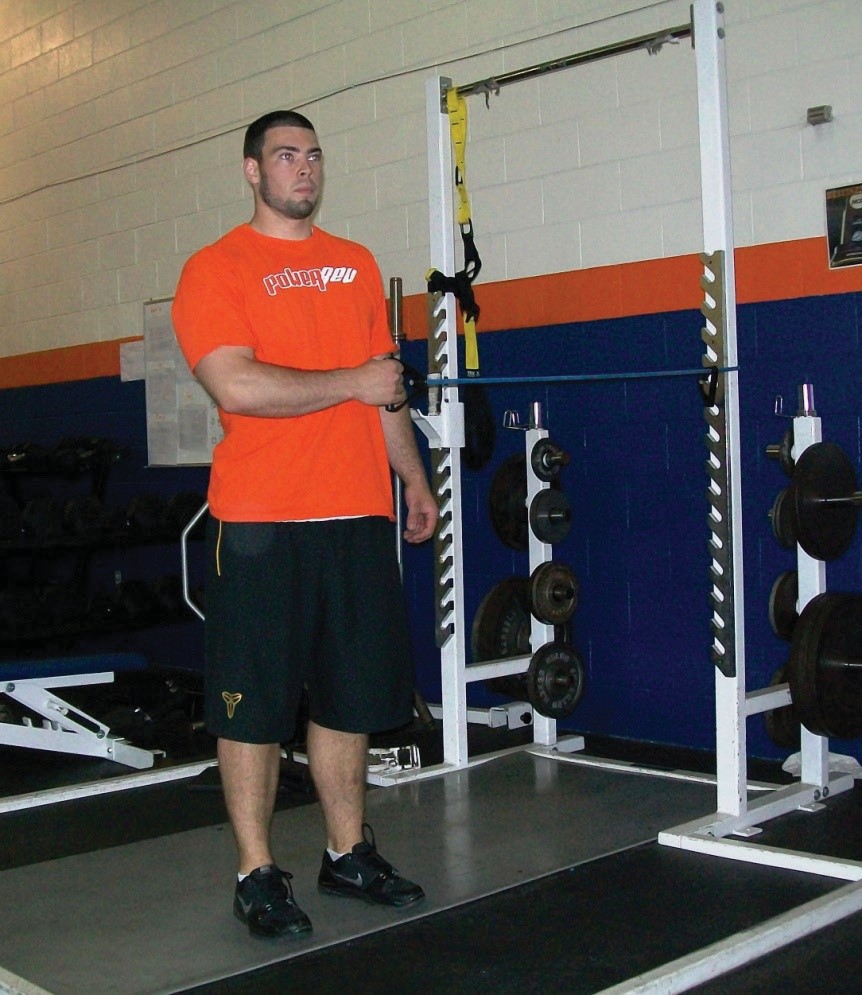
You can also change the resistance of the band by anchoring it narrower or wider. In these images anchoring with two feet makes the band shorter, providing more resistance.
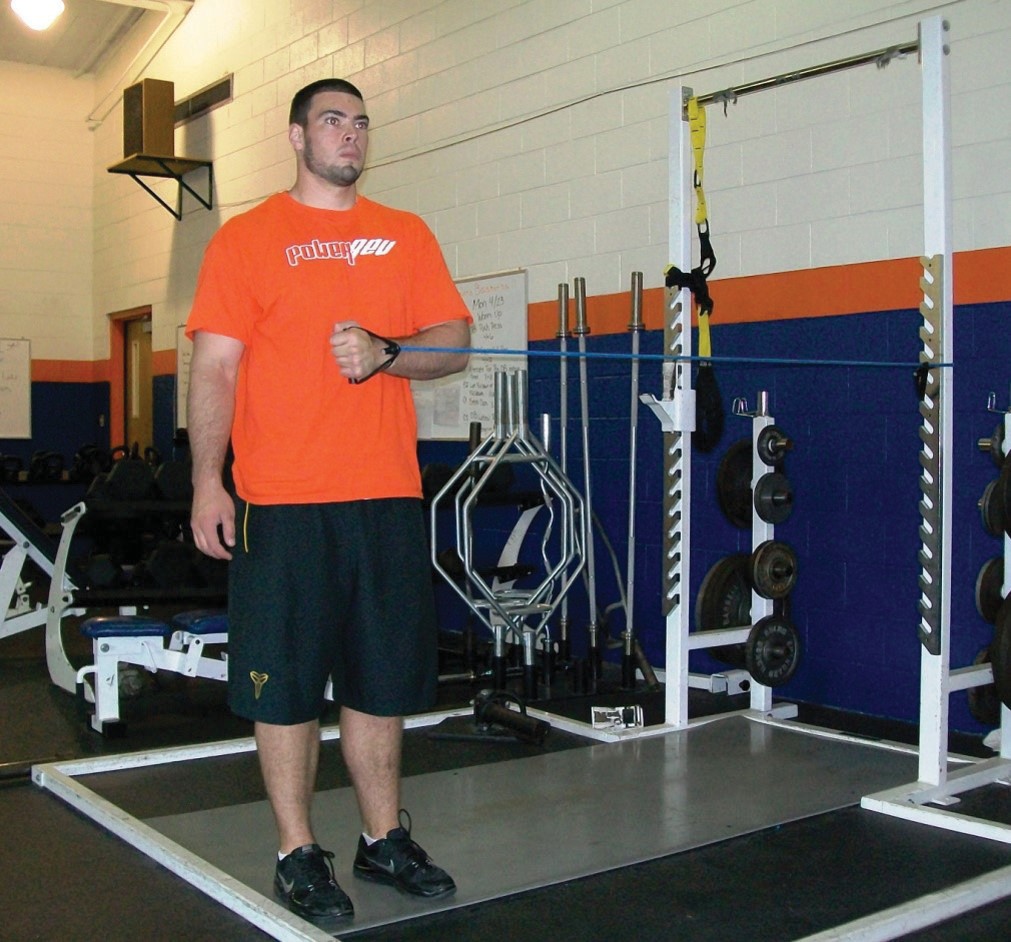
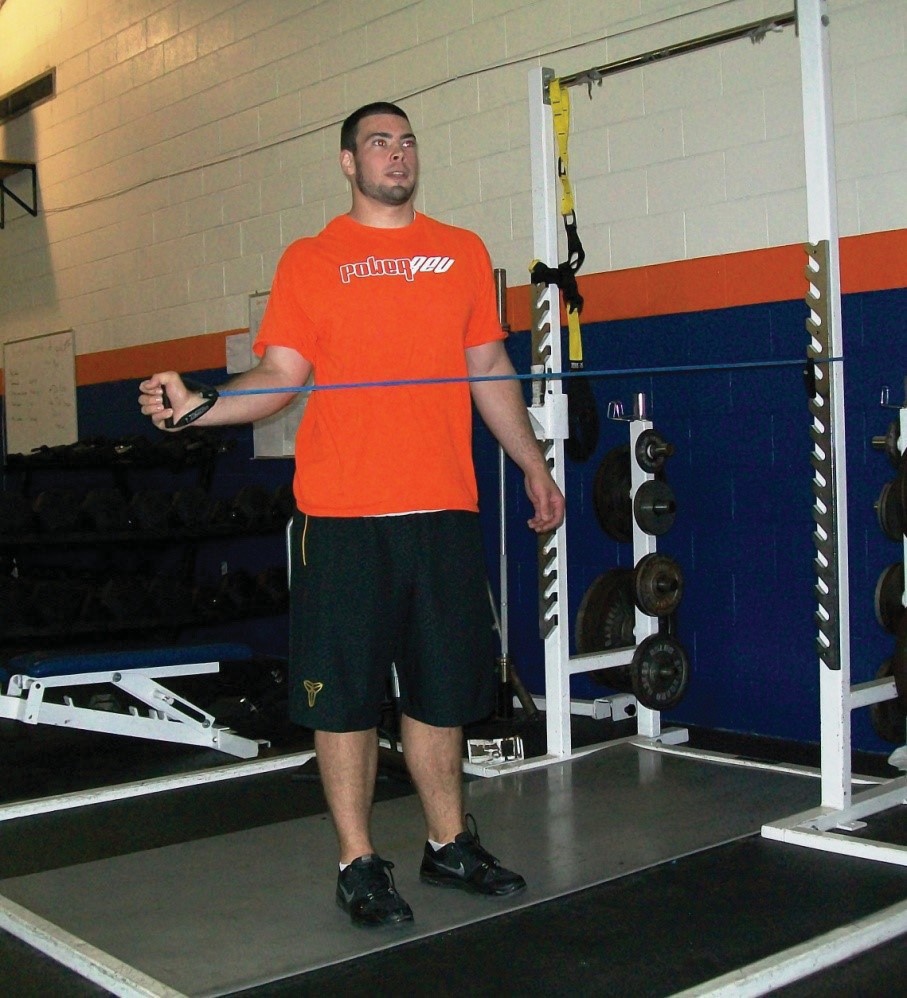
Less Resistance
Figure 6.228:
Figure 6.229:
More Resistance
Figure 6.230:
Figure 6.231:
To maximize the workout and reduce the chance of injury when working with resistance bands:
Keep the upper body stable with movement occurring only at the shoulder and elbow joints when doing upper body resistance band exercises.
Maintain tension on tubing through a whole range of motion.
Do not let the pull of the tubing cause the elbows to lock out and shoulders to raise up at top of movement.
Exhale on exertion as you pull and inhale as you return to the starting position
Always perform movements in a steady, controlled manner.
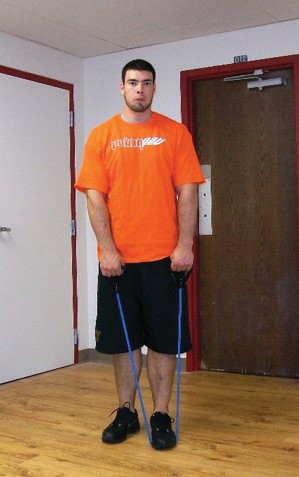
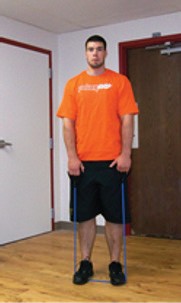
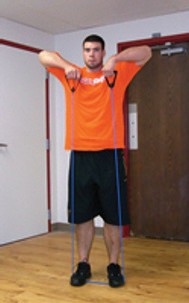
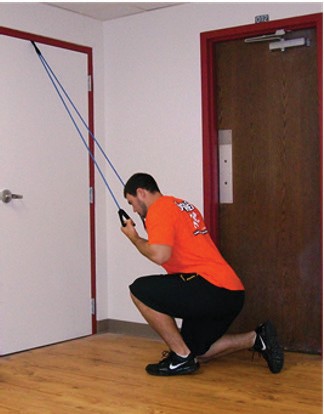
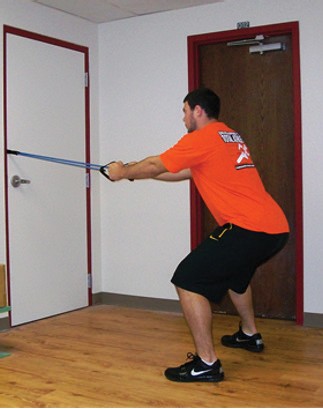
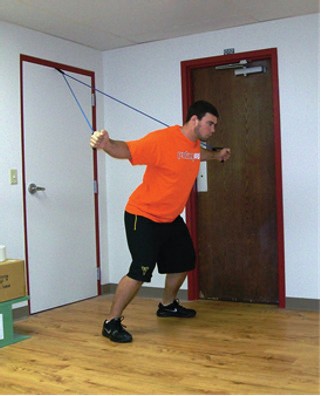
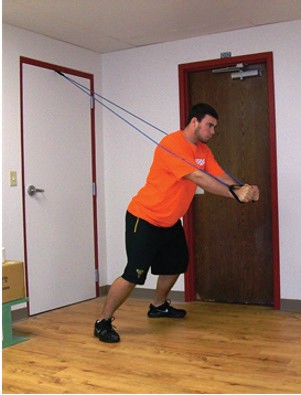
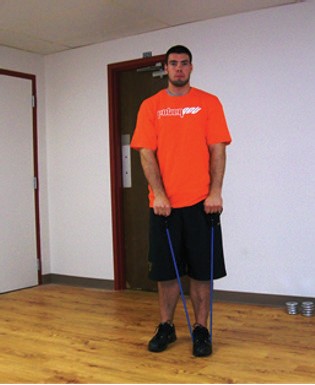
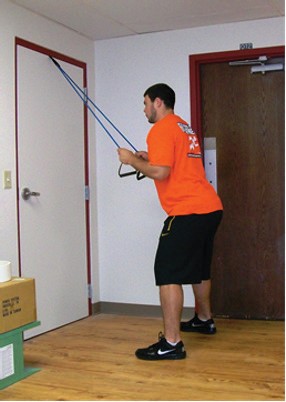
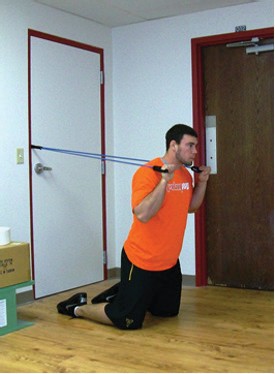
Start in a kneeling position with arms extended, using an underhand close grip (hands about six inches apart).
Torso should be flexed forward (but more upright than with wide grip variation) so that upper body is at the same angle as the stretched tubing (the line from the anchor point through the hands and shoulders down through the hips should be straight).
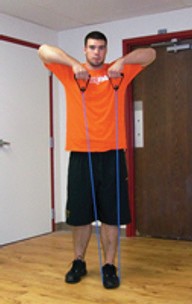
Pull handles (maintaining width) to shoulder height leading with the elbows. Pause briefly, and then extend arms, keeping elbows slightly flexed, back to starting position.
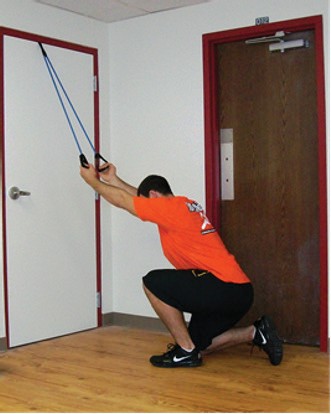
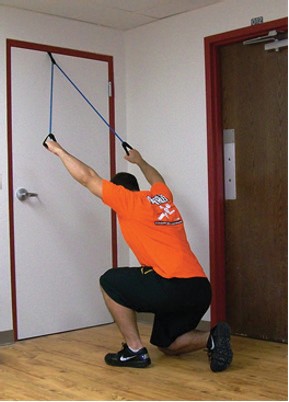
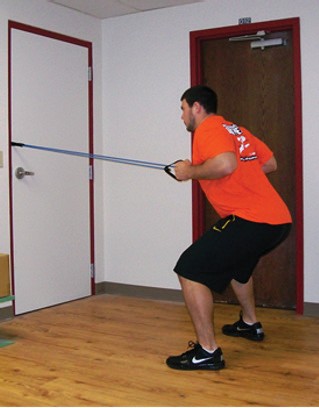
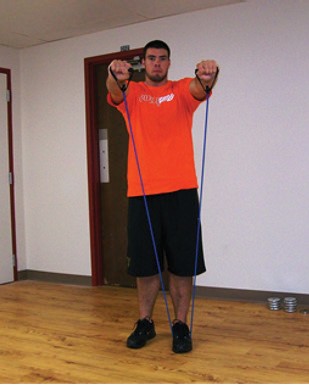
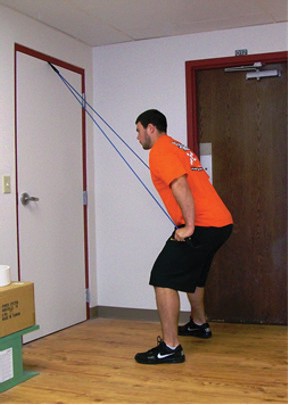
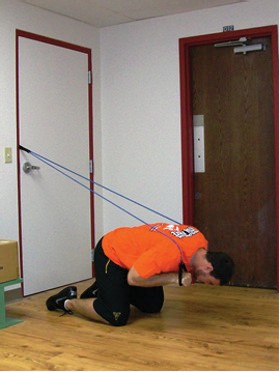
Use an overhand grip slightly wider than shoulder width.
Torso should be flexed forward so that upper body is at the same angle as the stretched tubing (the line from the anchor point through the hands and shoulders down through the hips should be straight).
Pull handles (maintaining width) to shoulder height leading with the elbows. Pause briefly, and then extend arms, keeping elbows slightly flexed, back to starting position.
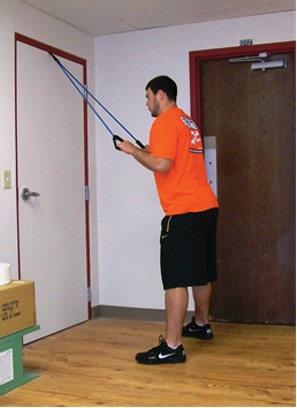
Figure 6.234: Starting Position
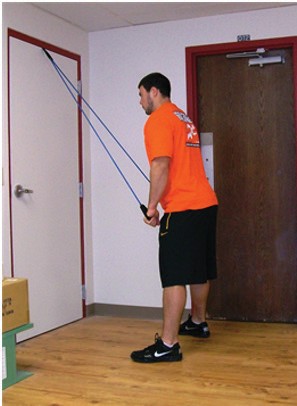
Figure 6.235: Pulldown Position
Video 6.64
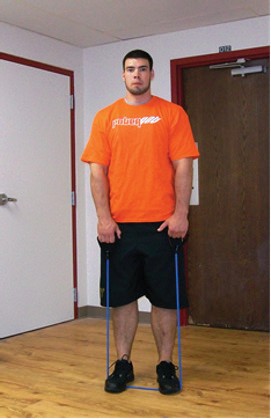
Standing Row
Anchor Point: Middle
Primary Muscle Group: Latissimus Dorsi (Back)
Start with feet shoulder width apart and sit back into a high squat position (chest at anchor height) with arms extended using a shoulder-width, neutral
Torso should be upright and held stable throughout movement.
Pull handles back to just outside the chest, leading with the elbows. Pause briefly and then ex- tend arms, keeping elbows slightly flexed, back to starting position.
Figure 6.236: Standing Row Starting Position
Figure 6.237: Standing Row Finishing Position
Video 6.65
Upright Row
Anchor Point: Low
Primary Muscle Group: Trapezius (Upper Back)
Stand with the tube close to the body to allow the line of pull to be as straight upwards as possible.
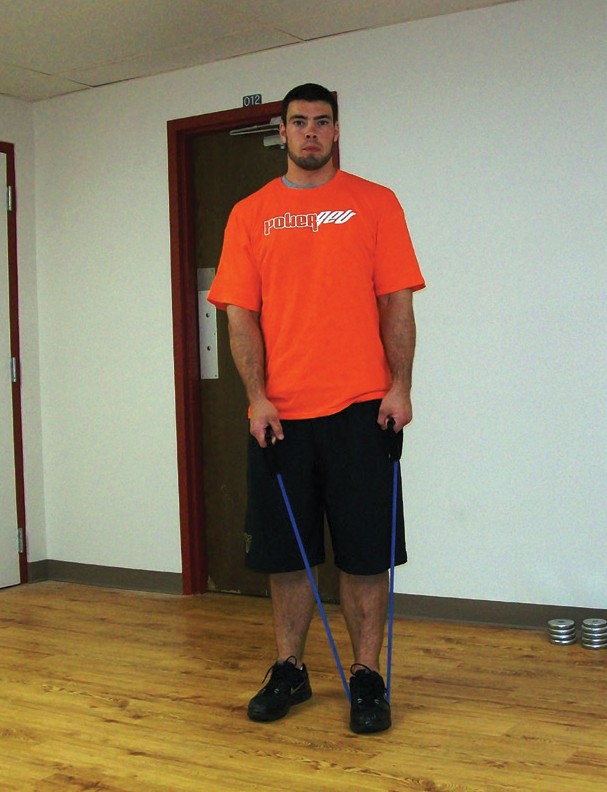
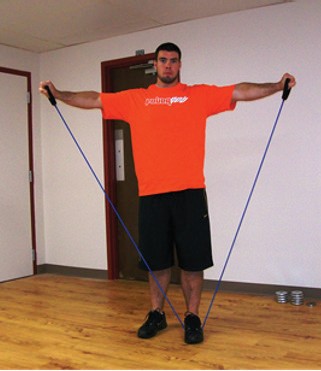
Start in a standing position with knees slightly flexed and with hands placed in front of thighs using an overhand close grip (hands about six inches apart).
Body should remain stable throughout movement with knees slightly flexed (to take pressure off the lower back). Common error is using upper body or knee movement to create momentum.
Pull handles (maintaining width) to shoulder height, leading with the Pause briefly, and then extend arms down, keeping elbows slightly flexed, back to starting.
Figure 6.238: Upright Row Starting Position
Figure 6.239: Upright Row Finishing Position
Video 6.66
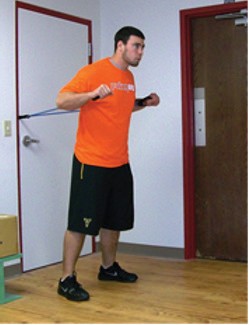
Chest Press
Anchor Point: Middle
Primary Muscle Group: Chest Press: Pectoralis Major (Chest)
Start with feet staggered slightly, shoulder width apart and hands placed shoulder width apart at chest height. Let tubing sit under arms and grip handles with an overhand grip.
Press straight forward at chest height, extending arms just short of full Pause for a second and bring hands back to just outside the chest.
Do not lock out the elbows at the end of the press.
Keeping a slight bend in the elbows at the end of the pressing movement will take stress off the elbow joint and help prevent tendonitis.
Push back off of front foot to return to starting position.
Repeat, lunging forward with the opposite leg.
Figure 6.240: Chest Press Starting Position
Figure 6.241: Chest Press Finishing Position
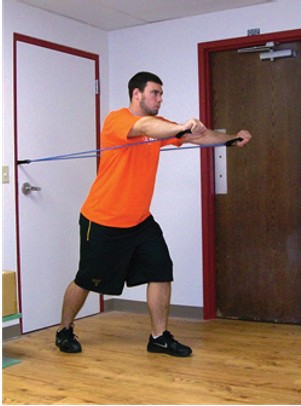
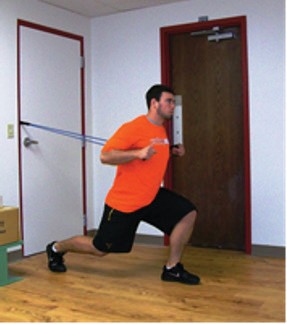
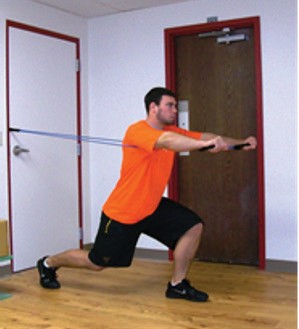
Chest Press/Lunge
Anchor Point: Middle
Primary Muscle Group: Lunge-Gluteus Maximus (Buttocks) and Quadriceps; Chest Press – Pectoralis Major (Chest)
Start with feet shoulder width apart and hands placed shoulder width apart at chest height. Let tubing sit under arms and grip handles with an overhand grip.
Take a large enough step forward with one leg so that the angles of the front and back leg are both 90 degrees.
When lunging, the optimal step places both knees at 90 degrees (front knee stays over mid foot to balls of feet).
Stepping too far will place the front knee over or behind the heel.
Stepping too short will allow the front knee to travel in front of toes.
Keep hands at chest height, hold lunging position while keeping back knee a couple inches off the ground.
Then press straight forward at chest height, extending arms just short of full Pause for a second and bring hands back to just outside the chest.
Maintain tension on tubing through whole range of motion. Do not let your back knee touch or rest on the ground.
Upper body should remain upright during lunge and remain stable throughout movement.
Push back off of the front foot to return to starting position.
Repeat, lunging forward with the opposite leg.
Figure 6.242: Chest Press/Lunge Position 1
Figure 6.243: Chest Press/Lunge Position 2
Figure 6.244: Chest Press/Lunge Position 3
Video 6.67
Chest Fly
Anchor Point: High
Primary Muscle Group: Pectoralis Major (Chest)
Stand with feet shoulder width apart in a staggered stance (one foot in front of the other).
Flex at the hips, leaning chest forward and grip handles using an overhand grip with arms outstretched at chest height.
Body should remain stable throughout movement with knees slightly flexed (to take pressure off the lower back).
Pull handles together as you squeeze your chest and arms together, finishing with handles together out in front of your chest.
Pause briefly, then abduct arms, keeping elbows slightly flexed, back to starting position.
Due to tension, this can be a difficult movement; you may need to use lighter tubing or perform exercise one arm at a time.
Figure 6.245: Chest Fly Starting Position
Figure 6.246: Chest Fly Finishing Position
Video 6.68
Lateral Raise
Anchor Point: Low
Primary Muscle Group: Middle Deltoid (Shoulders)
Stand with the tube close to the body to allow the line of pull to be as straight upwards as possible.
Start in a standing position with knees slightly flexed and hands facing in on the side of thighs using an overhand close grip.
Body should remain stable throughout movement with knees slightly flexed (to take pressure off the lower back).
Pull handles vertically raising/abducting the arms to shoulder height leading with the hands/wrist.
Movement should not go any higher than hands slightly above shoulders.
Common error is using upper body or knee movement to gain momentum.
Pause briefly, then lower arms down, keeping elbows slightly flexed, back to starting position.
Stand close to the machine with your back facing the machine and straddle the tubing.
Start in a standing position with knees slightly flexed and hands in front of thighs using an over- hand close grip (hands facing thighs).
Body should remain stable throughout movement with knees slightly flexed (to take pressure off the lower back).
Pull handles vertically, raising the arms to shoulder height, leading with the hands/wrists
Movement should not go any higher than hands slightly above shoulders.
Common error is using upper body or knee movement to gain momentum.
Pause briefly, then lower arms down, keeping elbows slightly flexed, back to starting position.
Figure 6.249: Front Raise Starting Position
Figure 6.250: Front Raise Finishing Position
Triceps Pushdown
Anchor Point: High
Primary Muscle Group: Triceps
Start in a standing position with knees slightly flexed and with hands placed just above chest height using an overhand close grip with elbows firmly tucked in against sides.
Body should remain stable throughout movement with knees slightly flexed (to take pressure off the lower back).
Movement should not go any higher than the upper chest, do not let tension pull elbows up.
Push handles down just short of full extension, keeping elbows close to sides.
Keep elbows slightly flexed at the end of the movement to prevent elbow tendonitis.
Common errors are using upper body or knee movement to gain momentum and letting the elbows flare out from the body, which takes pressure off of triceps.
Do not lean forward and let the chest muscle be involved in the movement.
Pause briefly, then raise hands back to starting position
Variation:
Same movement using an underhanded grip will place more emphasis on the lateral head of the triceps.
Figure 6.251: Triceps Pushdown Starting Position
Figure 6.252: Triceps Pushdown Finishing Position
Rope Grip Triceps Pushdown
Anchor Point: High
Primary Muscle Group: Triceps (lateral head of triceps)
Stand close to the machine facing the machine.
Start in a standing position with knees slightly flexed, feet shoulder-width apart, with hands placed just above chest height using a neutral close grip (hands facing in like you are holding a rope) with elbows firmly tucked in against sides.
Body should remain stable throughout movement with knees slightly flexed (to take pressure off the lower back).
Push handles down just short of full extension, keeping elbows close to sides.
To accentuate using the lateral head of the triceps, spread hands to the outside of legs at the end of movement.
Keep elbows slightly flexed at the end of the movement to prevent elbow tendonitis.
Pause briefly, then raise hands back to starting position.
Movement should not go any higher than the upper chest, do not let tension pull elbows up.
Common errors are using upper body or knee movement to gain momentum and letting the elbows flare out from the body which takes pressure off of triceps. Do not lean forward and let the chest muscle be involved in the movement.
Exhale on exertion as you push down and inhale as you return to the starting position.
Always perform movements in a steady, controlled manner.
Figure 6.253: Rope Grip Triceps Pushdown Starting Position
Figure 6.254: Rope Grip Triceps Pushdown Finishing Position
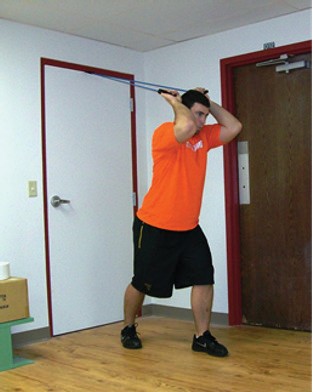
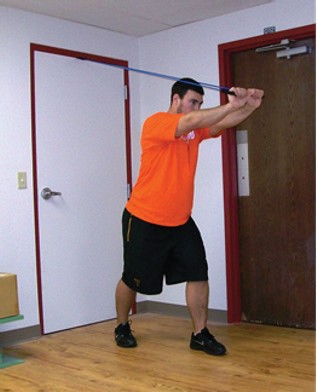
Overhead Triceps Extension
Anchor Point: High
Primary Muscle Group: Triceps
Technique:
Start in a standing position with knees slightly flexed, in a staggered stance–one foot in front of the other–with hands placed outside your ears using an overhand close grip, and with elbows in tight over shoulders.
Upper body should lean forward slightly and the body should remain stable throughout movement with knees slightly flexed (to take pressure off the lower back).
Push handles forward just short of full extension, keeping elbows in Pause briefly, then return hands back to starting position
Training Tips:
Upper body should remain stable with movement occurring only at the elbow joint. Maintain tension on tubing through the entire range of motion. Always keep elbows slightly flexed at the end of the movement to prevent elbow tendonitis. Do not let tension pull elbows up.
Common error is letting the elbows flare out which takes pressure off of the triceps. Do not let the upper body be involved; isolate movement to the elbow joint only.
Exhale on exertion as you press forward and inhale as you return to the starting position.
Always perform movements in a steady, controlled manner.
Figure 6.255: Overhead Triceps Extension Starting Position
Figure 6.256: Overhead Triceps Extension Finishing Position
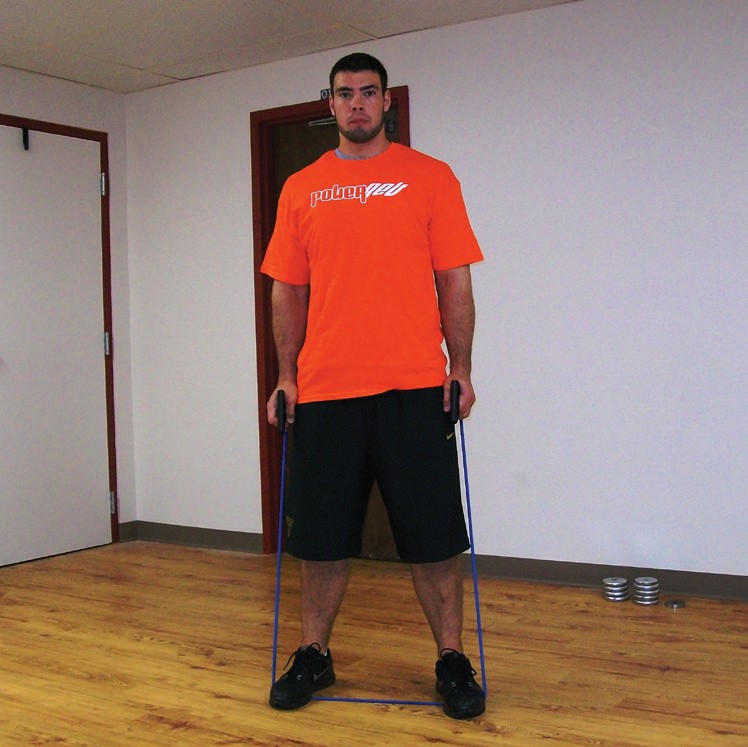
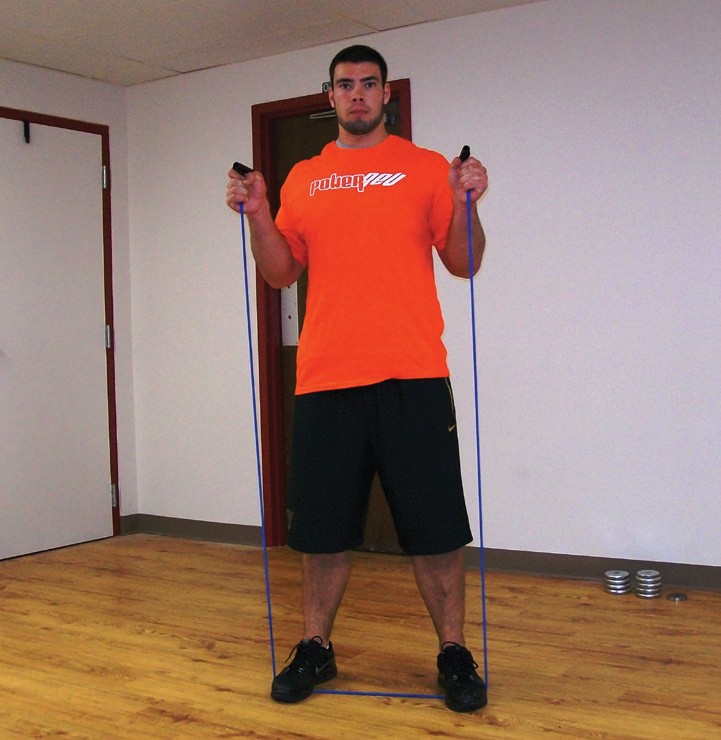
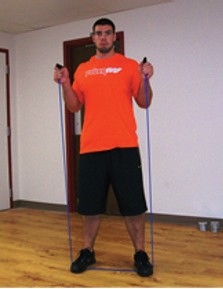
Biceps Curl
Anchor Point: Low
Primary Muscle Group: Biceps
Technique:
Start in a standing position with knees slightly flexed, with feet shoulder-width apart and arms extended with hands to the side of your thighs shoulder width apart using an underhand grip.
Upper body should remain upright and stable throughout movement with knees slightly flexed (to take pressure off the lower back).
Pull handles up to shoulder height, flexing only at the elbow joint (keeping elbows steady and in tight throughout movement).
Pause briefly, then return hands back down to starting position.
Training Tips:
Upper body should remain stable with movement occurring only at the elbow joint.
Maintain tension on tubing through entire range of motion.
Always keep elbows slightly flexed at the beginning of the movement to prevent elbow tendonitis.
Do not let elbows pull up or outwards.
Do not let the lower body be involved to create momentum; isolate movement to the elbow joint only:
Exhale on exertion as you pull up and inhale as you return to the starting position.
Always perform movements in a steady, controlled manner.
Variation:
Same movement using overhand grip (reverse curl) will place more emphasis on the forearms.
Figure 6.257: Overhead Triceps Extension Starting Position
Figure 6.258: Overhead Triceps Extension Finishing Position
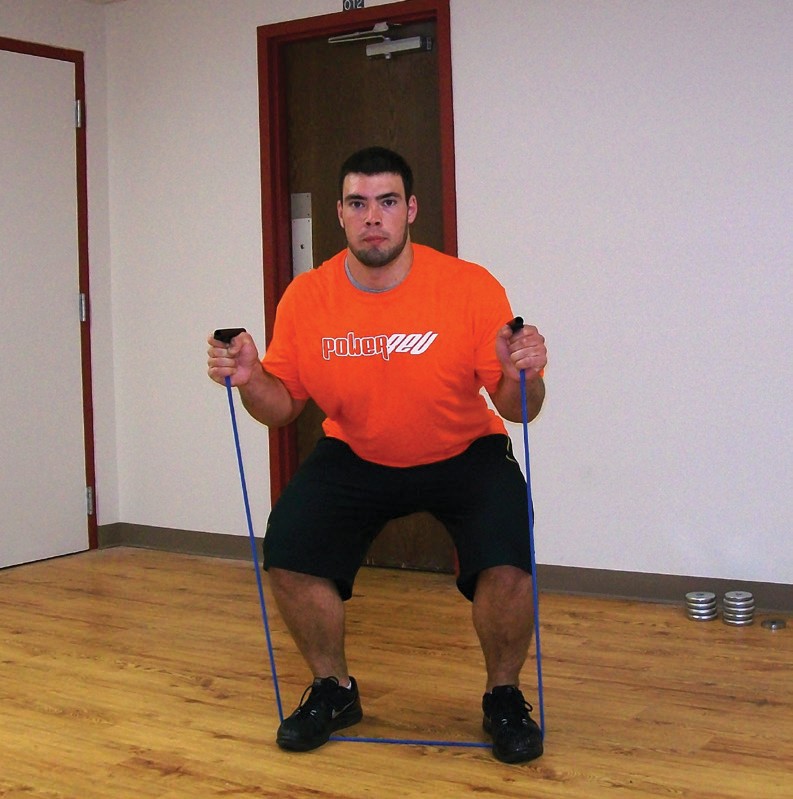
After completing the biceps curl with hands at shoulder height, sit back into a squatting position.
To perform the squat, keep your chest up and head facing straight ahead, bend your knees and hips as if you are sitting back into a chair.
Lower your hips until your upper thigh is parallel to the floor (knees should be at about 90 degrees).
Keep your chest up, leaning forward slightly and stick your hips back as you squat in order to keep your balance and not fall back.
Shifting hips back will also allow your knees to remain over your toes in a safe position.
After squatting down to 90 degrees, pause and then extend knees and hips to return to a standing position.
Training Tips:
Upper body should remain stable during the squat and not lean forward excessively.
To keep the knees safe, don’t let knees track out in front of toes.
When performed properly, balls of feet, knees, and shoulders should be in alignment at bottom of the squat.
Do not let knees drift inward while squatting.
Maintain slight knee bend when squat is completed.
Exhale on exertion as you stand up and inhale as you squat down.
Always perform movements in a steady, controlled manner.
Exhale on exertion as you stand up and inhale as you squat down.
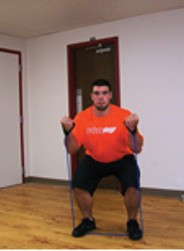
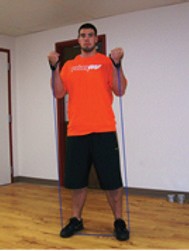
Figure 6.259: Biceps Curl / Resisted Squats Position 1
Figure 6.260: Biceps Curl / Resisted Squats Position 2
Figure 6.261: Biceps Curl / Resisted Squats Position 3
Figure 6.262: Biceps Curl / Resisted Squats Position 4
Video 6.70
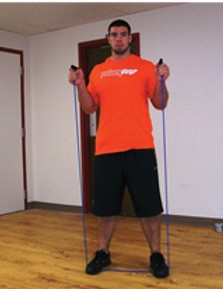
Hammer Curl
Anchor Point: Low
Primary Muscle Group: Biceps with added emphasis on the Brachioradialis
Technique:
Start in a standing position with knees slightly flexed, with feet shoulder width apart and arms extended with hands to the side of your thighs shoulder width apart using a neutral grip with palms facing in.
Upper body should remain upright and stable throughout movement with knees slightly flexed (to take pressure off the lower back).
Pull handles up to shoulder height, flexing only at the elbow joint (keeping elbows steady and in tight throughout movement).
Pause briefly, then return hands back down to starting position.
Training Tips:
Upper body should remain stable, with movement occurring only at the elbow joint. Maintain tension on tubing through the entire range of motion. Always keep elbows slightly flexed at the beginning of the movement to prevent elbow Do not let elbows pull up or outwards.
Hammer curl hand grip places more emphasis on the Do not let the lower body be involved to create momentum, isolate movement to the elbow joint only.
Exhale on exertion as you pull up and inhale as you return to the starting position.
Always perform movements in a steady, controlled manner.
Figure 6.263: Hammer Curl Starting Position
Figure 6.264: Hammer Curl Finishing Position
Hammer Curl/Resisted Squats
Anchor Point: Low
Primary Muscle Group: Biceps Curl: Biceps and Brachioradialis; Squats: Gluteus Maximus & Medius (Buttocks), Quadriceps
Technique:
After completing the hammer curl with hands at shoulder height, sit back into a squatting position.
To perform the squat, keep your chest up and head facing straight ahead, bend your knees and hips as if you are sitting back into a chair.
Lower your hips until your upper thigh is parallel to the floor (knees should be at about 90 degrees).
Keep your chest up, leaning forward slightly and stick your hips back as you squat in order to keep your balance and not fall back.
Shifting hips back will also allow your knees to remain over your toes in a safe position.
After squatting down to 90 degrees, pause and then extend knees and hips to return to a standing position.
Training Tips:
Upper body should remain stable during the squat and not lean forward excessively.
To keep the knee safe, don’t let knees track out in front of toes.
When performed properly, balls of feet, knees, and shoulders should be in alignment at the bot- tom of the squat.
Do not let knees drift inward during Maintain slight knee bend when squat is completed.
Exhale on exertion as you stand up and inhale as you squat down.
Always perform movements in a steady, controlled manner.
Figure 6.265: Hammer Curl / Resisted Squats Position 1
Figure 6.266: Hammer Curl / Resisted Squats Position 2
Figure 6.267: Hammer Curl / Resisted Squats Position 3
Figure 6.268: Hammer Curl / Resisted Squats Position 4
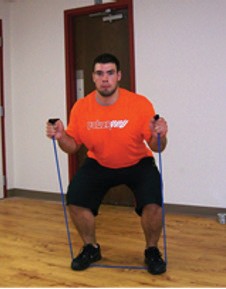
Resisted Squats
Anchor Point: Low
Primary Muscle Group: Squats: Gluteus Maximus & Medius (Buttocks), Quadriceps
Technique:
With hands at shoulder height and tension on the tubing, sit back into a squatting position.
To perform the squat, keep your chest up and head facing straight ahead, bend your knees and hips as if you are sitting back into a chair.
Lower your hips until your upper thigh is parallel to the floor (knees should be at about 90 degrees).
Keep your chest up, leaning forward slightly and stick your hips back as you squat in order to keep your balance and not fall back.
Shifting hips back will also allow your knees to remain over your toes in a safe position.
After squatting down to 90 degrees pause and then extend knees and hips to return to a standing position.
Training Tips:
Upper body should remain stable during the squat and not lean forward excessively.
To keep the knee safe, don’t let knees track out in front of toes.
When performed properly, balls of feet, knees, and shoulders should be in alignment at the bot- tom of the squat.
Do not let knees drift inward during squatting.
Maintain slight knee bend when squat is completed.
Exhale on exertion as you stand up and inhale as you squat down.
Always perform movements in a steady, controlled manner.
Figure 6.269: Resisted Squats Position 1
Figure 6.270: Resisted Squats Position 2
Figure 6.271: Resisted Squats Position 3
Resisted Crunch
Anchor Point: Middle / High
Primary Muscle Group: Rectus Abdominis (Abdomen)
Technique:
Start in a kneeling position, holding handles slightly in front of shoulders.
Begin with the upper body in a straight position with shoulders, hips and knees in line.
Roll or curl your spine, pulling your chest towards your hips as you flex your abdominal muscles.
This “crunch” movement does not require a large movement. You just want to move far enough to feel the abdominal muscles fully engage as they flex.
Then extend back up to your starting position.
Training Tips:
Hips and knees should remain relatively stable, with movement occurring only from the contraction of the abdominal muscles. Slight movement may occur at the hips due to the abdominals’ relationship to the hip flexors.
Maintain tension on tubing through the entire movement.
Common error is having too much movement at the knees and hips, which takes the emphasis off the If too much movement is happening with the knees and hips, then shift hips back slightly (sitting back on heels a little) to take the hip flexors out of the movement.
Exhale on exertion as you curl/crunch forward and inhale as you return to the starting movement.
Always perform movements in a steady, controlled manner.
Figure 6.272: Resisted Crunch Starting Position
Figure 6.273: Resisted Crunch Finishing Position
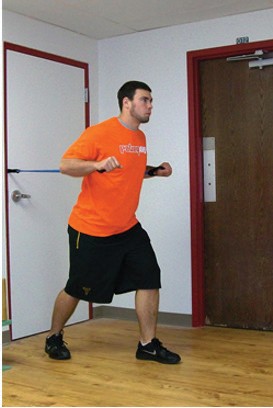
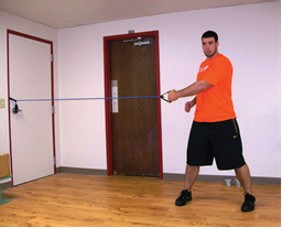
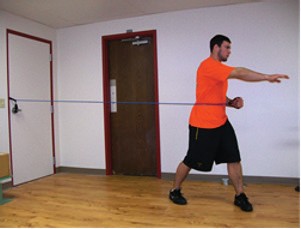
One Arm Rotational Row
Anchor Point: Middle
Primary Muscle Group: Torso & Hip Rotators, Abdominals, Latissimus Dorsi
Technique:
Start standing perpendicular to the attachment with knees slightly bent and reach across body with your arm farthest away, grabbing the handle at chest height.
Pull the band handle across your body to where your hand is outside the hip of the arm you are pulling with, then rotate your feet and hips 90 degrees.
Then rotate back to the starting position.
Repeat movement with the other side.
Training Tips:
Upper body should remain stable, with initial pull using the back and arms and the rest of the movement should come from the rotating of the hips and feet.
Maintain tension on tubing through the entire movement.
Inside arm can be used to generate force by swinging the arm over the tube as you rotate.
Be sure to allow the feet to naturally rotate on the balls of your feet with the hips.
Keeping the feet stationary while twisting with the hip will place too much strain on the knees.
Starting position should be perpendicular to the attachment and in the finishing position, you should be facing away from the attachment site.
Exhale on exertion as you pull and rotate, and inhale as you return to the starting position.
Always perform movements in a steady, controlled manner.
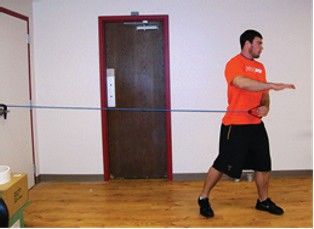
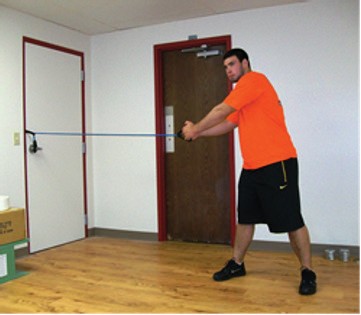
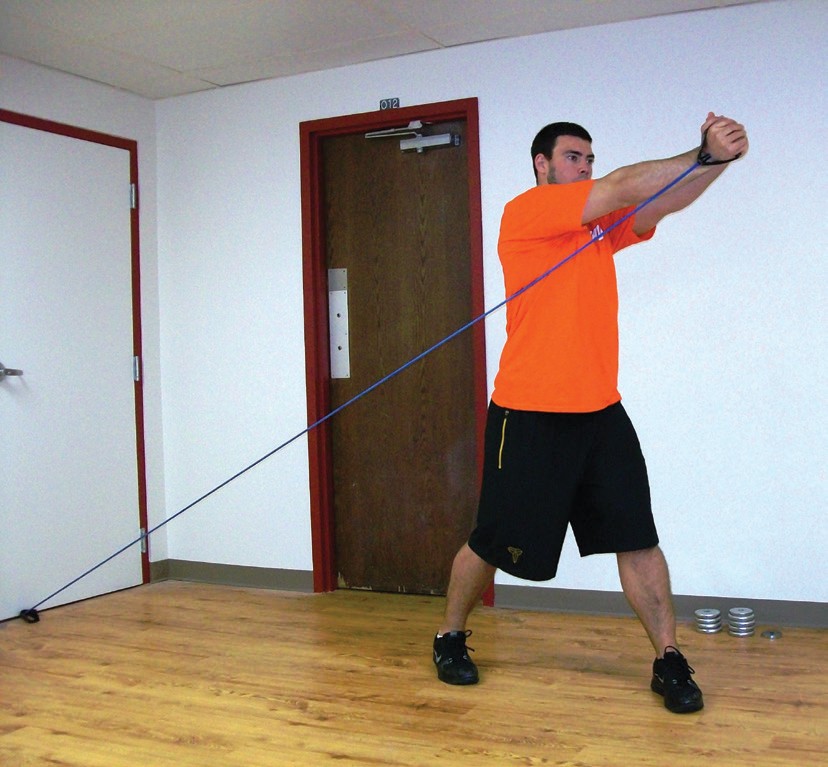
Start standing perpendicular to the attachment with knees slightly bent and reach across the body with both hands grabbing the handle at chest height.
Pull the band as you rotate your hips and feet 90 As you finish rotating your hips and feet, extend your arms out in front like you are chopping wood with an ax.
Then rotate back to the starting position.
Repeat movement with the other side.
Training Tips:
Upper body should remain stable with initial pull using the back and arms. Continue the momentum as you rotate the hips and feet, and then use the chest and arms as you extend your hands forward.
Maintain tension on tubing through the entire movement.
With such a long movement, holding both ends of the tube can provide a lot of tension. If less tension is needed, anchor one end of the tube on the machine and pull on just one end.
Be sure to allow the feet to naturally rotate on the balls of your feet with the hips.
Keeping the feet stationary while twisting with the hip will place too much strain on the knees.
Starting position should be perpendicular to the attachment and in the finishing position, you should be facing away from the attachment site.
Exhale on exertion as you pull and rotate, and inhale as you return to the starting position.
Always perform movements in a steady, controlled manner.
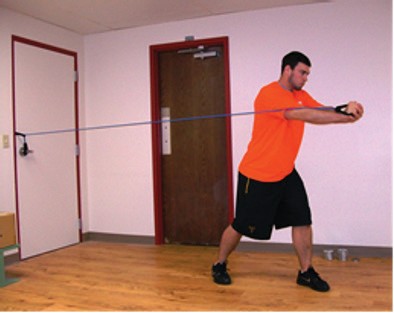
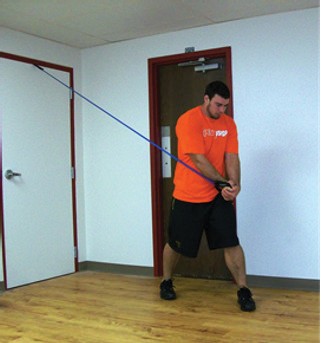
Start standing perpendicular to the attachment with knees slightly bent and reach up and across your body with both hands grabbing the handle slightly higher than your head.
Pull the band down on an angle as you rotate your hips and feet 90 As you finish rotating your hips and feet, extend your arms out in front maintaining the same angle as the initial pull down, like you are chopping wood with an ax.
Then rotate back up to the starting position.
Repeat movement with the other side.
Training Tips:
Upper body should remain stable with initial pull down using the back and arms. Continue the momentum as you rotate the hips and feet and then use the chest and arms as you extend your hands down and forward.
Maintain tension on tubing through the entire movement.
With such a long movement, holding both ends of the tube can provide a lot of tension. If less tension is needed, anchor one end of the tube on the machine and pull on just one end.
Be sure to allow the feet to naturally rotate on the balls of your feet with the Keeping the feet stationary while twisting with the hip will place too much strain on the knees.
Starting position should be perpendicular to the attachment and in the finishing position you should be facing away from the attachment site.
Exhale on exertion as you pull and rotate, and inhale as you return to the starting position.
Always perform movements in a steady, controlled manner.
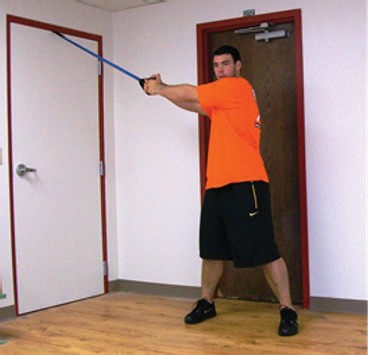
Start standing perpendicular to the attachment with knees slightly bent and reach up and across the body with both hands grabbing the handle below hip height.
Pull the band up on an angle as you rotate your hips and feet 90 degrees. As you finish rotating your hips and feet, extend your arms out in front maintaining the same angle as the initial pull up, like you are chopping wood with an ax.
Then rotate back up to the starting position.
Repeat movement with the other side.
Training Tips:
Upper body should remain stable with initial pull up using the back and arms. Continue the momentum as you rotate the hips and feet and then use the chest and arms as you extend your hands up and forward.
Maintain tension on tubing through the entire movement.
With such a long movement, holding both ends of the tube can provide a lot of tension. If less tension is needed, anchor one end of the tube on the machine and pull on just one end.
Be sure to allow the feet to naturally rotate on the balls of your feet with the hips.
Keeping the feet stationary while twisting with the hip will place too much strain on the knees.
Starting position should be perpendicular to the attachment and in the finishing position you should be facing away from the attachment site.
Exhale on exertion as you pull and rotate and inhale as you return to the starting position.
Always perform movements in a steady, controlled manner.
Figure 6.281: Low High Chop Starting Position
Figure 6.282: Low High Chop Finishing Position
Internal Rotation
Tubing should be placed at elbow height.
Using an adequate resistance, step far enough from the anchor so that tube is tight without slack.
Holding elbow steady at your side, start with your hand reaching out while your elbow is bent at 90 degrees.
Keeping elbow stationary, internally rotate your shoulder to pull the cable or tube across your body.
Externally rotate your shoulder to return to starting position.
Figure 6.283: Internal Rotation Starting Position
Figure 6.284: Internal Rotation Finishing Position
External Rotation
Tubing should be placed at elbow height.
Using an adequate resistance, step far enough from the anchor so that the tube is tight without slack.
Holding elbow steady at your side, start with your hand across your body while your elbow is bent at 90 degrees.
Keeping elbow stationary, externally rotate your shoulder to pull the cable or tube across your body until your hand is extended away from your body.
Internally rotate your shoulder to return to starting position.
Figure 6.285: External Rotation Starting Position
Figure 6.286: External Rotation Finishing Position