Chapter 06: STRENGTH DEVELOPMENT & LIFTING TECHNIQUES
06
CHAPTER
STRENGTH DEVELOPMENT & LIFTING TECHNIQUES
Tim Dornemann, Ed. D., CES, PES, CSCS, OS Pro
Exercise Science Program & Kinesiology Director, Barton College
Associate Professor of Exercise Science, Barton College
Part 1: Lower Body Exercises
SQUATS ARE A primary lower body exercise. Lunge variations, deadlift and lower level squat variations can be used as secondary lower body movements. The Romanian deadlift and good morning exercises are used to train posterior chain musculature.
Squat Series
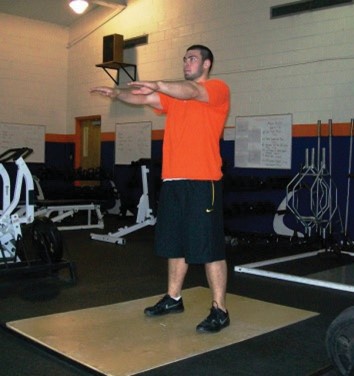
Body Weight Squat
Start with feet slightly wider than shoulder width, toes angled slightly out and arms extend in front at shoulder height for balance
Push the hips back sticking the butt out, keeping chest forward to balance out body
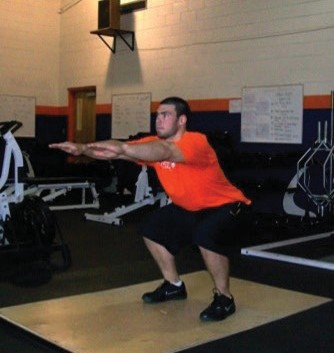
Lower the hips down and back with the feet flat and the pressure on the heels
Lower the hips down and back until the hips are lower than the knees (or top of the thigh parallel to the ground)
Upon reaching the lower point of the descent, drive back up through the heels while also driving the hips forward to keep the chest up
Figure 6.1: Body Weight Squat Top Position
Figure 6.2: Body Weight Squat Bottom Position
Video 5.1
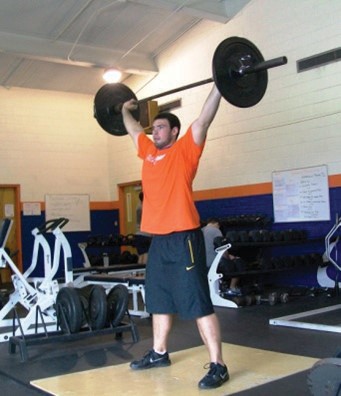
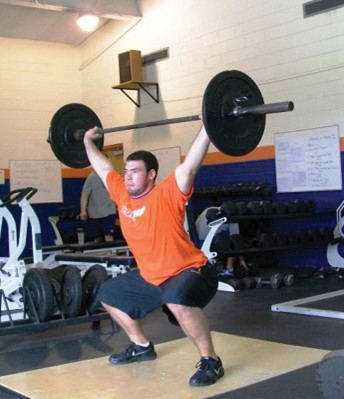
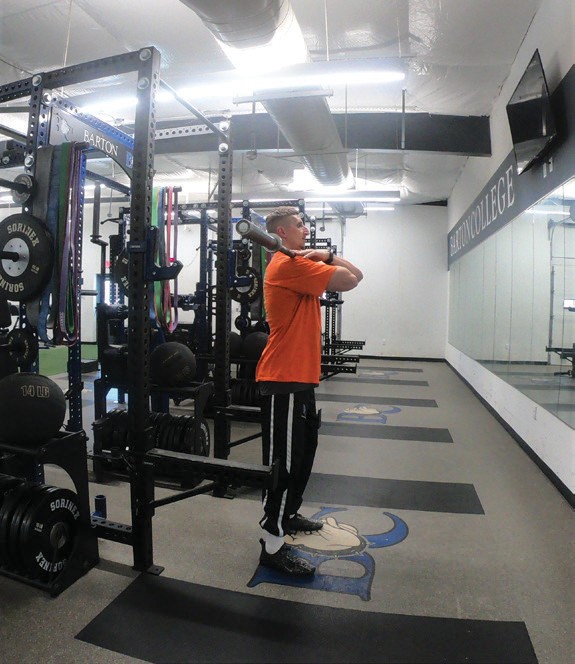
Overhead Squat
Start with dowel, stick or light weight bar to learn and practice good form
With a snatch width grip, place the bar overhead slightly behind or directly above the ears
Raise arms to shoulder height
Bend elbows to 90-degrees
Maintaining that hand width, grab bar with over hand grip
Extend arms as bar is raised overhead
While performing the lower body squatting movement, gradually rotate the bar back as you go down
Overhead squat can build flexibility and reveal tightness in shoulder, ankle and hip joints
Figure 6.3: Overhead Squat Top Position
Figure 6.4: Overhead Squat Bottom Position
Video 5.1
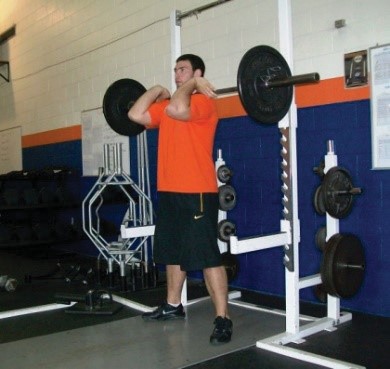
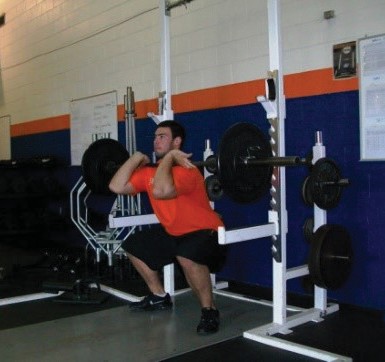
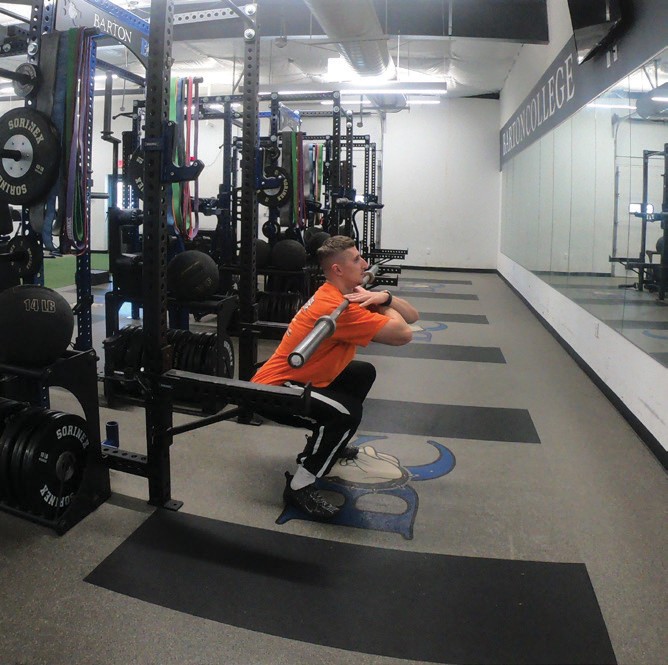
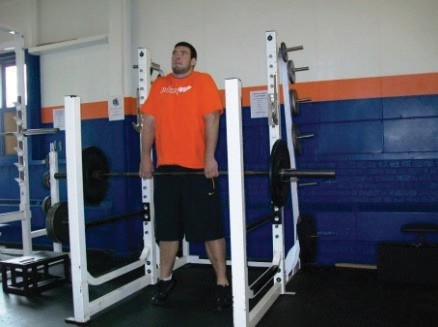
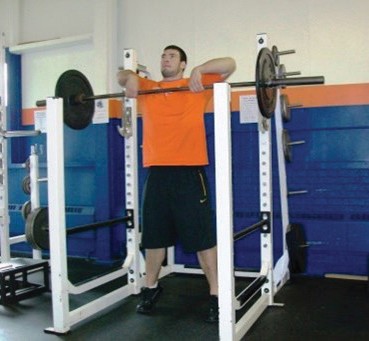
Front Squat
Hands are placed with a grip slightly wider than shoulder width
Barbell should rest on the upper chest and shoulders
Pushing the elbows up and inward will form a rack on which the bar will rest while also keeping the chest up during the movement
Clean grip or crossover grip
While performing the lower body squatting movement, focus on keeping the elbows up the entire time and therefore keeping the chest up.
Figure 6.5: Clean Grip Front Squat Top Position
Figure 6.6: Crossover Grip Front Squat Top Position
Figure 6.7: Overhead Squat Top Position
Figure 6.8: Crossover Grip Front Squat Bottom Position
Video 5.1
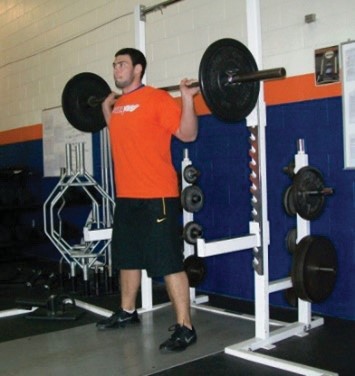
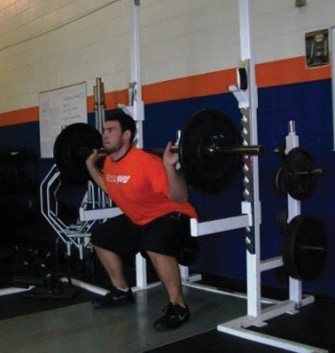
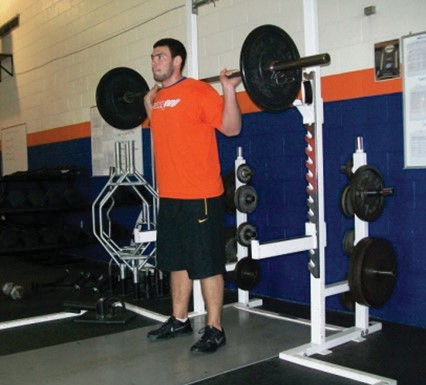
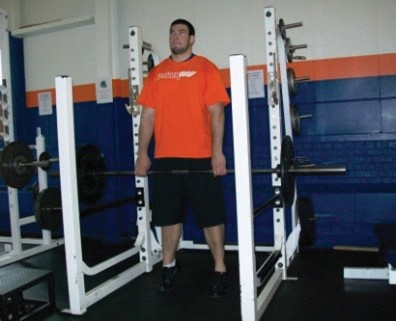
Back Squat
Squeeze the shoulders back and place the bar high on top of the shoulder muscles
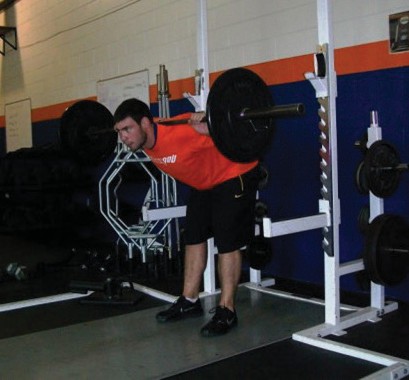
Perform the squatting movement
While coming up, push through the heels and drive the hips forward, keeping the chest up
Figure 6.9: Back Squat Top Position
Figure 6.10: Back Squat Bottom Position
Video 5.1
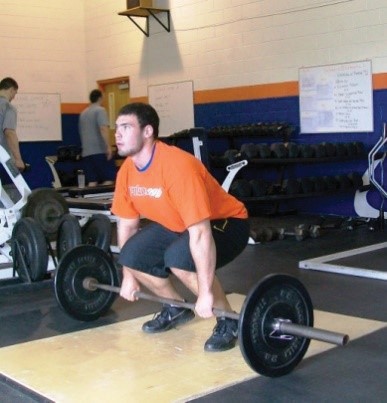
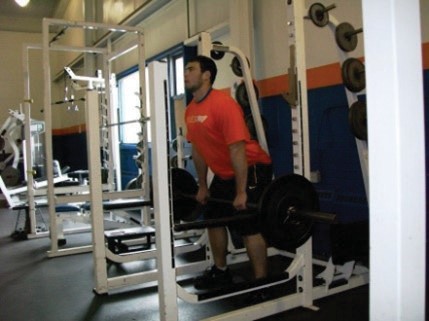
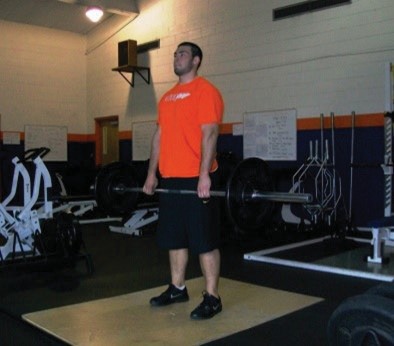
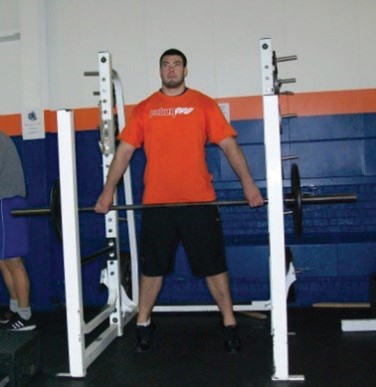
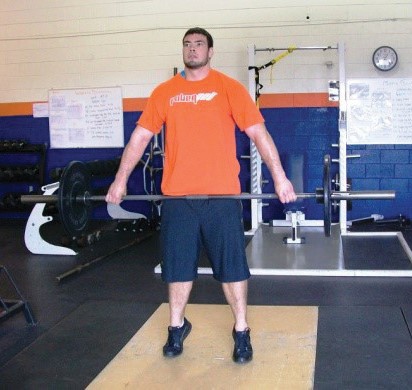
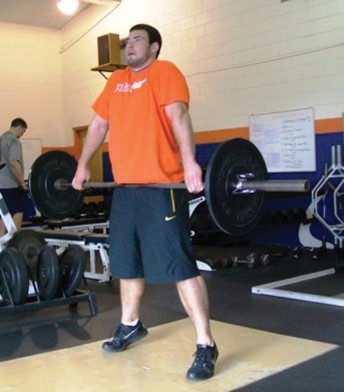
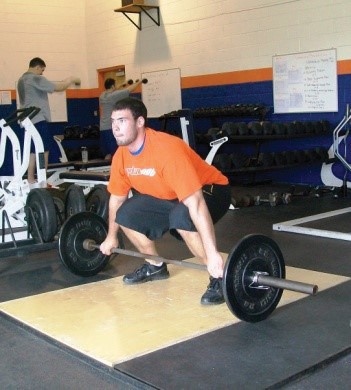
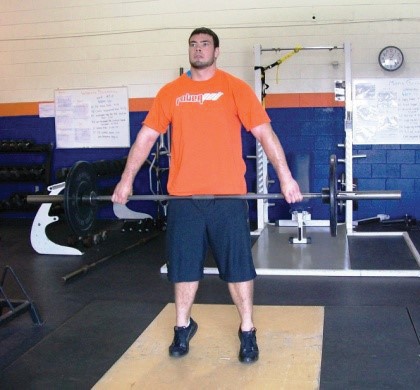
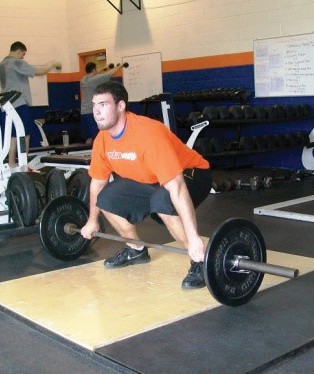
Deadlift
Clean Deadlift (Deadlift from Clean starting position)
Feet at hip width, hands should be placed on the bar just outside of legs (using overhand or alternating grip)
Barbell in close to the body with arms straight and elbows rotated out
Shoulder blades should be squeezed back with the chest as high as possible
Hips are higher than the knees, but lower than the shoulders
Eyes straight ahead
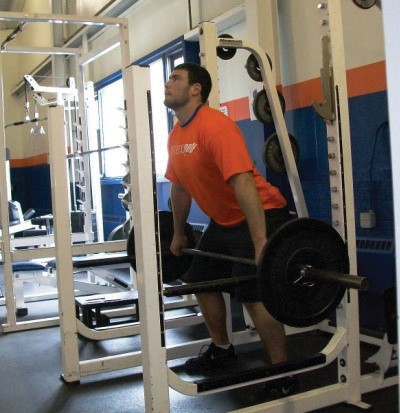
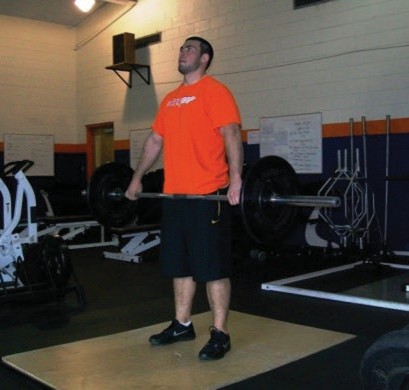
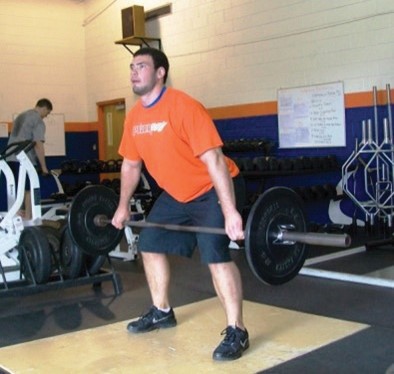
Raise up hips slowly, pulling bar off ground
Maintain consistent back angle as you extend your hips and legs, pulling the bar to hip height
Finish lift with slight back hyperextension and shoulders pulled back (retracted)
Figure 6.11: Deadlift Bottom Position
Figure 6.12: Deadlift Top Position
Video 5.1
Lunge Series
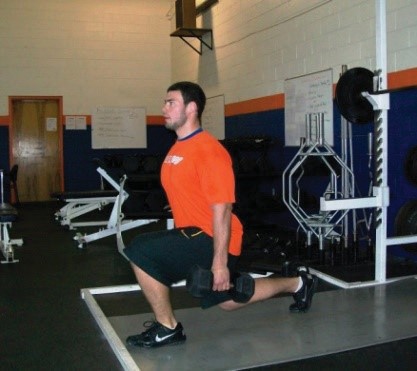
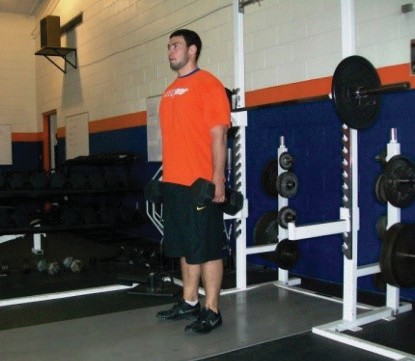
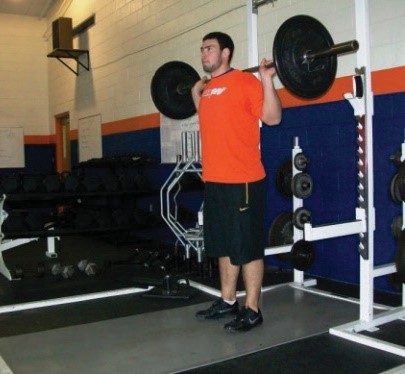
Front Lunge
Start with the feet underneath the hips and lined up evenly with each other
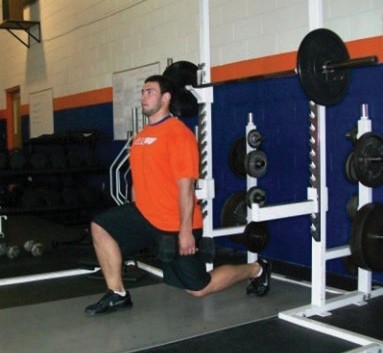
Take an over-exaggerated step forward
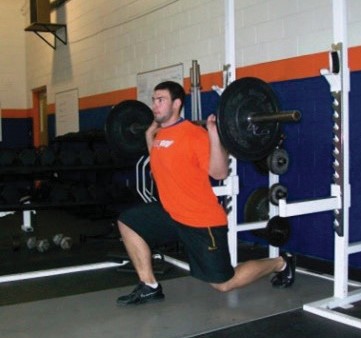
Drop the hips straight down into 90-degree bend of both front and back legs
Proper stride length places front knee over the ball of the foot
Too long of a stride places knee over heel or back leg is extended past 90 degrees
Too short of a stride places front knee in front of toes
Drive through the front heel and pull with the back foot to return to the starting position
Alternate legs throughout the set
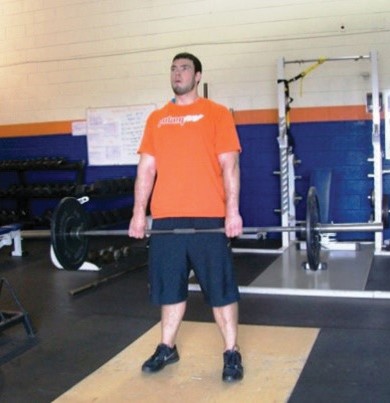
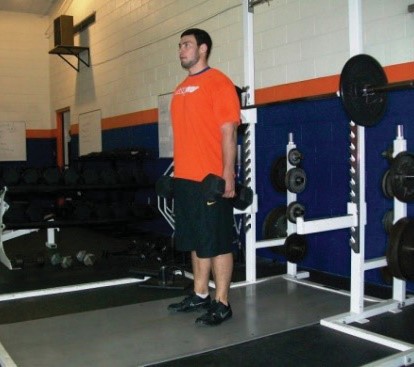
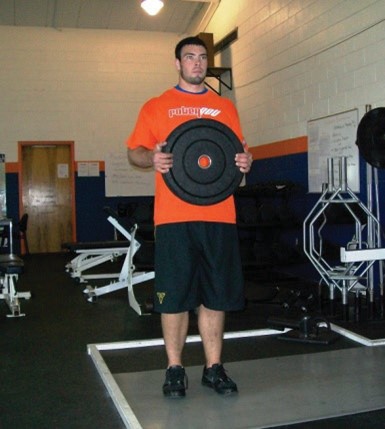
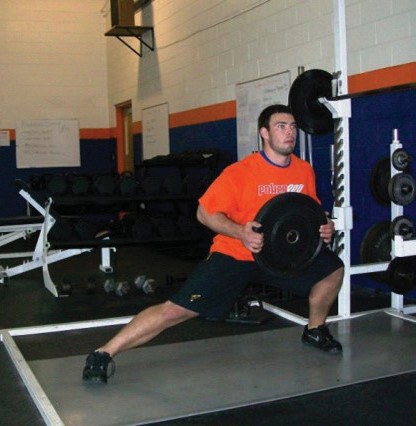
Figure 6.13: Front Lunge (DB) Top Position
Figure 6.14: Front Lunge (DB) Bottom Position
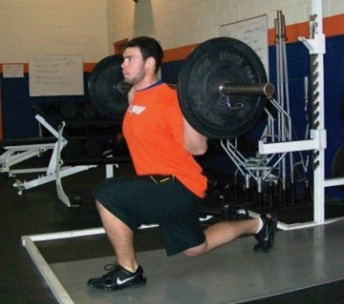
Figure 6.15: Front Lunge (Bar) Top Position
Figure 6.16: Front Lunge (Bar) Bottom Position
Video 5.1
Video 5.1
Back Lunge
Start with the feet underneath the hips and lined up evenly with each other
Take an over-exaggerated step back, sitting back into the front heel until both front and back knees are bent at 90 degrees
Same stride length cues apply as front lunge
Push through the front heel driving the hips forward and returning the back foot to the starting position
Figure 6.17: Back Lunge (DB) Top Position
Figure 6.18: Back Lunge (DB) Bottom Position
Figure 6.19: Back Lunge (Bar) Top Position
Figure 6.20: Back Lunge (Bar) Bottom Position
Video 5.1
Video 5.1
Side Lunge
Start with feet shoulder width apart
Take an exaggerated step out to the side keeping toes pointed forward
Drop hips down bending knee of lead leg to 90 degrees
As you drop down, sit hips back, leaning chest forward to balance body
Trail leg is extended with slight knee bend
Push off lead leg back to standing position
Alternate movement to both sides
Figure 6.21: Side Lunge Top Position
Figure 6.22: Side Lunge Bottom Position
Video 5.1
Posterior Leg Exercises
Romanian Deadlift (RDL)
Stand upright, holding the barbell with the hands at the hip width
Place a slight bend in the knees (knees straight but not locked)
Stick chest out and squeeze the shoulders back with an over-exaggerated posture
In a controlled manner, lower the bar down, keeping the bar behind the toes
When lowering the bar, keep the shoulders squeezed back (with over-exaggerated posture) and the knees straight but not locked, lowering the bar by sticking the butt out (NOT bending the knees or rounding the back)
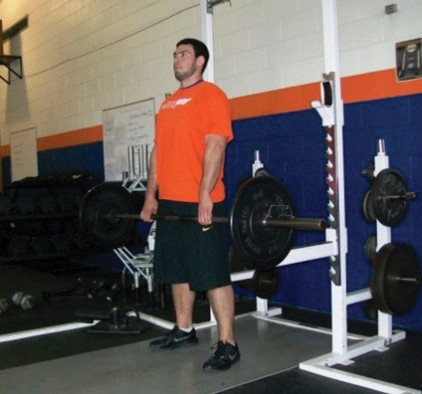
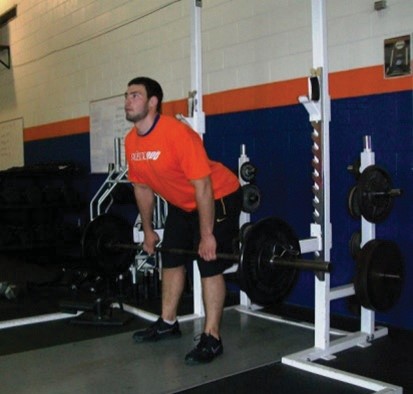
Figure 6.23: Romanian Deadlift Top Position
Figure 6.24: Romanian Deadlift Bottom Position
Video 5.1
Good Morning Exercise
Squeeze the shoulders back and place the barbell high on top of shoulders
Place a slight bend in the knees (knees straight but not locked)
Squeeze the shoulders back with an over-exaggerated posture
In a controlled manner, lower the bar down, keeping the bar behind the toes
When lowering the bar, keep the shoulders squeezed back (with over-exaggerated posture) and the knees straight but not locked, lowering the bar by sticking the butt out (NOT bending the knees or rounding the back)
Figure 6.25: Good Morning Top Position
Figure 6.26: Good Morning Bottom Position
Video 5.1
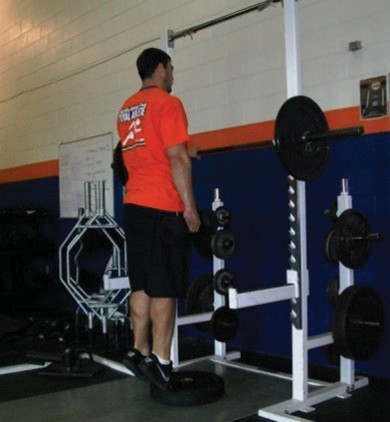
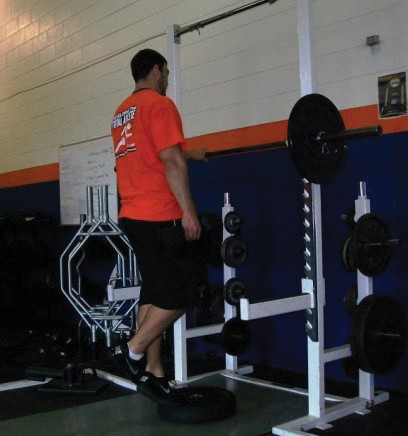
Calf Raise
Use a step or platform, feet shoulder width apart (can use a stable block of wood that allows your heel to be off the ground, if no step or platform)
Place balls of feet securely on edge
Placing too much of foot on edge limits range of motion
Putting too little of foot on edge increases risk of slipping off edge
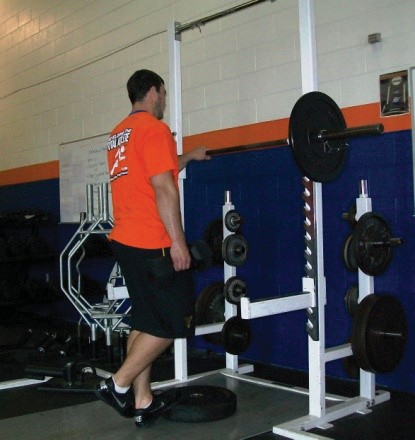
Use a wall or railing for balance (in front with two hands or to the side with one hand)
Dorsiflex, dropping heels down
Then plantarflex, raising up on balls of feet
To add resistance, work one leg at a time or balance with one hand and hold a dumbbell or weight in the other hand
Figure 6.27: Calf Raise Top Position
Figure 6.28: Calf Raise Bottom Position
Video 5.1
Calf Raise Variation Pictures
Figure 6.29: Two Leg DB Calf Raise (Top)
Figure 6.30: Two Leg DB Calf Raise (Bottom)
Figure 6.31: Single Leg DB Calf Raise (Top)
Figure 6.32: Single Leg DB Calf Raise (Bottom)
Video 5.1
Video 5.1
Part 2: Upper Body
The larger upper body muscle groups of the back and chest are targeted as primary areas.
Chest Exercises
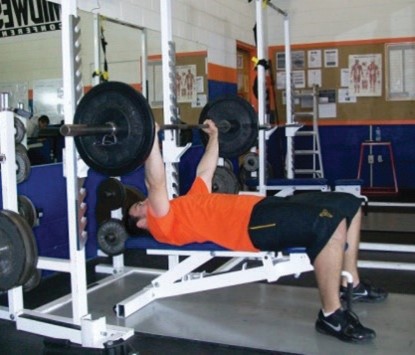
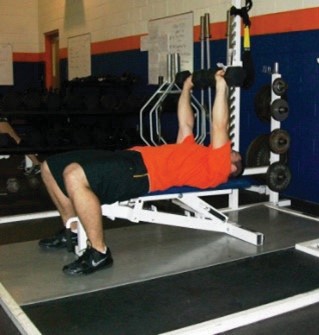
Bench Press
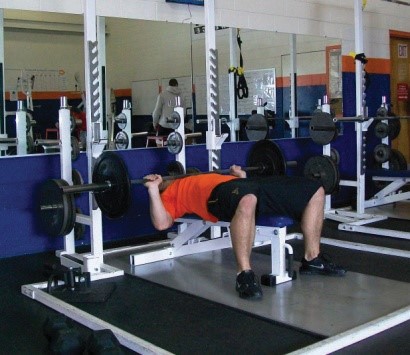
Lie back on bench establishing five points of contact (head, shoulders/back and buttocks) on the bench and right and left feet flat on floor
Position body so that eyes are directly below the racked bar
Using an overhand, closed grip, place your hands wide enough that your forearms are perpendicular to the floor in the bottom position of the lift
With help of a spotter, lift the bar off the rack so that the bar is above the shoulders
Slowly and under control, lower the bar to the chest, touching the chest in line with the nipples
Maintaining the five points of contact (do not arch excessively where the hips lift off the bench), press the bar upwards and slightly back to the original position over the shoulders, keeping the elbows slightly bent at the top of the movement
Figure 6.33: Bench Press Bottom Position
Figure 6.34: Bench Press Top Position
Video 5.1
Dumbbell Chest Press
Lie back on bench establishing five points of contact (head, shoulders/back and buttocks) on the bench and right and left feet flat on floor
Starting with the dumbbell in your hands, start with hands just outside your chest, just above chest height
Maintaining the five points of contact (do not arch excessively where the hips lift off the bench), press the dumbbell upwards and slightly back to over the shoulders, keeping the elbows slightly bent at the top of the movement
Slowly and under control, lower the dumbbell to the chest, touching the side of the chest in line with the nipples
Figure 6.35: Dumbbell Chest Press Bottom Position
Figure 6.36: Dumbbell Chest Press Top Position
Video 5.1
Incline Bench Press
Sit down at the incline bench (positioned at a 45- to 60-degree angle), position your feet flat on the ground with thighs parallel to the floor
Lean back on bench establishing five points of contact (head, shoulders/back and buttocks) on the bench and right and left feet on floor
Grip the bar with an overhand, closed grip, slightly wider than shoulder width (a narrower grip than the bench press grip increases the focus on the upper chest)
Starting with the bar above your eyes, lower the bar slowly, under control, touching the bar to your upper chest
Maintaining the five points of contact (do not arch excessively where the hips lift off the bench), press the bar upwards and slightly back to the original position, keeping the elbows slightly bent at the top of the movement
Video 5.1
Incline Dumbbell Chest Press
Sit down at the incline bench (positioned at a 45- to 60-degree angle) position your feet flat on the ground with thighs parallel to the floor
Lean back on bench establishing five points of contact (head, shoulders/back and buttocks) on the bench and right and left feet on floor
With the dumbbell in your hands, start with hands just outside your chest, even with your up- per chest
Maintaining the five points of contact (do not arch excessively where the hips lift off the bench), press the dumbbell upwards and slightly back to over the eyes, keeping the elbows slightly bent at the top of the movement
Slowly and under control, lower the dumbbell to the upper chest, touching the side of the upper chest
Video 5.1
Flat Dumbbell Fly
Lie back on bench establishing five points of contact (head, shoulders/back and buttocks) on the bench and right and left feet flat on floor
Starting with your arms extended (with slight bend in the elbows) with the dumbbell over your chest and palms facing together
With elbows staying bent at the same angle all the way through the movement, slowly and under control, lower the arms directly out to the sides in an arcing pattern
When hands are even with the chest, maintain the five points of contact (do not arch excessively where the hips lift off the bench) and in the same arcing pattern raise the back up to the starting position
Video 5.1
Back Exercises
Wide Grip Lat Pulldown
From a seated position with thighs parallel to the floor and feet flat on the floor, grab the bar with an overhand, closed grip with hands evenly spaced wider than shoulder width
Lean back slightly, with arms extended and elbows slightly bent
Keeping your upper body stable, pull the bar down, leading with your elbows to the clavicles/ upper chest
Under control, slowly guide the bar back to the starting position
Do not let the bar jerk you up, maintain your upper body position and maintain a slight bend in the elbows are the top of the movement
Video 5.1
Narrow Grip Lat Pulldown
From a seated position with thighs parallel to the floor and feet flat on the floor, grab the bar with an underhand, closed grip using a narrow grip (hands 6-10 inches apart)
Keep the upper body straight in line, arms extended with elbows slightly bent
Keeping your upper body stable, pull the bar down, leading with your elbows to the clavicles/ upper chest
Under control, slowly guide the bar back to the starting position
Do not let the bar jerk you up. Maintain your upper body position and maintain a slight bend in the elbows are the top of the movement
Video 5.1
Bent-Over Row
With feet shoulder width apart (or slightly wider) and keeping legs straight (with slight bend in knees) bend your upper body forward so that your back is parallel to the ground
Grip the bar with either an overhand (pronated) or underhand (supinated) closed grip
As you pull the bar up to just below your chest, maintain your back position, while pulling the shoulders back as the elbows flex upwards and away from the body (the underhand grip will keep the elbows tighter to the body)
Pull the bar all the way up to your body, then slowly and under control lower the bar back down extending your arms
Maintain a slight bend in the elbows at the bottom position and do not let the weight touch the ground between repetitions so that the muscles remain under resistance during the whole set
Video 5.1
Dumbbell Variations
Video 5.1
One-Arm Dumbbell Row
Stand to the right side of a flat bench, place your left hand on the bench in line with your shoulder and place your left knee on the bench in line with your hip
With your left hand and left knee on the bench, keep your upper body parallel to the floor maintaining a flat back
Your right leg should be close to the side of the bench with a slight bend in the right knee and your foot flat on the floor
Grasping a dumbbell in your right hand extend your arm in line with your chest, keeping a slight bend in your elbow at the bottom position
Maintaining a flat back position, pull the dumbbell up, leading with your elbow, until your elbow is slightly higher than your back and your hand is just below your chest
Lower the dumbbell in a slow, controlled manner back to the starting position
Repeat with the other side
Video 5.1
Video 5.1
Three-Point Stance Row
The Three-Point Stance Row is performed the same way as the One-Arm The only difference is that the lifter uses his/her own body for support instead of a bench
Take a staggered stance with knees slightly bent, bending at the hips so that your upper body is parallel to the floor with your back flat
Place the hand opposite the DB on your knee to stabilize your position
Video 5.1
Upright Row
Standing with feet shoulder width apart and knees slightly bent, grip the bar using an overhand, closed grip with hands narrower than shoulder width
With the bar hanging at hip height and with arms extended (maintaining a slight bend in the elbows), keep your body stable as you pull the bar up until your hands are at shoulder height
As you raise the bar close to your body leading with your elbows, keep the elbows above the wrists throughout the whole movement
Maintaining a stable body position, lower the bar as you slowly extend your arms back to the starting position
Video 5.1
Dumbbell Variations
Video 5.1
Shoulder Exercises
Shoulder Press
Can be performed in either a seated or standing position
Standing: stand up straight with feet shoulder width apart and knees slightly bent
Seated: sit with feet firmly on the floor, shoulder width apart, keeping back straight (if bench has a back pad, rest back against pad for support)
Start holding dumbbells with an overhand grip, with hands at shoulder height
Press the weight straight up, stopping just short of fully extending the elbows
Under control, lower the weight back to shoulder height
Video 5.1
Video 5.1
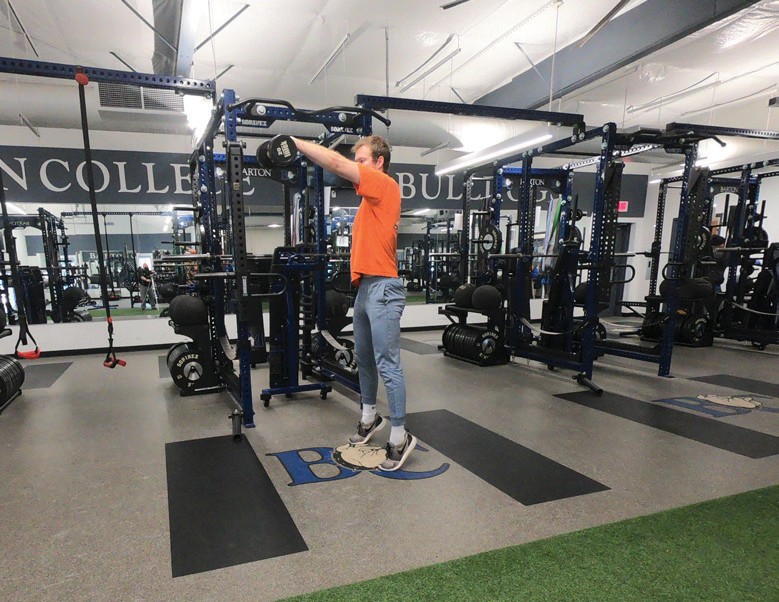
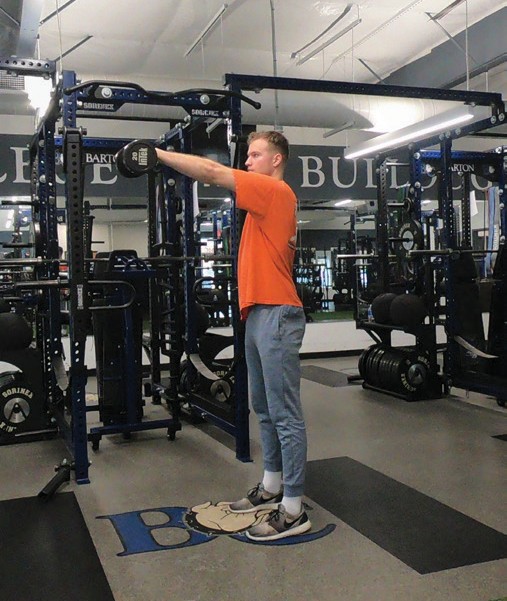
Front Raise
Start in a standing position with knees slightly flexed and with hands placed in front of thighs using an overhand close grip (hands facing thighs)
Body should remain stable throughout movement with knees slightly flexed (to take pressure off the lower back)
Pull hands and weight vertically, raising the arms to shoulder height leading with the hands/wrist
Pause briefly, and then lower arms down, keeping elbows slightly flexed, back to starting position
Video 5.1
Side Raise
Start in a standing position with knees slightly bent
Hands placed in on the side of thighs using an overhand close grip (hands facing in)
Body should remain stable throughout movement with knees slightly flexed (to take pressure off the lower back)
Pull hands and weight vertically raising/abducting the arms to shoulder height leading with the hands/wrist
Pause briefly, and then lower arms down, keeping elbows slightly flexed, back to starting position
Always keep elbows slightly flexed and at the same angle all the way through the movement
Video 5.1
Posterior Raise
Bending at the waist, lower your upper body to parallel with the floor
In a standing position, place feet shoulder width apart with knees slightly bent
In a seated position, keep feet firmly on the ground shoulder width apart and lower your chest to your knees
Keeping back straight, let your arms be extended towards the ground with elbows bent slightly and the top of your hands even with your ears (to align line of pull with the posterior deltoid)
Maintain the same elbow angle as you raise your arms up to shoulder height, keeping the hands forward so that tension remains on the targeted muscle
Under control, lower your arms / hands back to the starting position
Video 5.1
Internal Rotation
Tubing or cable height should be placed at elbow height
Using an adequate resistance, step far enough from the machine or anchor so that the cable or tube is tight without slack
Holding elbow steady at your side, start with your hand reaching out while your elbow is bent at 90 degrees
Keeping elbow stationary, internally rotate your shoulder to pull the cable or tube across your body
Externally rotate your shoulder to return to starting position
Video 5.1
External Rotation
Tubing or cable height should be placed at elbow height
Using an adequate resistance, step far enough from the machine or anchor so that the cable or tube is tight without slack
Holding elbow steady at your side, start with your hand across your body while your elbow is bent at 90 degrees
Keeping elbow stationary, externally rotate your shoulder to pull the cable or tube across your body until your hand is extended away from your body
Internally rotate your shoulder to return to starting position
Video 5.1
Straight Bar Curl
Start in a standing position with knees slightly flexed, with feet shoulder width apart, arms extended, with hands to the side of your thighs shoulder width apart using an underhand grip
Upper body should remain upright and stable throughout movement, with knees slightly flexed (to take pressure off the lower back)
Pull bar up to shoulder height, flexing only at the elbow joint (keeping elbows steady and in tight throughout movement)
Pause briefly then return hands back down to starting position
Video 5.1
Standing Dumbbell Curl
Start in a standing position with knees slightly flexed, with feet shoulder width apart, arms extended, with hands to the side of your thighs shoulder width apart using an underhand grip
Upper body should remain upright and stable throughout movement with knees slightly flexed (to take pressure off the lower back)
Pull dumbbells up to shoulder height, flexing only at the elbow joint (keeping elbows steady and in tight throughout movement)
Pause briefly then return hands back down to starting position
Video 5.1
Hammer Curl
Start in a standing position with knees slightly flexed, with feet shoulder width apart, arms extended, with hands to the side of your thighs shoulder width apart using an underhand grip
Grip the dumbbells as you would grip a hammer so that your palms face your thighs
Use of the hammer grip shifts more emphasis to the forearm muscles
Upper body should remain upright and stable throughout movement with knees slightly flexed (to take pressure off the lower back)
Pull dumbbells up to shoulder height, flexing only at the elbow joint (keeping elbows steady and in tight throughout movement)
Pause briefly then return hands back down to starting position
Video 5.1
Overhead Triceps Extensions (Two Hands)
Position one dumbbell overhead with both hands under inner plate (heart shaped grip)
With elbows overhead, lower weight behind the head by flexing elbows
Flex wrists at bottom to avoid hitting dumbbell on back of neck
Raise dumbbell overhead by extending elbows
Keep elbows tight to the ears/head to keep resistance focused on the triceps
Slowly lower the dumbbell back to the starting position
Video 5.1
Overhead Triceps Extensions (Single Arm)
Position dumbbell over head with arm straight up or slightly back
Lower dumbbell behind neck or shoulder while maintaining upper arm’s vertical position throughout exercise
Extend arm until almost straight
Slowly lower the dumbbell back to the starting position
Continue with opposite arm
Video 5.1
Lying Triceps Extensions
Lie on bench maintaining five points of contact (head, shoulders, hips and feet) with narrow overhand grip on barbell or heart-shaped grip with a dumbbell (like in the two arm overhead extension)
Position barbell over shoulders with arms extended
With a bar: lower bar to forehead by bending elbows
With a dumbbell: lower the dumbbell behind your head till hands are at forehead height
Keeping elbows in tight, extend arms just short of full extension
Video 5.1
Triceps Kickback
Kneel on bench with one knee and with arm of the same side supporting body, keeping back flat
Other foot is firmly on the floor next to the bench
Grasp dumbbell with other hand, position upper arm parallel to floor
Extend arm until it is almost straight
Continue with opposite arm
Video 5.1
Triceps Pushdowns
Stand close to the high pulley station of the machine
Start in a standing position with feet shoulder width apart and knees slightly flexed
Hands placed just above chest height using an overhand close grip with elbows firmly tucked in against sides
Body should be upright, remaining stable throughout movement with knees slightly flexed (to take pressure off the lower back)
Be careful of leaning upper body forward and shifting emphasis to the chest
Push handles down just short of full extension, keeping elbows close to sides. Pause briefly, then raise hands back to starting position.
A rope attachment can be used in place of the handle to put more emphasis on the triceps by spreading the hands apart at the bottom of the movement.
Triceps Pushdowns with Bar
Video 5.1
Triceps Pushdowns with Rope
Video 5.1
Forearm Extension
Sit on bench and grip dumbbell with overhand grip
Rest forearm on thigh with wrist just beyond knee
Raise dumbbell by pointing knuckles upward as high as possible
Return until knuckles are pointing downward as far as possible
Keep elbow approximately wrist height to maintain resistance through full range of motion
Can be done with both sides at one time, or one arm can be done at a time with other hand helping support the wrist to help isolate the movement (perform one arm version for both sides)
Video 5.1
Forearm Flexion
Sit and grasp dumbbell with underhand grip
Rest forearm on thigh with wrist just beyond knee
Allow dumbbell to roll out of palm down to fingers
Raise dumbbell back up by gripping and pointing knuckles up as high as possible
Keep elbow approximately wrist height to maintain resistance through full range of motion
Can be done with both sides at one time, or one arm can be done at a time with other hand helping support the wrist to help isolate the movement (perform one arm version for both sides)
Video 5.1
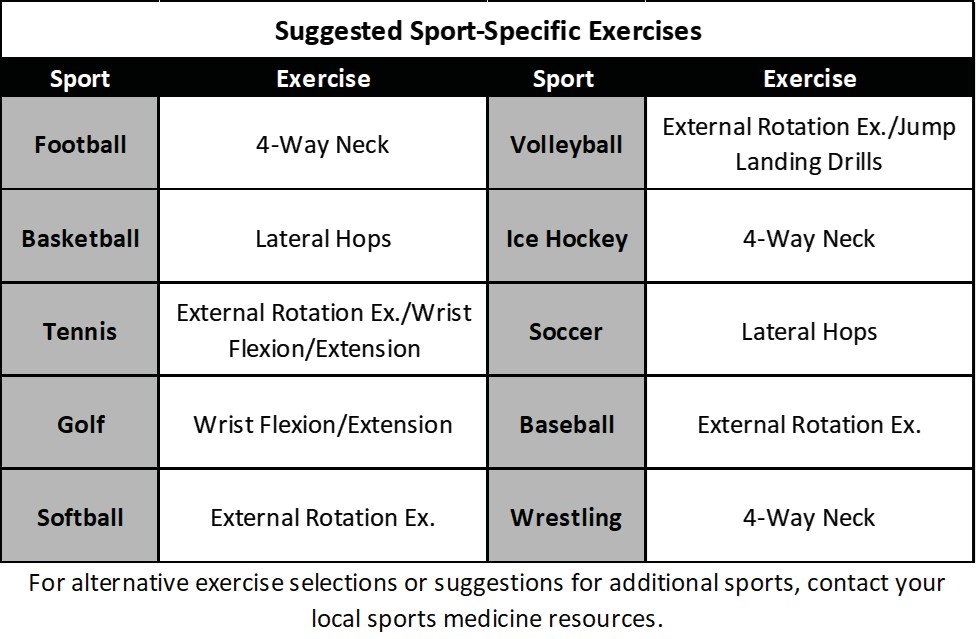
Part 3: Sport-Specific Exercises
The sport-specific exercises are special auxiliary exercises that are designed to add a sport-specific element to your program and aid in injury prevention. Below is a chart that provides examples of sports-specific exercises that can be inserted into your program. For multi-sport athletes, the sport-specific exercise can be based on their primary sport or exercises can be rotated using the exercises for the sports the athlete participates in.
Table 6.1:
Part 4: Full-Body Power Exercises
PowerRev full-body exercises are explosive lifts that feature triple extension of the hips, knees, and ankles. These are the program’s primary power development exercises. The primary core lifts in the program are the Power Clean and Snatch movements. Both these lifts are taught using a progressive series of exercises. The Push Jerk and any of the Clean or Snatch progression exercises can be used as secondary full body movements in the program.
Power Clean Progression Series
Box/Rack Pull
Use rack or box to elevate bar off the floor to above the knees (feet shoulder width, hands placed on bar at side of legs)
Bend knees so that bar is aligned with middle of upper thigh
Lean trunk forward so that chest is over bar (cover bar)
Explosively pop hips forward as you triple extend
Figure 6.100: Box/Rack Pull Start Position
Figure 6.101: Box/Rack Pull Top Position
Box/Rack Shrug
Use rack or box to elevate bar off the floor to above the knees (feet shoulder width, hands placed on bar at side of legs)
Bend knees so that bar is aligned with middle of upper thigh
Lean trunk forward so that chest is over bar (cover bar)
Explosively pop hips forward as you triple extend
Continue to accelerate the bar (introducing the upper body) by aggressively shrugging the shoulders
Figure 6.102: Box/Rack Shrug Start Position
Figure 6.103: Box/Rack Shrug Top Position
Box/Rack High Pull
Use rack or box to elevate bar off the floor to above the knees (feet shoulder width, hands placed on bar at side of legs)
Bend knees so that bar is aligned with middle of upper thigh
Lean trunk forward so that chest is over bar (cover bar)
Explosively pop hips forward as you triple extend
Continue to move bar upwards, keeping elbows above wrists
Pull bar as high as possible (as weight is increased, ability to pull bar up high decreases)
Figure 6.104: Box/Rack High Pull Start Position
Figure 6.105: Box/Rack High Pull Top Position
Hang Pull
Picking up bar from floor, lift bar above knees and bend knees so that bar is aligned with middle of upper thigh (feet shoulder width, hands placed on bar at side of legs) – hang position
Flex at the hips, slightly leaning trunk forward so that chest is over bar – cover bar (power position)
Immediately from power position, explosively pop hips forward as you triple extend
Figure 6.106: Hang Pull Start Position
Figure 6.107: Hang Pull Power Position
Figure 6.108: Hang Pull Top Position
Hang Shrug
Picking up bar from floor, lift bar above knees and bend knees so that bar is aligned with middle of upper thigh (feet shoulder width, hands placed on bar at side of legs) – hang position
Flex at the hips, slightly leaning trunk forward so that chest is over bar – cover bar (power position)
Immediately from power position, explosively pop hips forward as you triple extend
Continue to accelerate the bar (introducing the upper body) by aggressively shrugging the shoulders
Figure 6.109: Hang High Pull Start Position
Figure 6.110: Hang Shrug Power Position
Figure 6.111: Hang Shrug Top Position
Hang High Pull
Starting with bar in hang position
Perform same movement as hang shrug
Explosively extend hips forward
Complete triple extension
Aggressively shrug shoulders upwards
Continue to move bar upwards, keeping elbows above wrists
Pull bar as high as possible (as weight is increased, ability to pull bar up high decreases)
Figure 6.112: Hang Shrug Start Position
Figure 6.113: Hang High Pull Power Position
Figure 6.114: Hang High Pull Top Position
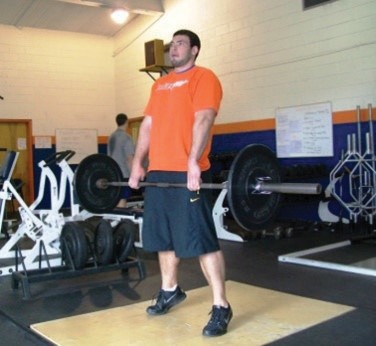
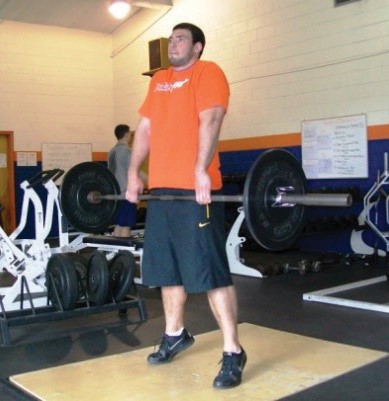
Floor Initial Pull
Feet at hip width, hands should be placed on the bar just outside of legs
Barbell in close to the body with arms straight with the elbows rotated out
Shoulder blades should be squeezed back with the chest as high as possible
Hips are higher than the knees but lower than the shoulders
Eyes straight ahead
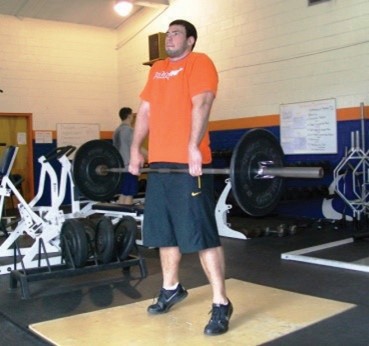
Raise up hips slowly, pulling bar off ground
Maintain consistent back angle
As soon as the bar gets to above the knees, initiate a violent, explosive hip extension
Complete triple extension rising up on toes
Return weights to the ground
Figure 6.115: Clean Start Position
Figure 6.116: Floor Pull Top Position
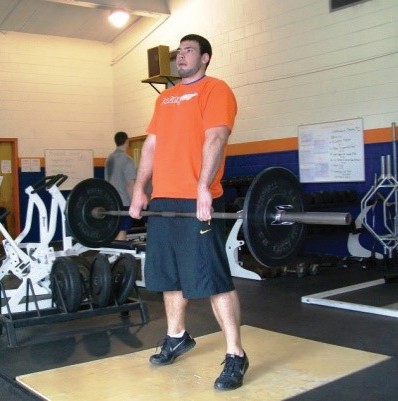
Floor Shrug
Perform same steps as Floor Pull
Add in aggressive shoulder shrug by lifting/shrugging shoulders up towards ears
Figure 6.117: Clean Start Position
Figure 6.118: Floor High Pull Top Position
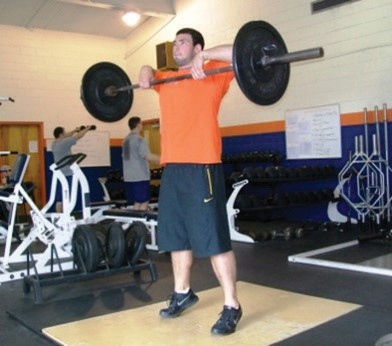
Floor High Pull
Perform same movement as Floor Shrug
Explosively extend hips forward once bar passes above knees
Complete triple extension
Aggressively shrug shoulders upwards
Continue to move bar upwards, keeping elbows above wrists
Pull bar as high as possible (as weight is increased, ability to pull bar up high decreases)
Figure 6.119: Clean Start Position
Figure 6.120: Floor High Pull Top Position
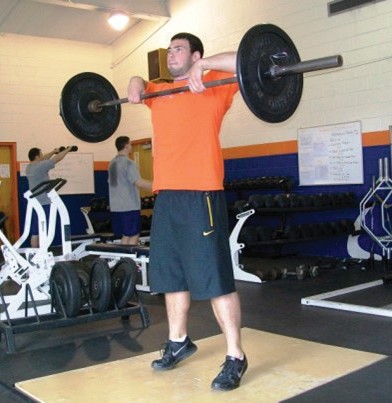
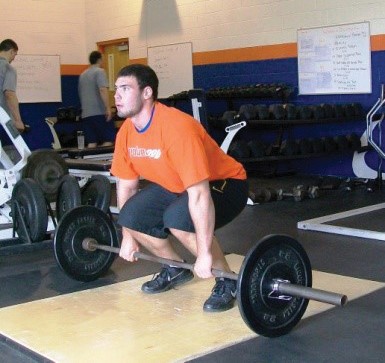
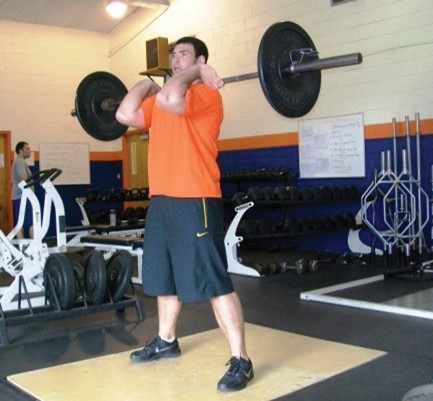
Power Clean
Perform the Floor High Clean Pull
Spread the feet to squat width (heels under the shoulders with the toes pointed slightly out)
At the same time, violently force the elbows forward and up while dropping the hips down and back
Catch bar in a Front Squat (Clean Grip) position and stand up with it
Floor Shrug
Figure 6.121: Clean Start Position
Figure 6.122: Clean Catch Position
Figure 6.123: Clean Finish Position
Snatch Progression Series
Box/Rack Pull
Use rack or box to elevate bar off the floor above the knees (feet shoulder width, using a snatch width grip – overhead squat grip)
Bend knees so that bar is aligned with middle of upper thigh
Lean trunk forward so that chest is over bar (cover bar)
Explosively pop hips forward as you triple extend
Figure 6.124: Box/Rack Snatch Start Position
Figure 6.125: Box/Rack Snatch Pull Top Position
Box/Rack Shrug
Use rack or box to elevate bar off the floor to above the knees (feet shoulder width, using a snatch width grip – overhead squat grip)
Bend knees so that bar is aligned with middle of upper thigh
Lean trunk forward so that chest is over bar (cover bar)
Explosively pop hips forward as you triple extend
Continue to accelerate the bar (introducing the upper body) by aggressively shrugging the shoulders
Figure 6.126: Box/Rack Snatch Start Position
Figure 6.127: Box/Rack Snatch Shrug Top Position
Hang Snatch
Picking up bar from floor, lift bar above knees and bend knees so that bar is aligned with middle of upper thigh (feet shoulder width, using a snatch width grip – overhead squat grip) – hang position
Flex at the hips, slightly leaning trunk forward so that chest is over bar – cover bar (power position)
Immediately from power position, explosively pop hips forward as you triple extend
Floor Shrug
Figure 6.128: Hang Snatch Start Position
Figure 6.129: Hang Snatch Power Position
Figure 6.130: Hang Snatch Pull Position
Hang Shrug
Picking up bar from floor, lift bar above knees and bend knees so that bar is aligned with middle of upper thigh (feet shoulder width, using a snatch width grip – overhead squat grip) – hang position
Flex at the hips, slightly leaning trunk forward so that chest is over bar – cover bar (power position)
Immediately from power position, explosively pop hips forward as you triple extend
Continue to accelerate the bar (introducing the upper body) by aggressively shrugging the shoulders
Figure 6.131: Hang Snatch Start Position
Figure 6.132: Hang Snatch Power Position
Figure 6.133: Hang Snatch Shrug Position
Floor Initial Pull
Feet at hip width, using a snatch width grip – overhead squat grip
Barbell in close to the body with arms straight and with the elbows rotated out
Shoulder blades should be squeezed back with the chest as high as possible
Hips are higher than the knees but lower than the shoulders
Eyes straight ahead
Raise up hips slowly, pulling bar off ground
Maintain consistent back angle
As soon as the bar gets to above the knees, initiate a violent, explosive hip extension
Complete triple extension, rising up on toes
Return weights to the ground
Figure 6.134: Snatch Start Position
Figure 6.135: Floor Initial Snatch Pull Top Position
Floor Shrug
Perform same steps as Floor Initial Pull
Add in aggressive shoulder shrug
Lifting / shrugging shoulders up towards ears
Figure 6.136: Snatch Start Position
Figure 6.137: Floor Initial Snatch Pull Top Position
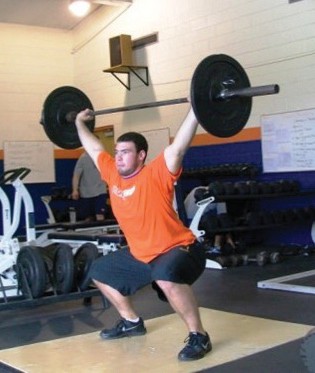
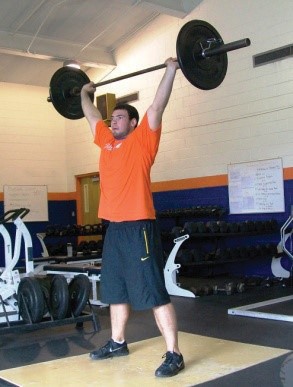
Snatch
Perform the Snatch Shrug continuing to accelerate the bar upwards
Spread the feet to squat width (heels under the shoulders with the toes pointed out)
At the same time, allow the bar to fly right by the lifter’s nose while dropping the hips down and back to catch the bar in an Overhead Squat position
Stand up with the bar overhead
Figure 6.138: Snatch Start Position
Figure 6.139: Snatch Catch Position
Figure 6.140: Snatch Finish Position
Secondary Full Body Movements
Pressing Continuum
Shoulder Press – all upper body and no help from the lower body
Push Press – primarily upper body with some help from the legs
Push Jerks – primarily lower body with some help from the upper body
Push Press
The Push Press and Push Jerk are very similar movements (see Push Jerk teaching points)
The difference is in the use of the arms and the legs
In the Push Press emphasizes the upper body, using more force production from the upper body and shoulders, with some help from the legs
The Push Jerk emphasizes the lower body, using more explosive force production from the lower body with some help from the upper body
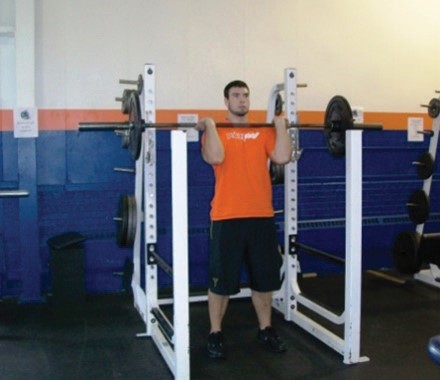
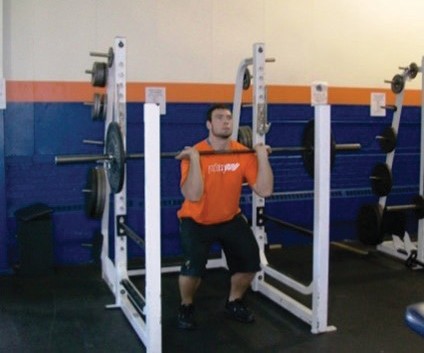
Push Jerk
Starting position – Shoulder Press-In Front
Slightly dip the hips down and back while slightly bending the knees
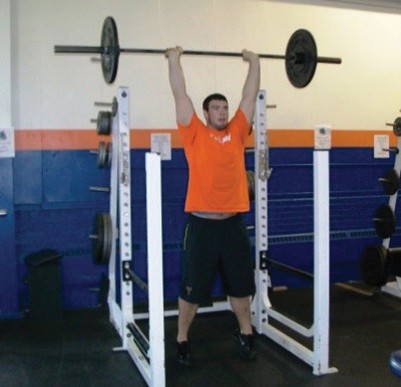
Immediately extend the legs, explosively pushing the bar upward and slightly back, tucking the chin out of the way
Once the bar passes the head, return the head to its original position
Finishing the lift by pressing the bar with the shoulders
Allow the heels to return to the ground
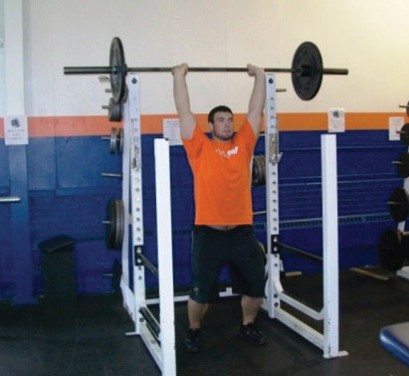
Dip with knees slightly bent to absorb impact of bar coming down (getting under bar)
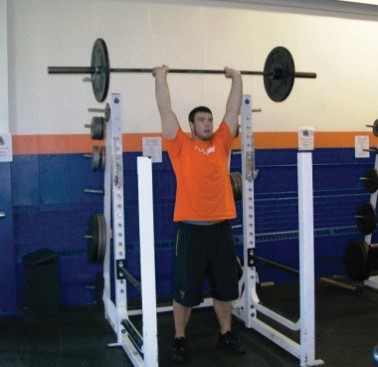
Lock the elbows out with the bar right behind the ears and straighten legs out to standing position
Figure 6.141: Push Jerk Starting Position
Figure 6.142: Push Jerk Hip Dip Position
Figure 6.143: Jerk Extension Position
Figure 6.144: Push Jerk Catch Position
Figure 6.145: Push Jerk Finish Position
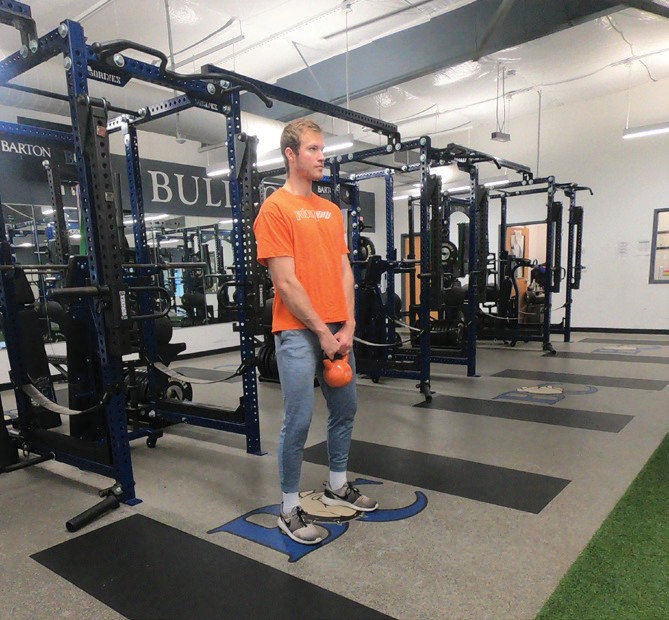
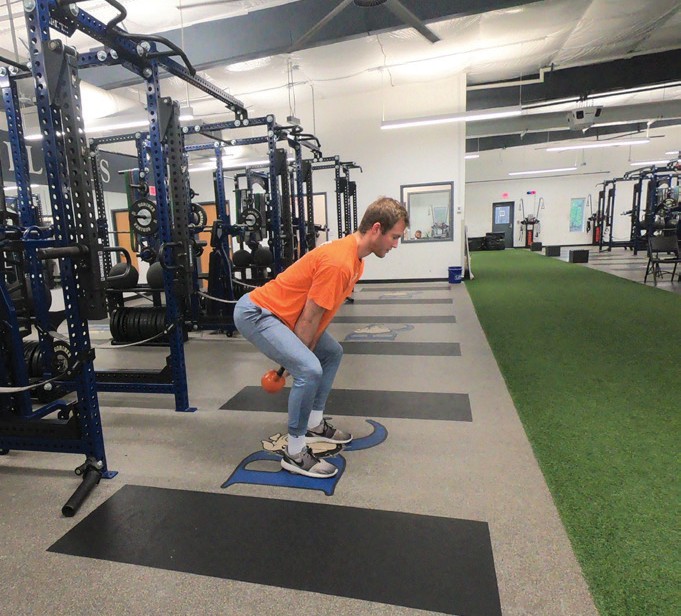
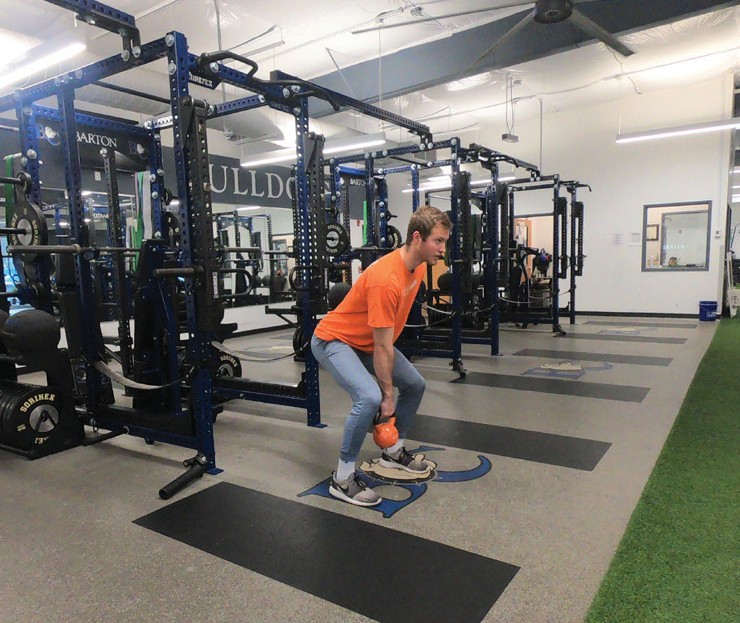
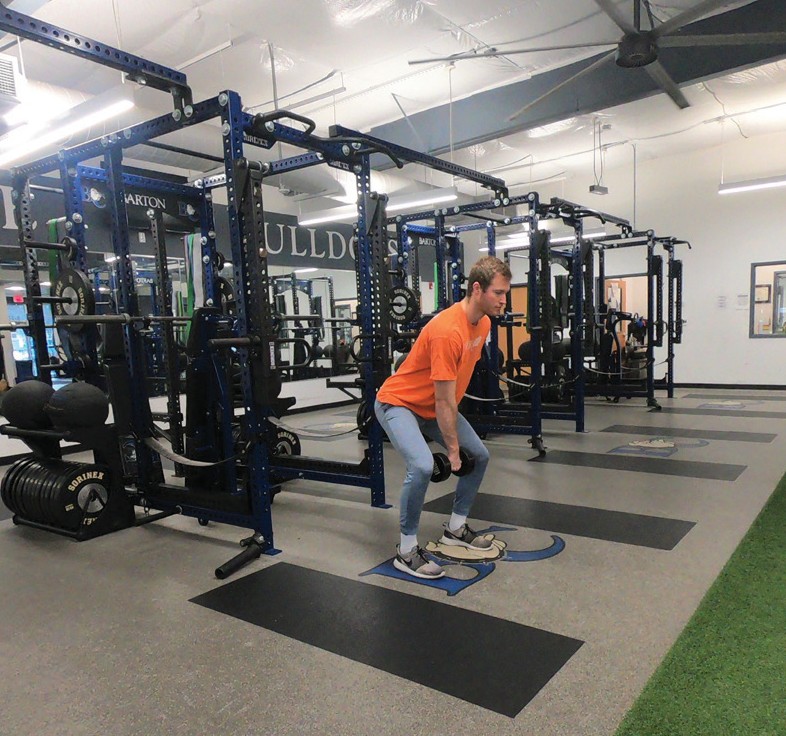
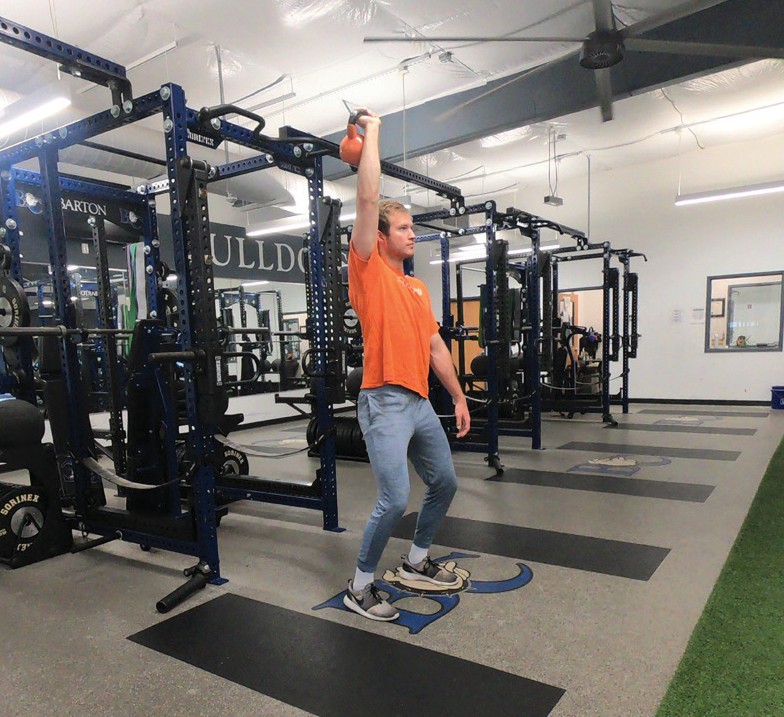
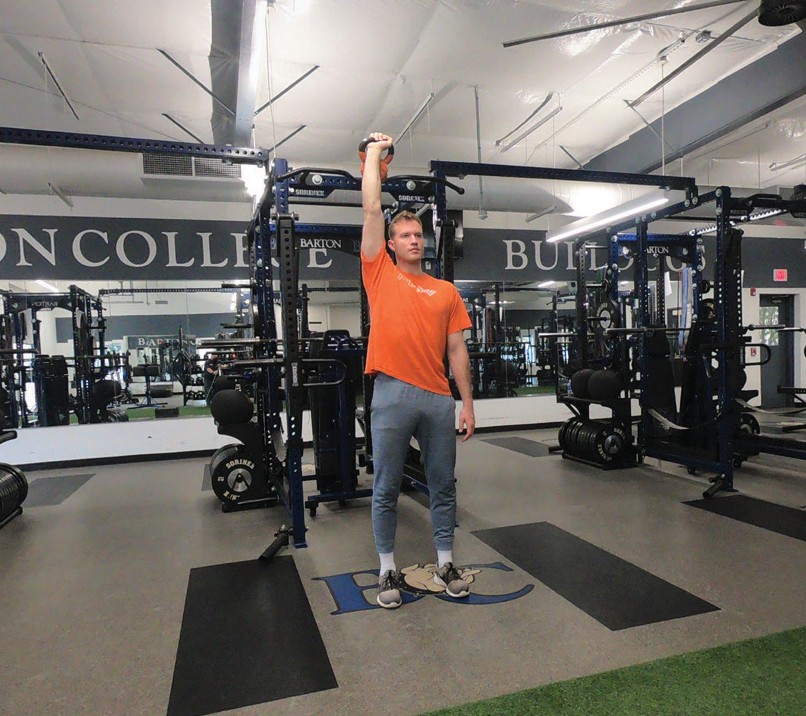
Kettlebell/Dumbbell Swings
Bend knees so that kettlebell/dumbbell is aligned with middle of upper thigh
Lean trunk forward so that chest is over kettlebell/dumbbell (cover weight)
Explosively pop hips forward as you triple extend
Figure 6.146: Kettlebell Swing Bottom Position
Figure 6.147: Kettlebell Swing Power Position
Figure 6.148: Kettlebell Swing Top Position
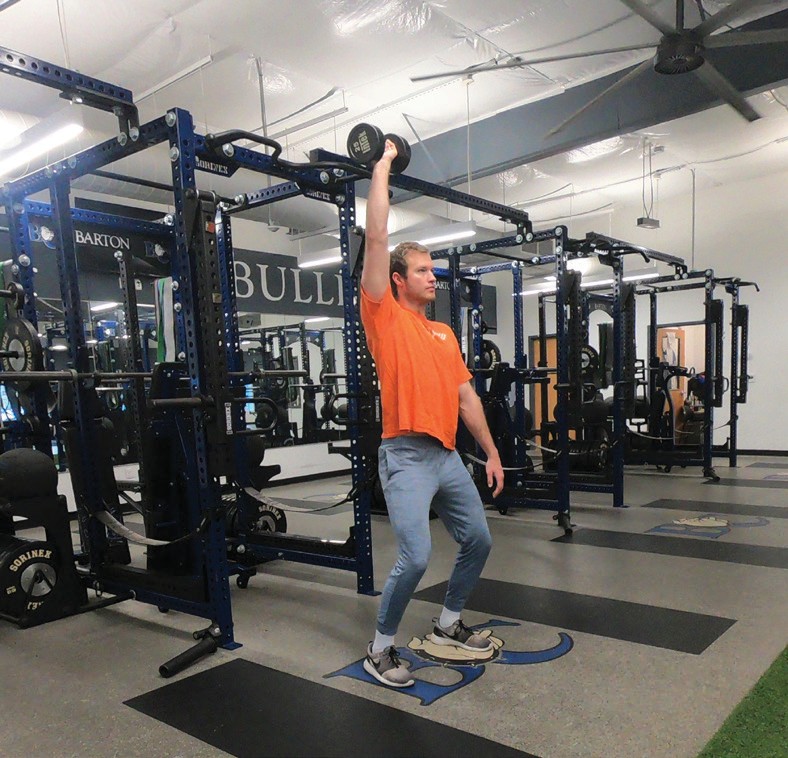
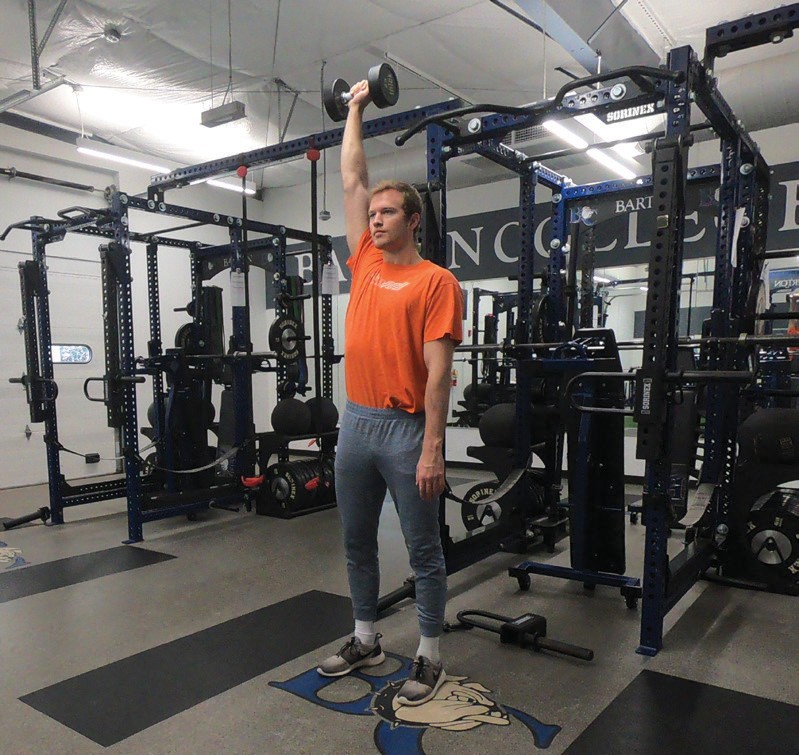
Figure 6.149: Dumbbell Swing Starting Position
Figure 6.150: Dumbbell Swing Power Position
Figure 6.151: Dumbbell Swing Triple Extension Position
Figure 6.152: Dumbbell Finishing Position
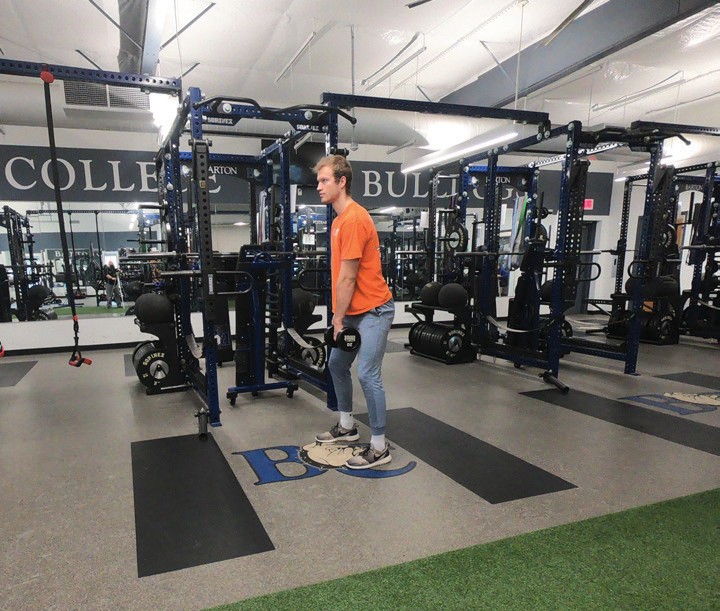
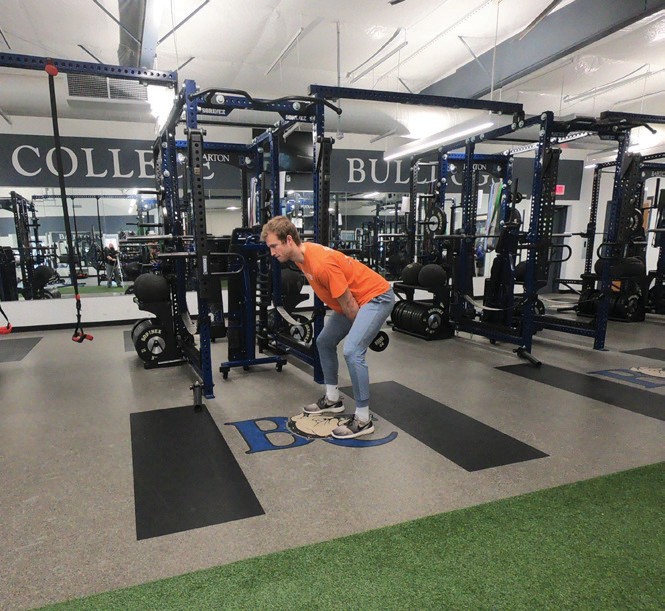
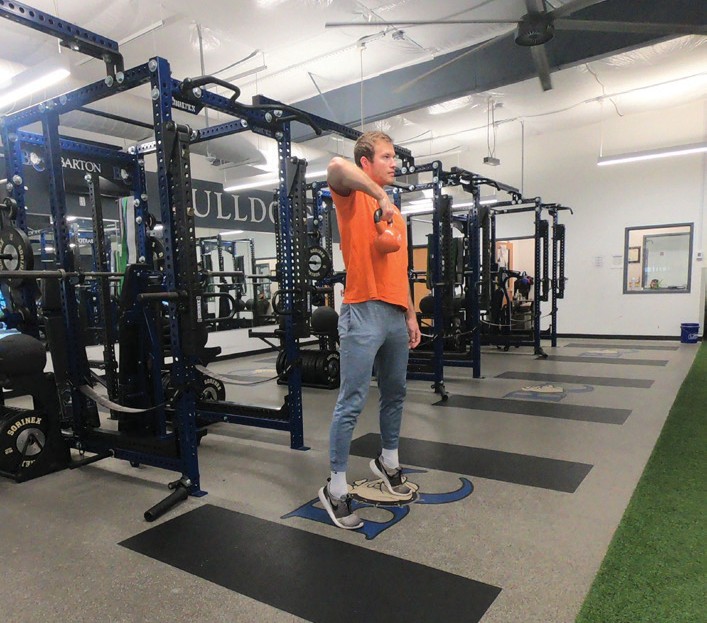
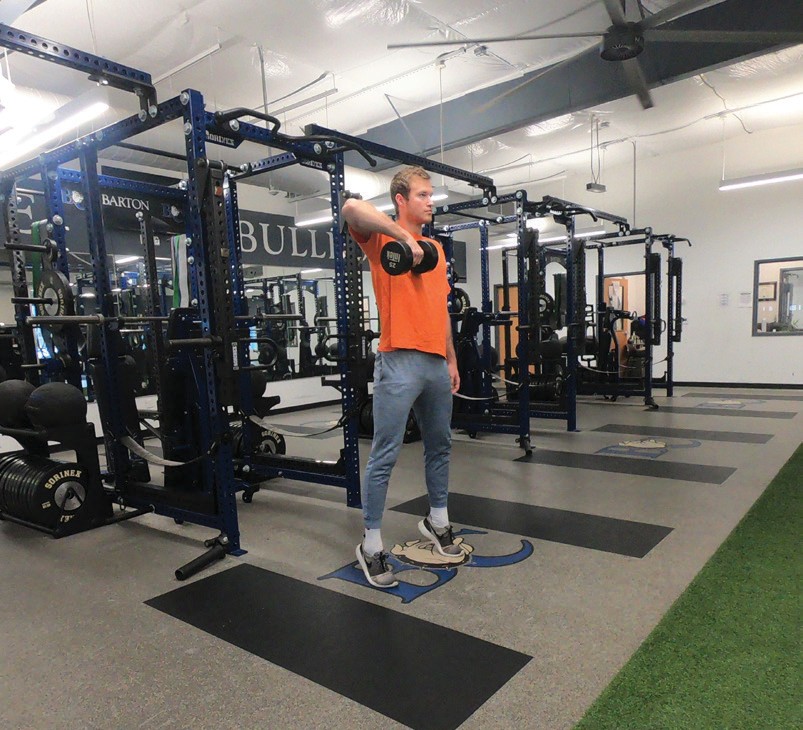
Kettlebell/Dumbbell Clean
Lean trunk forward so that chest is over kettlebell/dumbbell (cover weight)
Explosively pop hips forward as you triple extend
Continue to accelerate (introducing the upper body) the kettlebell/dumbbell by aggressively shrugging the shoulders
Figure 6.153: Kettlebell Snatch Bottom Position
Figure 6.154: Kettlebell Snatch Pull Position
Figure 6.155: Kettlebell Snatch Receiving Position
Figure 6.156: Kettlebell Snatch Top Position
Figure 6.157: Dumbbell Snatch Bottom Position
Figure 6.158: Dumbbell Snatch Pull Position
Figure 6.159: Dumbbell Snatch Receiving Position
Figure 6.160: Dumbbell Snatch Top Position
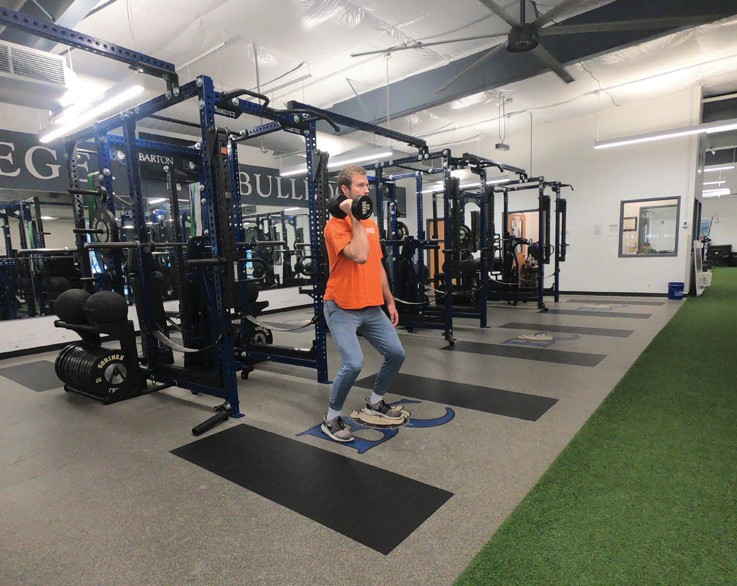
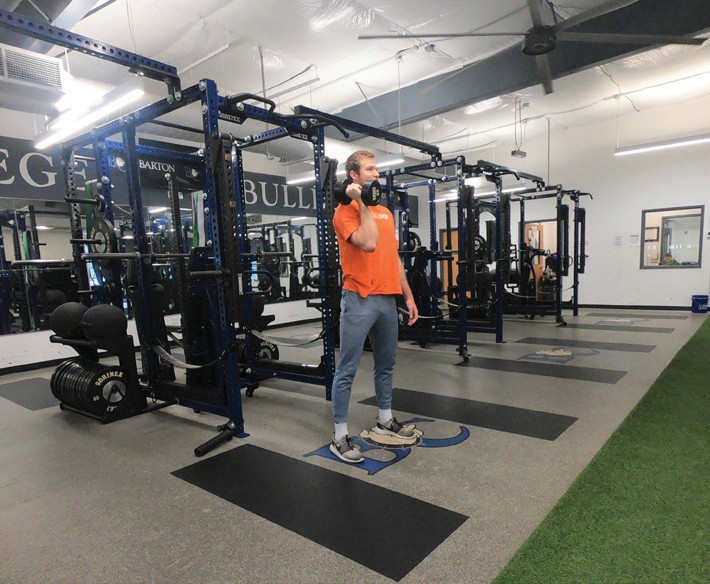
Kettlebell/Dumbbell Snatch
Bend knees so that kettlebell/dumbbell is aligned with middle of upper thigh
Lean trunk forward so that chest is over kettlebell/dumbbell (cover weight)
Explosively pop hips forward as you triple extend
Figure 6.161: Kettlebell Snatch Bottom Position
Figure 6.162: Kettlebell Snatch Pull Position
Figure 6.163: Kettlebell Snatch Receiving Position
Figure 6.164: Kettlebell Snatch Top Position
Figure 6.165: Dumbbell Snatch Bottom Position
Figure 6.166: Dumbbell Snatch Pull Position
Figure 6.167: Dumbbell Snatch Receiving Position
Figure 6.168: Dumbbell Snatch Top Position
Part 5 : Body Weight Strength Exercises
Body Weight Squat
Start with feet slightly wider than shoulder width, toes angled slightly out and arms extend in front at shoulder height for balance
Push the hips back, sticking the butt out, keeping chest forward to balance out body
Lower the hips down and back with the feet flat and the pressure on the heels
Lower the hips down and back until the hips are lower than the knees (or top of the thigh is parallel to the ground)
Upon reaching the lower point of the descent, drive back up through the heels while also driving the hips forward to keep the chest up
Video 5.1
Overhead Squat
Start with dowel, stick or lightweight bar to learn form
With a snatch-width grip, place the bar overhead, slightly behind or directly above the ears
Raise arms to shoulder height
Bend elbows to 90 degrees
Maintaining that hand width, grab bar with over and grip
Extend arms as bar is raised overhead, cock wrist back
While performing the lower body squatting movement, gradually rotate the bar back as you go down
Overhead squat can build flexibility and reveal tightness in shoulder, ankle and hip joints
Video 5.1
Rear Leg Elevated Split Squat
Support the rear leg on something like a bench in a comfortable position off the ground
With the rear leg supported, position the front foot far enough forward that when the back leg is lowered to the floor, the front knee does not extend out in front of the toes
Bending the front knee, drop the hips straight down into 90-degree bend of both front and back legs
Push up on the front leg, extending the knees and hips back to the starting position
If needed, something like a wooden dowel can be used for balance; just be sure to keep the emphasis on the leg muscle
Video 5.1
Front Lunge
Start with the feet underneath the hips and lined up evenly with each other
Take an exaggerated step forward
Drop the hips straight down into 90- degree bend of both front and back legs
Proper stride length places front knee over the ball of the foot
Too long a stride places knee over heel or back leg is extended past 90 degrees
Too short a stride places front knee in front of toes
Drive through the front heel and pull with the back foot to return to the starting position
Alternate legs throughout the set
Video 5.1
Side Lunge
Start with feet shoulder width apart
Take an exaggerated step out to the side, keeping toes pointed forward
Drop hips down, bending knee of lead leg to 90 degrees
As you drop down, sit hips back, leaning chest forward to balance out body
Trail leg is extended with slight knee bend
Push back off lead leg back to standing position
Alternate movement to both sides
Video 5.1
Back Lunge
Start with the feet underneath the hips and lined up evenly with each other
Take an over-exaggerated step back, sitting back into the front heel until both front and back knees are bent at 90 degrees
Same stride length cues apply as front lunge
Push through the front heel, driving the hips forward and returning the back foot to the starting position
Video 5.1
Push Up
Lie on the floor face down and place just outside shoulder width and your hands even with your chest.
Feet should be shoulder width apart, pressing through the toes.
Now breathe out and press your upper body up to almost full extension (keep a slight bend in your elbows to avoid locking out joints) while squeezing your chest.
After a brief pause, lower yourself downward until your chest almost touches the floor as you inhale.
Pause without relaxing, then press yourself upwards and complete as many repetitions as desired. Keep the core engaged by maintaining proper plank body position, maintaining a straight line from the toes up through the shoulders, throughout movement.
Video 5.1
Basic Variations
Wall Push Up (lower strength option)
Place hands at chest height and perform push-ups at a comfortable body angle (less of an angle reduces the body weight being worked against)
Video 5.1
Modified Push Up (lower strength option)
Instead of using the toes as an anchor point, use the knees as the back pivot/anchor point. Keep the rest of the body in a good plank position maintaining a straight line from the knees up through the shoulders
Video 5.1
Incline Push Up (increased strength option)
Elevate the feet and maintain a good plank body position as you perform push-ups.
The higher the feet are, the more body weight resistance is pushed against. Highest level is the wall pushup where full body weight resistance is provided (body position also transfers emphasis to the shoulders, like a body weight shoulder press).
Video 5.1
Hands Elevated Push Up (reduced strength option)
Place hands on object and perform push-ups at a comfortable body angle (as you reduce the incline, getting closer to a push up on the ground, the more body weight being worked against)
Video 5.1
Bar Incline Push Up
Place hands on bar and perform push-ups at a comfortable body angle (as you reduce the incline, getting closer to a push up on the ground, the more body weight being worked against)
Video 5.1
Diamond Push Up
Start with hands close together, with thumbs and index fingers touching to create a “diamond”
Narrowing the width of the hands places greater emphasis on the triceps as you lower the body down and press back up
Video 5.1
Dive Bomber Push Up (Rocking Push Up)
Start in a modified push up position with feet wide and hips raised to place the upper body at a forward incline.
As you lower yourself, rock your upper body forward in a curved pattern bringing your chest close to the
Reverse the pattern to rock yourself back to the starting
Video 5.1
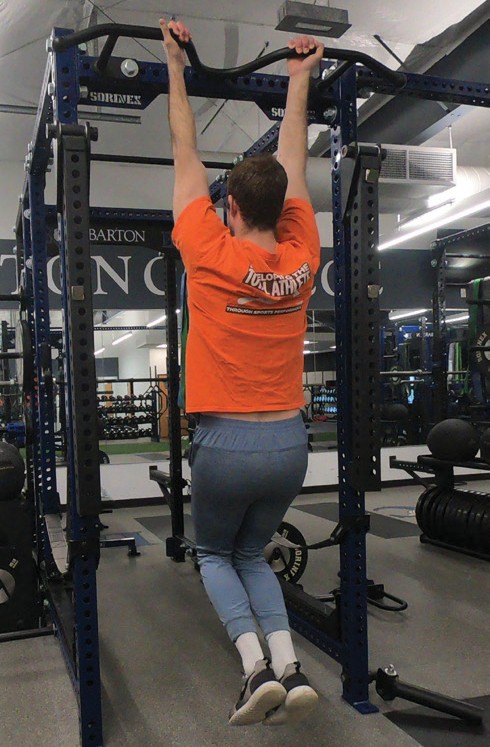
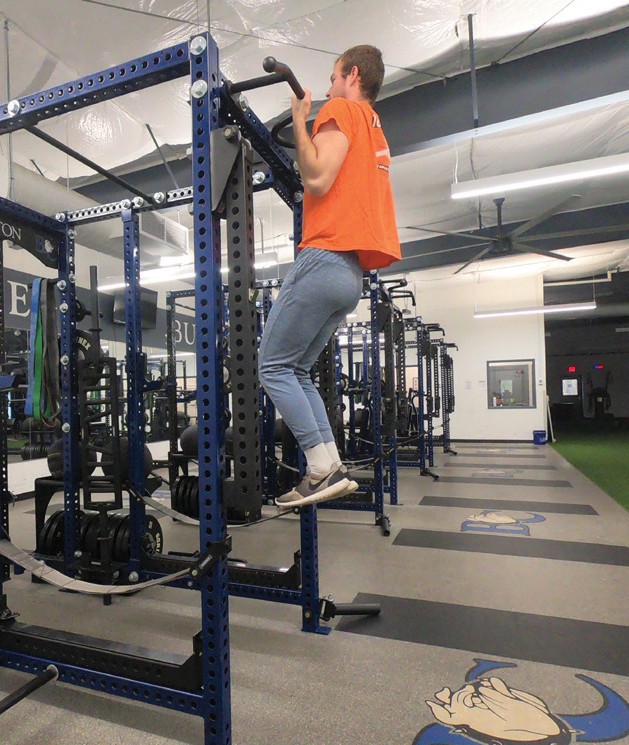
Pull Ups
Using a bar that allows your body weight to hang with feet not touching the ground, grip the bar with an overhand grip (palms facing away), with hands outside the shoulders.
Using your back and biceps muscles, pull your body up so that your chin is above the bar
Concentrating on squeezing your back helps to engage the back muscles
Exhale as you pull yourself up and inhale as you lower yourself down to the starting position
The torso should remain in an upright position as you control your body through the lifting and lowering movements
Video 5.1
Pull Ups Variations
Chin Up
Reversing the grip, using an underhand (palms facing the body) grip is often referred to as a chin up.
Using an underhanded grip utilizes the biceps to a greater extent.
Figure 6.200: Chin Up Grip
Figure 6.201: Chin Up Starting Position
Figure 6.202: Chin Up Top Position
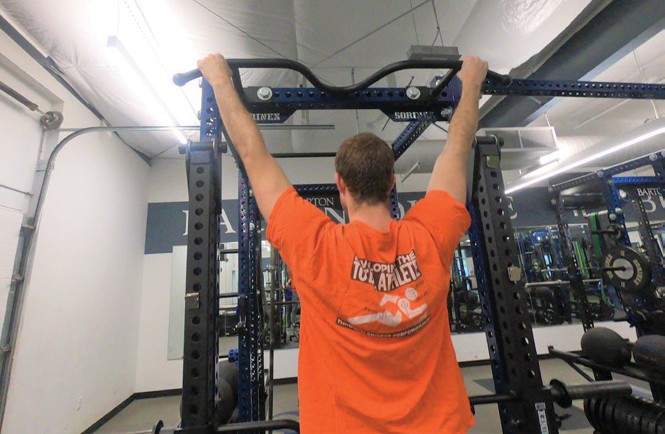
Wide Grip
Using a grip that is wider than shoulder width, but with no greater than a 45-degree angle of the forearms, will utilize the rhomboids posterior deltoids and upper/outer area of the latissimus dorsi
Figure 6.203: Wide Pull Up Grip
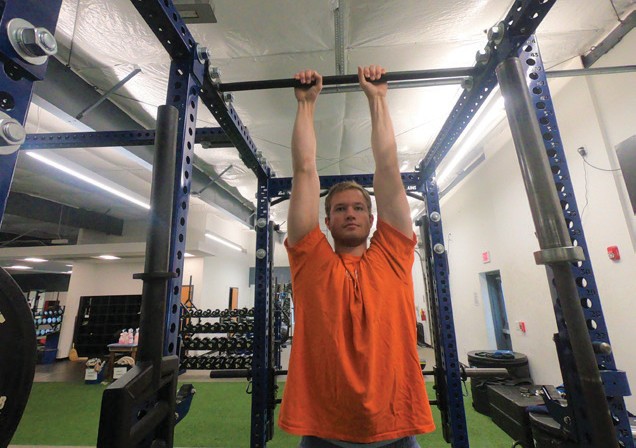
Close Grip
Using a narrower than shoulder width grip will utilize the lower latissimus dorsi with more help from the chest and biceps
Figure 6.204: Close Pull Up Grip
Towel Pull Up
Looping towels over the bar and grabbing the end using a neutral grip (palm facing in like you are shaking someone’s hand) will utilize the forearms more and help increase grip strength to a greater degree
Assisted Pull Up
Using a counterbalance system, band or spotter assistant makes the exercise easier by decreasing the resistance being worked against to allow the exercise to be performed properly
Inverted Row
A bar at a lower height can be used to allow the feet to touch the ground
The steeper the incline of the body, the more resistance is utilized
Match the proper body angle based on the strength needs of the exerciser, allowing proper execution of the exercise and loading of the muscles
Figure 6.179: Wide Pull Up Grip
Close Grip
Using a narrower than shoulder width grip will utilize the lower latissimus dorsi with more help from the chest and biceps
Towel Pull Up
Looping towels over the bar and grabbing the end using a neutral grip (palm facing in like you are shaking someone’s hand) will utilize the forearms more and help increase grip strength to a greater degree
Part 6 : Manual Resistance Exercises
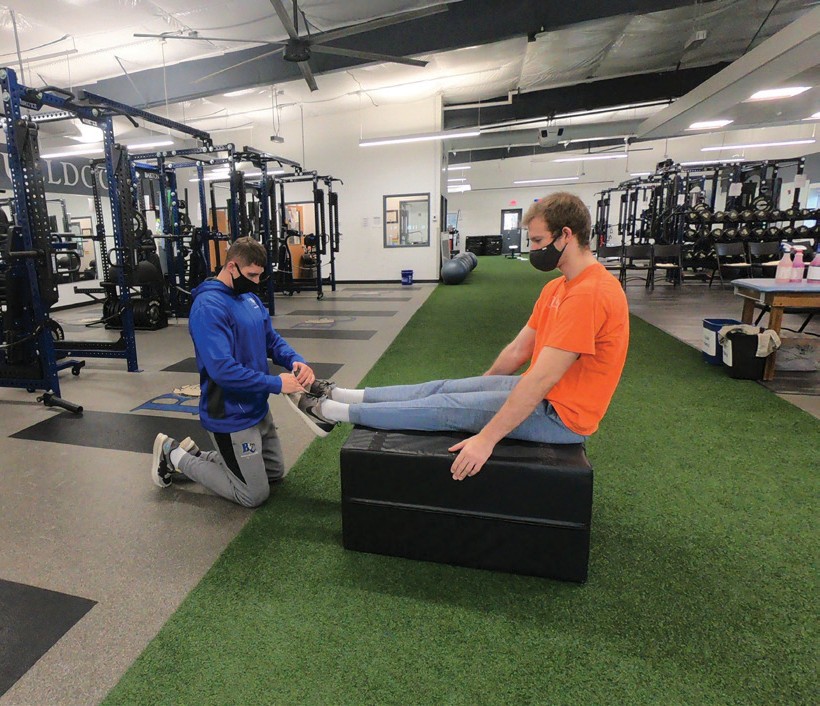
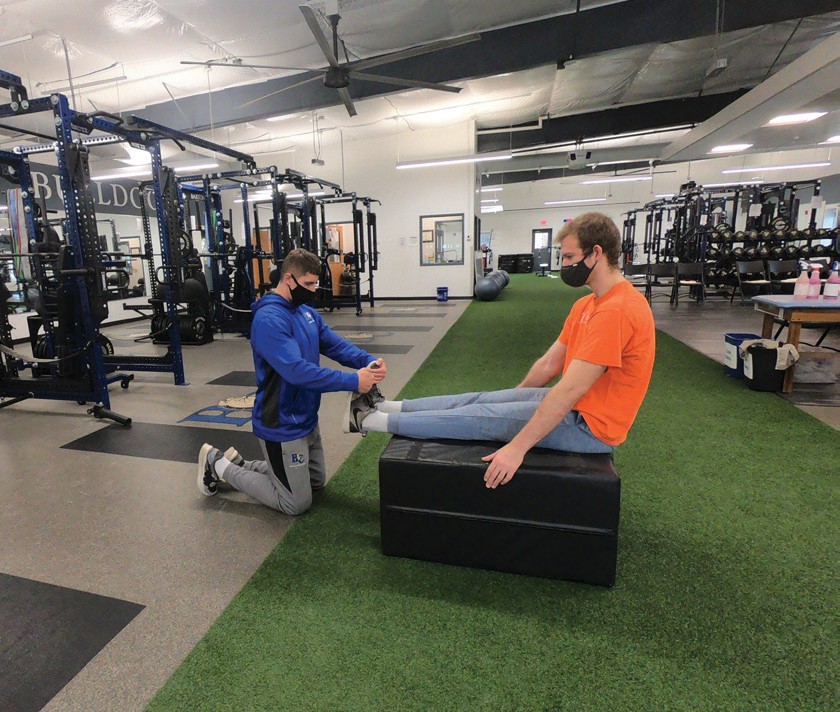
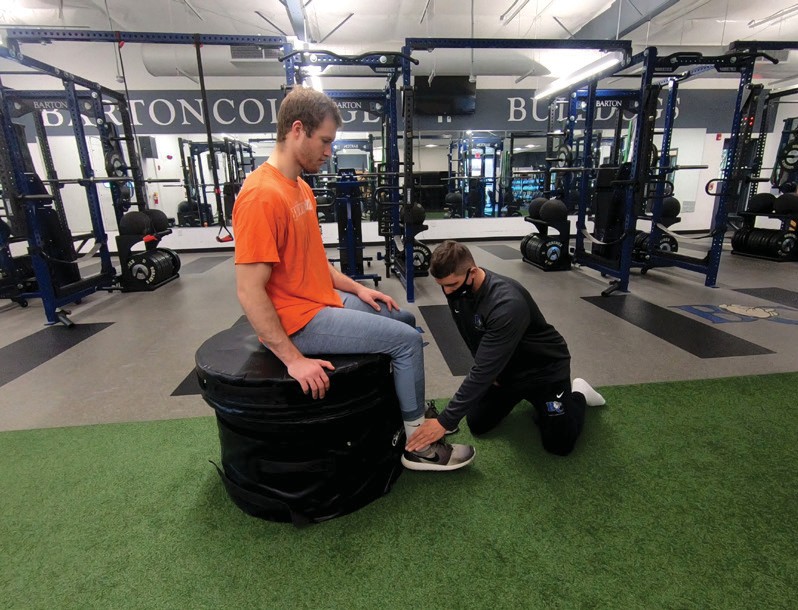
Resisted Ankle Dorsiflexion
Position the person performing the exercise with the leg outstretched, sitting on the ground or supported in some way.
The person supplying the resistance places one hand above the ankle to stabilize the leg so that movement only occurs at the ankle joint.
With the foot fully plantarflexed, place the other hand below the toes to provide resistance.
Provide steady resistance as the person exercising pulls their toes back towards their shin into a fully dorsiflexed position.
The person exercising and the person applying resistance must communicate properly to apply appropriate resistance.
Too much resistance and the foot cannot move; too little resistance and the muscle will not be overloaded.
Good communication is needed so that injury will not occur, movement should be slow and steady through the full range of motion.
Figure 6.179: Resisted Ankle Plantar Starting Position
Figure 6.179: Resisted Ankle Plantar Finishing Position
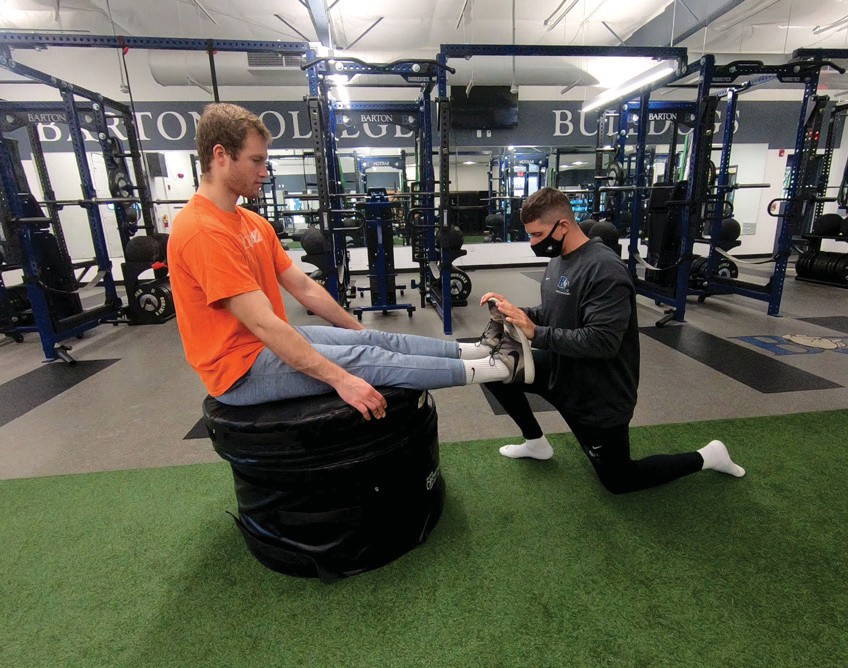
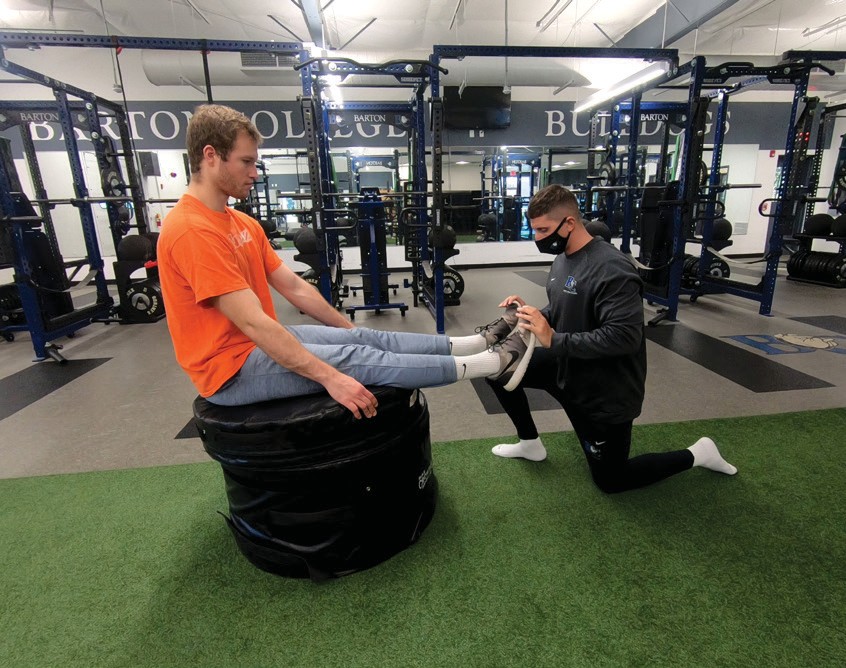
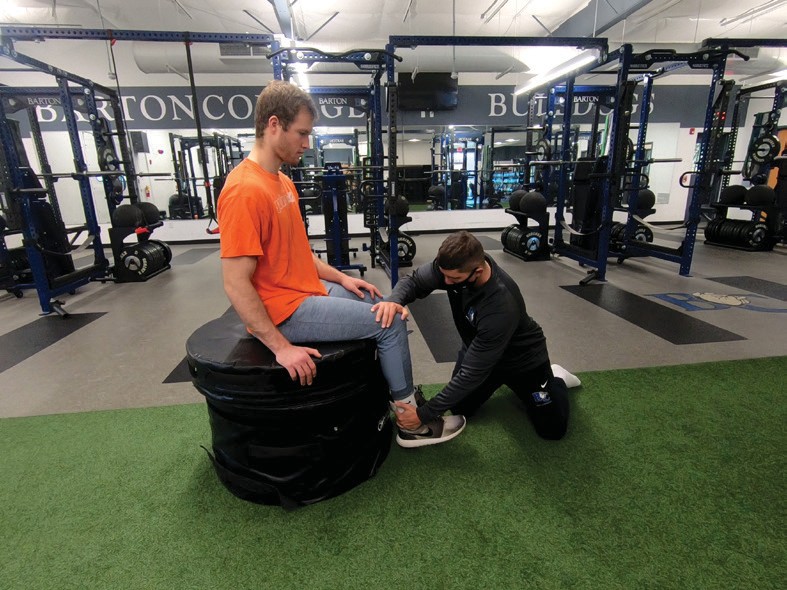
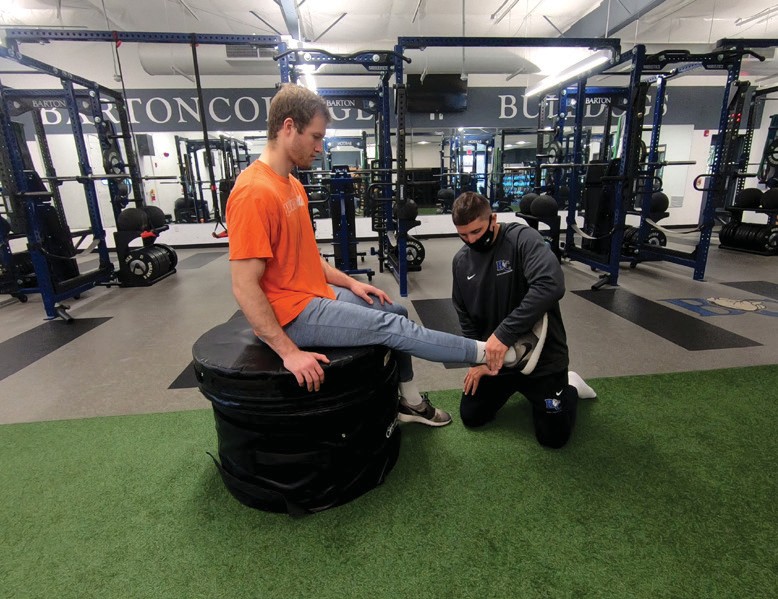
Resisted Ankle Plantar Flexion
Position the person performing the exercise with the leg outstretched, sitting on the ground or supported in some way.
The person supplying the resistance places one hand above the ankle to stabilize the leg so that movement only occurs at the ankle joint.
With the foot fully dorsiflexed, place the other hand on the ball of the foot to provide resistance.
Provide steady resistance as the person exercising extends their foot, pointing their toes towards their shin into a fully plantarflexed position.
The person exercising and the person applying resistance must communicate properly to apply appropriate resistance.
Too much resistance and the foot cannot move; too little resistance and the muscle will not be overloaded.
Good communication is needed so that injury will not occur. Movement should be slow and steady through the full range of motion.
Figure 6.179: Resisted Ankle Plantar Starting Position
Figure 6.179: Resisted Ankle Plantar Finishing Position
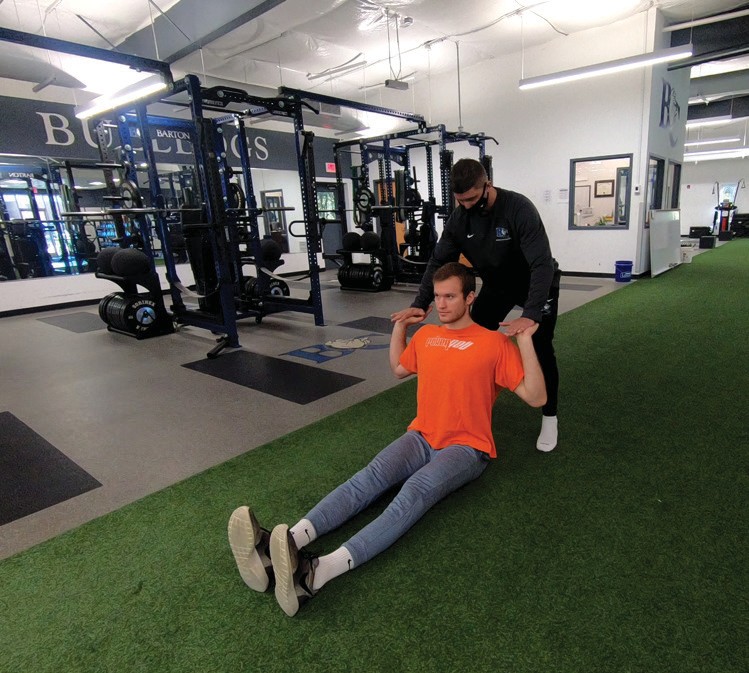
Resisted Hamstring Curl
Position the person performing the exercise on a chair with the bend of the knee against the end of the chair.
Two chairs can be stacked or an object like a towel can be placed behind the knee so that the foot stays above the floor.
The person supplying the resistance places one hand above the knee to stabilize the leg so that movement only occurs at the knee joint, with the person exercising extending the leg straight.
Place the other hand above the ankle on the Achilles tendon to provide resistance.
The hand is placed above the ankle to take pressure off the ankle joint while maximizing the axis of rotation.
Provide steady resistance as the person exercising flexes at the knee, as they pull their foot towards the ground.
The person exercising and the person applying resistance must communicate properly to apply appropriate resistance.
Too much resistance and the foot cannot move; too little resistance and the muscle will not be overloaded.
Good communication is needed so that injury will not occur. Movement should be slow and steady through the full range of motion.
Figure 6.179: Resisted Hamstring Curl Starting Position
Figure 6.179: Resisted Hamstring Curl Finishing Position
Resisted Leg Extension
Position the person performing the exercise on a chair with the bend of the knee against the end of the chair.
Two chairs can be stacked or an object like a towel can be placed behind the knee so that the foot stays above the floor.
The person supplying the resistance places one hand above the knee to stabilize the leg so that movement only occurs at the knee joint, with the person exercising letting the other leg relax.
Place the other hand above the ankle on bottom of the shin to provide resistance.
The hand is placed above the ankle to take pressure off the ankle joint while maximizing the axis of rotation.
Provide steady resistance as the person exercising extends at the knee, as they extend their leg to straighten the leg.
The person exercising and the person applying resistance must communicate properly to apply appropriate resistance.
Too much resistance and the foot cannot move; too little resistance and the muscle will not be overloaded.
Good communication is needed so that injury will not occur. Movement should be slow and steady through the full range of motion.
Figure 6.179: Resisted Leg Extension Starting Position
Figure 6.179: Resisted Leg Extension Finishing Position
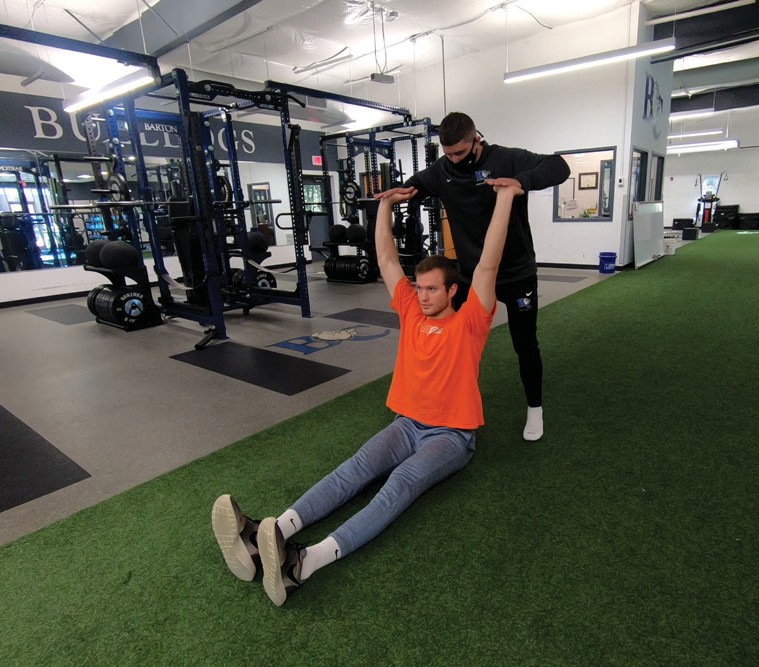
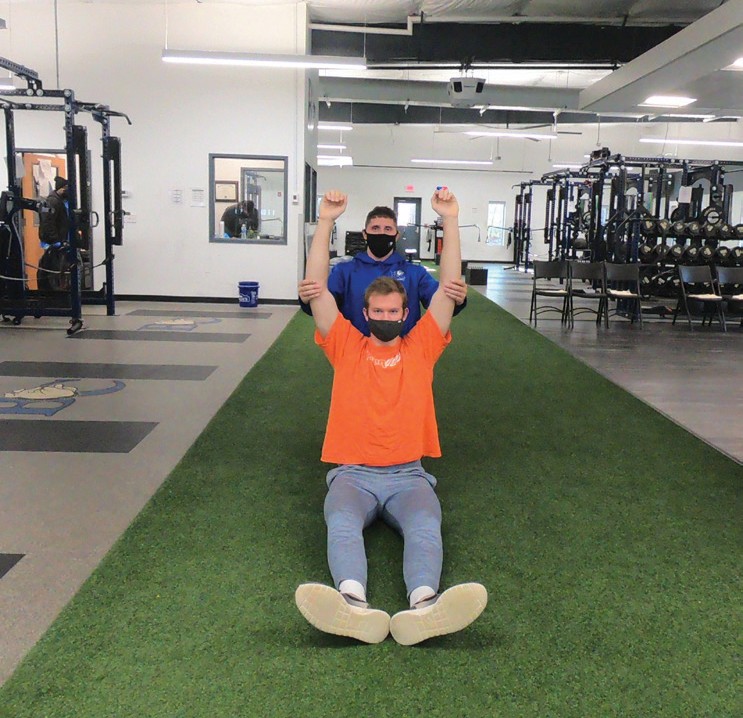
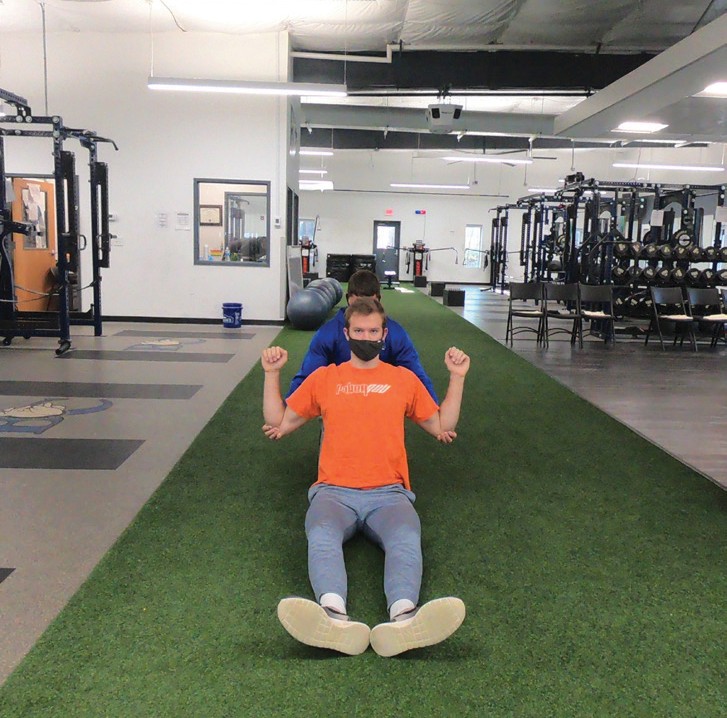
Resisted Shoulder Press
The person exercising can be sitting in a chair or sitting on the
If the person exercising is stronger, having them sit lower with the person providing resistance higher helps provide leverage for the person providing resistance (this allows the needed resistance to be delivered).
The person exercising should place their hands palm up, at shoulder
The person providing resistance puts their palms on the other person’s hands/palms and provides resistance as the exercises push up against
Provide steady resistance as the person exercising extends their arms over head, to an almost straight position.
Leaving a little bend in the elbows, or any joint being exercised, takes pressure off the joint and keeps the resistance on the targeted
The person exercising and the person applying resistance must communicate properly to apply appropriate resistance.
Too much resistance and the foot cannot move; too little resistance and the muscle will not be
Good communication is needed so that injury will not occur. Movement should be slow and steady through the full range of motion.
Figure 6.179: Resisted Shoulder Press Starting Position
Figure 6.179: Resisted Shoulder Press Finishing Position
Resisted Lat Pulldown
Start: Sitting with a natural arch in your back and slightly leaning back with your arms extended overhead.
Movement: Pull your elbows downwards until your elbows come down to your Pause momentarily and resist the negative to the starting position.
Spotting: Position one leg against the lifter’s back to add Grasp under the lifter’s elbows and appropriately apply pressure.
The person exercising and the person applying resistance must communicate properly to apply appropriate resistance.
Too much resistance and the foot cannot move; too little resistance and the muscle will not be overloaded.
Good communication is needed so that injury will not occur, movement should be slow and steady through the full range of motion.
Figure 6.179: Resisted Lat Pulldown Starting Position
Figure 6.179: Resisted Lat Pulldown Finishing Position
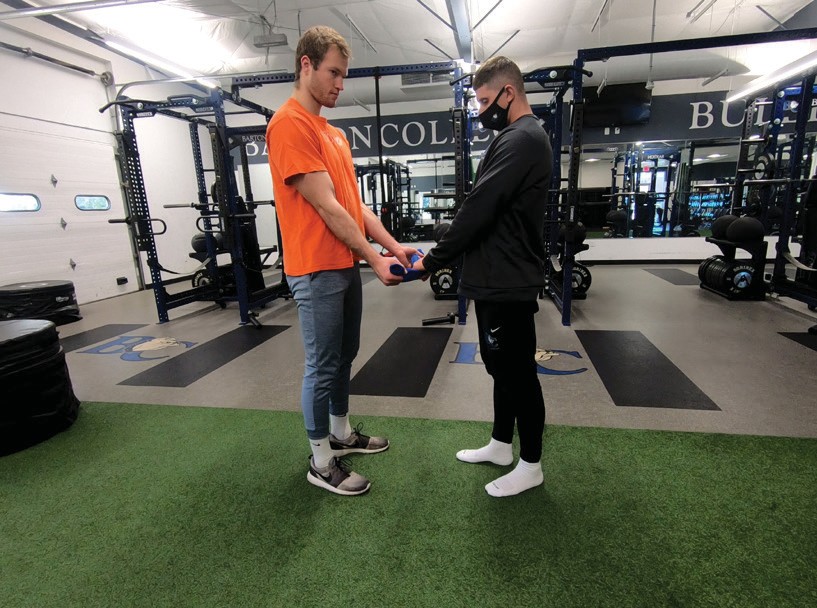
Resisted Towel Biceps Curl
Stand with feet shoulder width apart and knees slightly bent.
With an end of a short towel in each hand (palms up), start with arms extended at thigh height.
With a partner providing resistance from below, keep the elbows at the sides and flex biceps to pull the towel up to shoulder height.
The person exercising and the person applying resistance must communicate properly to apply appropriate resistance.
Too much resistance and the foot cannot move, too little resistance and the muscle will not be overloaded.
Good communication is needed so that injury will not Movement should be slow and steady through the full range of motion.
Figure 6.179: Resisted Towel Biceps Curl Starting Position
Figure 6.179: Resisted Towel Biceps Curl Finishing Position
Resisted Towel Triceps Extension
Stand with feet shoulder width apart and knees slightly bent.
With an end of a short towel in each hand (palms down), start with arms flexed and hands at chest height.
With a partner providing resistance from above, keep the elbows at the sides and extend triceps, pushing the towel down to hip/thigh height.
The person exercising and the person applying resistance must communicate properly to apply appropriate resistance.
Too much resistance and the foot cannot move; too little resistance and the muscle will not be overloaded.
Good communication is needed so that injury will not Movement should be slow and steady through the full range of motion.
Figure 6.179: Resisted Towel Triceps Extension Starting Position
Figure 6.179: Resisted Towel Triceps Extension Finishing Position
Part 7: Resistance Band Exercises
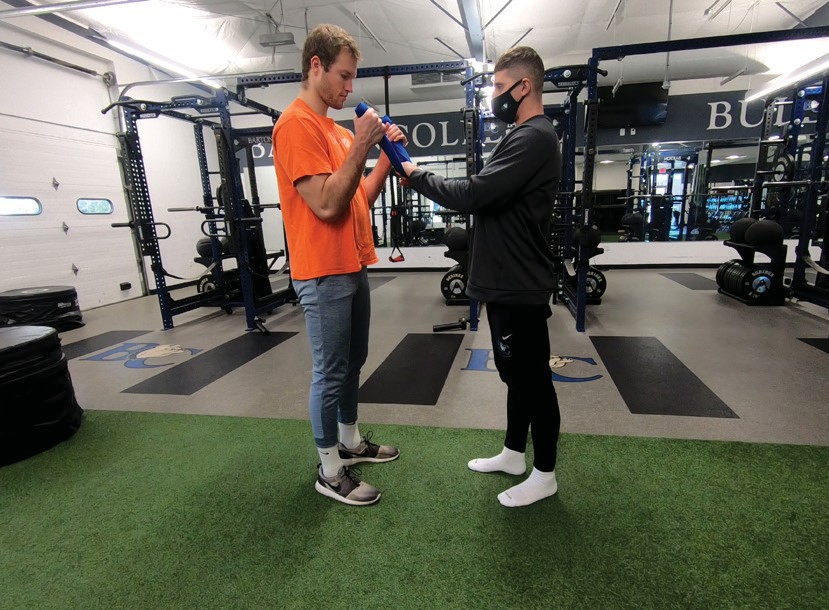
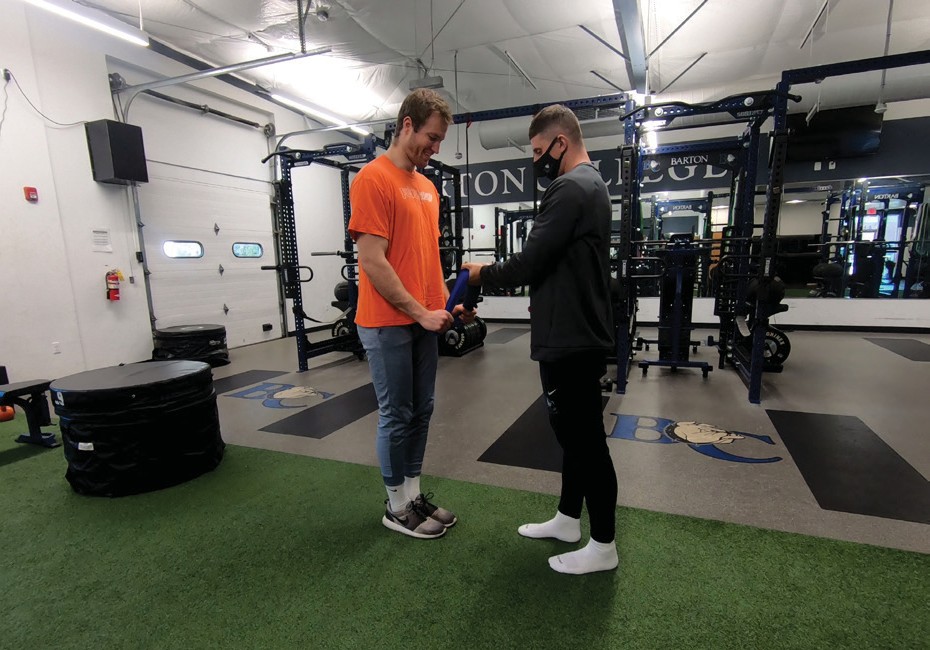
Fitness bands provide a self-contained source of resistance, referred to as dynamic progressive resistance, which does not rely on gravity or other external forces for resistance. To the body, and specifically the muscle, the source of the resistance is not as important. What is important is that the muscle is overloaded or pushed past its normal limits. Alter band resistance by using bands with different thickness. Thinner bands will have less resistance.
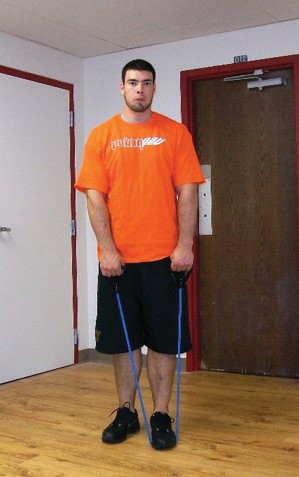
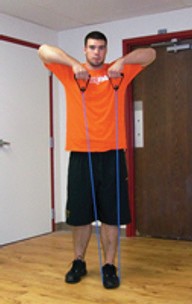
You can also change the resistance of the band by anchoring it narrower or wider. In these images anchoring with two feet makes the band shorter, providing more resistance.
Less Resistance
Figure 6.179: Resisted Towel Triceps Extension Starting Position
Figure 6.179: Resisted Towel Triceps Extension Finishing Position
More Resistance
Figure 6.179: Resisted Towel Triceps Extension Starting Position
Figure 6.179: Resisted Towel Triceps Extension Finishing Position
To maximize the workout and reduce the chance of injury when working with resistance bands:
Keep the upper body stable with movement occurring only at the shoulder and elbow joints when doing upper body resistance band exercises.
Maintain tension on tubing through a whole range of motion.
Do not let the pull of the tubing cause the elbows to lock out and shoulders to raise up at top of movement.
Exhale on exertion as you pull and inhale as you return to the starting position
Always perform movements in a steady, controlled manner.
Start in a kneeling position with arms extended, using an underhand close grip (hands about six inches apart).
Torso should be flexed forward (but more upright than with wide grip variation) so that upper body is at the same angle as the stretched tubing (the line from the anchor point through the hands and shoulders down through the hips should be straight).
Pull handles (maintaining width) to shoulder height leading with the elbows. Pause briefly, and then extend arms, keeping elbows slightly flexed, back to starting position.
Use an overhand grip slightly wider than shoulder width.
Torso should be flexed forward so that upper body is at the same angle as the stretched tubing (the line from the anchor point through the hands and shoulders down through the hips should be straight).
Pull handles (maintaining width) to shoulder height leading with the elbows. Pause briefly, and then extend arms, keeping elbows slightly flexed, back to starting position.
Video 5.1
Standing Row
Anchor Point: Middle
Primary Muscle Group: Latissimus Dorsi (Back)
Start with feet shoulder width apart and sit back into a high squat position (chest at anchor height) with arms extended using a shoulder-width, neutral
Torso should be upright and held stable throughout movement.
Pull handles back to just outside the chest, leading with the elbows. Pause briefly and then ex- tend arms, keeping elbows slightly flexed, back to starting position.
Video 5.1
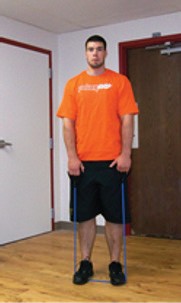
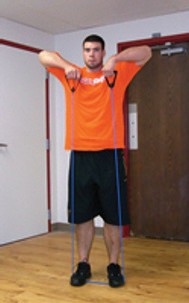
Upright Row
Anchor Point: Low
Primary Muscle Group: Trapezius (Upper Back)
Stand with the tube close to the body to allow the line of pull to be as straight upwards as possible.
Start in a standing position with knees slightly flexed and with hands placed in front of thighs using an overhand close grip (hands about six inches apart).
Body should remain stable throughout movement with knees slightly flexed (to take pressure off the lower back). Common error is using upper body or knee movement to create momentum.
Pull handles (maintaining width) to shoulder height, leading with the Pause briefly, and then extend arms down, keeping elbows slightly flexed, back to starting.
Video 5.1
Chest Press
Anchor Point: Middle
Primary Muscle Group: Chest Press: Pectoralis Major (Chest)
Start with feet staggered slightly, shoulder width apart and hands placed shoulder width apart at chest height. Let tubing sit under arms and grip handles with an overhand grip.
Press straight forward at chest height, extending arms just short of full Pause for a second and bring hands back to just outside the chest.
Do not lock out the elbows at the end of the press.
Keeping a slight bend in the elbows at the end of the pressing movement will take stress off the elbow joint and help prevent tendonitis.
Push back off of front foot to return to starting position.
Repeat, lunging forward with the opposite leg.
Chest Press/Lunge
Anchor Point: Middle
Primary Muscle Group: Lunge-Gluteus Maximus (Buttocks) and Quadriceps; Chest Press – Pectoralis Major (Chest)
Start with feet shoulder width apart and hands placed shoulder width apart at chest height. Let tubing sit under arms and grip handles with an overhand grip.
Take a large enough step forward with one leg so that the angles of the front and back leg are both 90 degrees.
When lunging, the optimal step places both knees at 90 degrees (front knee stays over mid foot to balls of feet).
Stepping too far will place the front knee over or behind the heel.
Stepping too short will allow the front knee to travel in front of toes.
Keep hands at chest height, hold lunging position while keeping back knee a couple inches off the ground.
Then press straight forward at chest height, extending arms just short of full Pause for a second and bring hands back to just outside the chest.
Maintain tension on tubing through whole range of motion. Do not let your back knee touch or rest on the ground.
Upper body should remain upright during lunge and remain stable throughout movement.
Push back off of the front foot to return to starting position.
Repeat, lunging forward with the opposite leg.
Video 5.1
Chest Fly
Anchor Point: High
Primary Muscle Group: Pectoralis Major (Chest)
Stand with feet shoulder width apart in a staggered stance (one foot in front of the other).
Flex at the hips, leaning chest forward and grip handles using an overhand grip with arms outstretched at chest height.
Body should remain stable throughout movement with knees slightly flexed (to take pressure off the lower back).
Pull handles together as you squeeze your chest and arms together, finishing with handles together out in front of your chest.
Pause briefly, then abduct arms, keeping elbows slightly flexed, back to starting position.
Due to tension, this can be a difficult movement; you may need to use lighter tubing or perform exercise one arm at a time.
Video 5.1
Lateral Raise
Anchor Point: Low
Primary Muscle Group: Middle Deltoid (Shoulders)
Stand with the tube close to the body to allow the line of pull to be as straight upwards as possible.
Start in a standing position with knees slightly flexed and hands facing in on the side of thighs using an overhand close grip.
Body should remain stable throughout movement with knees slightly flexed (to take pressure off the lower back).
Pull handles vertically raising/abducting the arms to shoulder height leading with the hands/wrist.
Movement should not go any higher than hands slightly above shoulders.
Common error is using upper body or knee movement to gain momentum.
Pause briefly, then lower arms down, keeping elbows slightly flexed, back to starting position.
Stand close to the machine with your back facing the machine and straddle the tubing.
Start in a standing position with knees slightly flexed and hands in front of thighs using an over- hand close grip (hands facing thighs).
Body should remain stable throughout movement with knees slightly flexed (to take pressure off the lower back).
Pull handles vertically, raising the arms to shoulder height, leading with the hands/wrists
Movement should not go any higher than hands slightly above shoulders.
Common error is using upper body or knee movement to gain momentum.
Pause briefly, then lower arms down, keeping elbows slightly flexed, back to starting position.
Triceps Pushdown
Anchor Point: High
Primary Muscle Group: Triceps
Start in a standing position with knees slightly flexed and with hands placed just above chest height using an overhand close grip with elbows firmly tucked in against sides.
Body should remain stable throughout movement with knees slightly flexed (to take pressure off the lower back).
Movement should not go any higher than the upper chest, do not let tension pull elbows up.
Push handles down just short of full extension, keeping elbows close to sides.
Keep elbows slightly flexed at the end of the movement to prevent elbow tendonitis.
Common errors are using upper body or knee movement to gain momentum and letting the elbows flare out from the body, which takes pressure off of triceps.
Do not lean forward and let the chest muscle be involved in the movement.
Pause briefly, then raise hands back to starting position
Variation:
Same movement using an underhanded grip will place more emphasis on the lateral head of the triceps.
Rope Grip Triceps Pushdown
Anchor Point: High
Primary Muscle Group: Triceps (lateral head of triceps)
Stand close to the machine facing the machine.
Start in a standing position with knees slightly flexed, feet shoulder-width apart, with hands placed just above chest height using a neutral close grip (hands facing in like you are holding a rope) with elbows firmly tucked in against sides.
Body should remain stable throughout movement with knees slightly flexed (to take pressure off the lower back).
Push handles down just short of full extension, keeping elbows close to sides.
To accentuate using the lateral head of the triceps, spread hands to the outside of legs at the end of movement.
Keep elbows slightly flexed at the end of the movement to prevent elbow tendonitis.
Pause briefly, then raise hands back to starting position.
Movement should not go any higher than the upper chest, do not let tension pull elbows up.
Common errors are using upper body or knee movement to gain momentum and letting the elbows flare out from the body which takes pressure off of triceps. Do not lean forward and let the chest muscle be involved in the movement.
Exhale on exertion as you push down and inhale as you return to the starting position.
Always perform movements in a steady, controlled manner.
Overhead Triceps Extension
Anchor Point: High
Primary Muscle Group: Triceps
Technique:
Start in a standing position with knees slightly flexed, in a staggered stance–one foot in front of the other–with hands placed outside your ears using an overhand close grip, and with elbows in tight over shoulders.
Upper body should lean forward slightly and the body should remain stable throughout movement with knees slightly flexed (to take pressure off the lower back).
Push handles forward just short of full extension, keeping elbows in Pause briefly, then return hands back to starting position
Training Tips:
Upper body should remain stable with movement occurring only at the elbow joint. Maintain tension on tubing through the entire range of motion. Always keep elbows slightly flexed at the end of the movement to prevent elbow tendonitis. Do not let tension pull elbows up.
Common error is letting the elbows flare out which takes pressure off of the triceps. Do not let the upper body be involved; isolate movement to the elbow joint only.
Exhale on exertion as you press forward and inhale as you return to the starting position.
Always perform movements in a steady, controlled manner.
Biceps Curl
Anchor Point: Low
Primary Muscle Group: Biceps
Technique:
Start in a standing position with knees slightly flexed, with feet shoulder-width apart and arms extended with hands to the side of your thighs shoulder width apart using an underhand grip.
Upper body should remain upright and stable throughout movement with knees slightly flexed (to take pressure off the lower back).
Pull handles up to shoulder height, flexing only at the elbow joint (keeping elbows steady and in tight throughout movement).
Pause briefly, then return hands back down to starting position.
Training Tips:
Upper body should remain stable with movement occurring only at the elbow joint.
Maintain tension on tubing through entire range of motion.
Always keep elbows slightly flexed at the beginning of the movement to prevent elbow tendonitis.
Do not let elbows pull up or outwards.
Do not let the lower body be involved to create momentum; isolate movement to the elbow joint only:
Exhale on exertion as you pull up and inhale as you return to the starting position.
Always perform movements in a steady, controlled manner.
Variation:
Same movement using overhand grip (reverse curl) will place more emphasis on the forearms.
After completing the biceps curl with hands at shoulder height, sit back into a squatting position.
To perform the squat, keep your chest up and head facing straight ahead, bend your knees and hips as if you are sitting back into a chair.
Lower your hips until your upper thigh is parallel to the floor (knees should be at about 90 degrees).
Keep your chest up, leaning forward slightly and stick your hips back as you squat in order to keep your balance and not fall back.
Shifting hips back will also allow your knees to remain over your toes in a safe position.
After squatting down to 90 degrees, pause and then extend knees and hips to return to a standing position.
Training Tips:
Upper body should remain stable during the squat and not lean forward excessively.
To keep the knees safe, don’t let knees track out in front of toes.
When performed properly, balls of feet, knees, and shoulders should be in alignment at bottom of the squat.
Do not let knees drift inward while squatting.
Maintain slight knee bend when squat is completed.
Exhale on exertion as you stand up and inhale as you squat down.
Always perform movements in a steady, controlled manner.
Exhale on exertion as you stand up and inhale as you squat down.
Video 5.1
Hammer Curl
Anchor Point: Low
Primary Muscle Group: Biceps with added emphasis on the Brachioradialis
Technique:
Start in a standing position with knees slightly flexed, with feet shoulder width apart and arms extended with hands to the side of your thighs shoulder width apart using a neutral grip with palms facing in.
Upper body should remain upright and stable throughout movement with knees slightly flexed (to take pressure off the lower back).
Pull handles up to shoulder height, flexing only at the elbow joint (keeping elbows steady and in tight throughout movement).
Pause briefly, then return hands back down to starting position.
Training Tips:
Upper body should remain stable, with movement occurring only at the elbow joint. Maintain tension on tubing through the entire range of motion. Always keep elbows slightly flexed at the beginning of the movement to prevent elbow Do not let elbows pull up or outwards.
Hammer curl hand grip places more emphasis on the Do not let the lower body be involved to create momentum, isolate movement to the elbow joint only.
Exhale on exertion as you pull up and inhale as you return to the starting position.
Always perform movements in a steady, controlled manner.
Hammer Curl/Resisted Squats
Anchor Point: Low
Primary Muscle Group: Biceps Curl: Biceps and Brachioradialis; Squats: Gluteus Maximus & Medius (Buttocks), Quadriceps
Technique:
After completing the hammer curl with hands at shoulder height, sit back into a squatting position.
To perform the squat, keep your chest up and head facing straight ahead, bend your knees and hips as if you are sitting back into a chair.
Lower your hips until your upper thigh is parallel to the floor (knees should be at about 90 degrees).
Keep your chest up, leaning forward slightly and stick your hips back as you squat in order to keep your balance and not fall back.
Shifting hips back will also allow your knees to remain over your toes in a safe position.
After squatting down to 90 degrees, pause and then extend knees and hips to return to a standing position.
Training Tips:
Upper body should remain stable during the squat and not lean forward excessively.
To keep the knee safe, don’t let knees track out in front of toes.
When performed properly, balls of feet, knees, and shoulders should be in alignment at the bot- tom of the squat.
Do not let knees drift inward during Maintain slight knee bend when squat is completed.
Exhale on exertion as you stand up and inhale as you squat down.
Always perform movements in a steady, controlled manner.
Resisted Squats
Anchor Point: Low
Primary Muscle Group: Squats: Gluteus Maximus & Medius (Buttocks), Quadriceps
Technique:
With hands at shoulder height and tension on the tubing, sit back into a squatting position.
To perform the squat, keep your chest up and head facing straight ahead, bend your knees and hips as if you are sitting back into a chair.
Lower your hips until your upper thigh is parallel to the floor (knees should be at about 90 degrees).
Keep your chest up, leaning forward slightly and stick your hips back as you squat in order to keep your balance and not fall back.
Shifting hips back will also allow your knees to remain over your toes in a safe position.
After squatting down to 90 degrees pause and then extend knees and hips to return to a standing position.
Training Tips:
Upper body should remain stable during the squat and not lean forward excessively.
To keep the knee safe, don’t let knees track out in front of toes.
When performed properly, balls of feet, knees, and shoulders should be in alignment at the bot- tom of the squat.
Do not let knees drift inward during squatting.
Maintain slight knee bend when squat is completed.
Exhale on exertion as you stand up and inhale as you squat down.
Always perform movements in a steady, controlled manner.
Resisted Crunch
Anchor Point: Middle / High
Primary Muscle Group: Rectus Abdominis (Abdomen)
Technique:
Start in a kneeling position, holding handles slightly in front of shoulders.
Begin with the upper body in a straight position with shoulders, hips and knees in line.
Roll or curl your spine, pulling your chest towards your hips as you flex your abdominal muscles.
This “crunch” movement does not require a large movement. You just want to move far enough to feel the abdominal muscles fully engage as they flex.
Then extend back up to your starting position.
Training Tips:
Hips and knees should remain relatively stable, with movement occurring only from the contraction of the abdominal muscles. Slight movement may occur at the hips due to the abdominals’ relationship to the hip flexors.
Maintain tension on tubing through the entire movement.
Common error is having too much movement at the knees and hips, which takes the emphasis off the If too much movement is happening with the knees and hips, then shift hips back slightly (sitting back on heels a little) to take the hip flexors out of the movement.
Exhale on exertion as you curl/crunch forward and inhale as you return to the starting movement.
Always perform movements in a steady, controlled manner.
One Arm Rotational Row
Anchor Point: Middle
Primary Muscle Group: Torso & Hip Rotators, Abdominals, Latissimus Dorsi
Technique:
Start standing perpendicular to the attachment with knees slightly bent and reach across body with your arm farthest away, grabbing the handle at chest height.
Pull the band handle across your body to where your hand is outside the hip of the arm you are pulling with, then rotate your feet and hips 90 degrees.
Then rotate back to the starting position.
Repeat movement with the other side.
Training Tips:
Upper body should remain stable, with initial pull using the back and arms and the rest of the movement should come from the rotating of the hips and feet.
Maintain tension on tubing through the entire movement.
Inside arm can be used to generate force by swinging the arm over the tube as you rotate.
Be sure to allow the feet to naturally rotate on the balls of your feet with the hips.
Keeping the feet stationary while twisting with the hip will place too much strain on the knees.
Starting position should be perpendicular to the attachment and in the finishing position, you should be facing away from the attachment site.
Exhale on exertion as you pull and rotate, and inhale as you return to the starting position.
Always perform movements in a steady, controlled manner.
Start standing perpendicular to the attachment with knees slightly bent and reach across the body with both hands grabbing the handle at chest height.
Pull the band as you rotate your hips and feet 90 As you finish rotating your hips and feet, extend your arms out in front like you are chopping wood with an ax.
Then rotate back to the starting position.
Repeat movement with the other side.
Training Tips:
Upper body should remain stable with initial pull using the back and arms. Continue the momentum as you rotate the hips and feet, and then use the chest and arms as you extend your hands forward.
Maintain tension on tubing through the entire movement.
With such a long movement, holding both ends of the tube can provide a lot of tension. If less tension is needed, anchor one end of the tube on the machine and pull on just one end.
Be sure to allow the feet to naturally rotate on the balls of your feet with the hips.
Keeping the feet stationary while twisting with the hip will place too much strain on the knees.
Starting position should be perpendicular to the attachment and in the finishing position, you should be facing away from the attachment site.
Exhale on exertion as you pull and rotate, and inhale as you return to the starting position.
Always perform movements in a steady, controlled manner.
Start standing perpendicular to the attachment with knees slightly bent and reach up and across your body with both hands grabbing the handle slightly higher than your head.
Pull the band down on an angle as you rotate your hips and feet 90 As you finish rotating your hips and feet, extend your arms out in front maintaining the same angle as the initial pull down, like you are chopping wood with an ax.
Then rotate back up to the starting position.
Repeat movement with the other side.
Training Tips:
Upper body should remain stable with initial pull down using the back and arms. Continue the momentum as you rotate the hips and feet and then use the chest and arms as you extend your hands down and forward.
Maintain tension on tubing through the entire movement.
With such a long movement, holding both ends of the tube can provide a lot of tension. If less tension is needed, anchor one end of the tube on the machine and pull on just one end.
Be sure to allow the feet to naturally rotate on the balls of your feet with the Keeping the feet stationary while twisting with the hip will place too much strain on the knees.
Starting position should be perpendicular to the attachment and in the finishing position you should be facing away from the attachment site.
Exhale on exertion as you pull and rotate, and inhale as you return to the starting position.
Always perform movements in a steady, controlled manner.
Start standing perpendicular to the attachment with knees slightly bent and reach up and across the body with both hands grabbing the handle below hip height.
Pull the band up on an angle as you rotate your hips and feet 90 degrees. As you finish rotating your hips and feet, extend your arms out in front maintaining the same angle as the initial pull up, like you are chopping wood with an ax.
Then rotate back up to the starting position.
Repeat movement with the other side.
Training Tips:
Upper body should remain stable with initial pull up using the back and arms. Continue the momentum as you rotate the hips and feet and then use the chest and arms as you extend your hands up and forward.
Maintain tension on tubing through the entire movement.
With such a long movement, holding both ends of the tube can provide a lot of tension. If less tension is needed, anchor one end of the tube on the machine and pull on just one end.
Be sure to allow the feet to naturally rotate on the balls of your feet with the hips.
Keeping the feet stationary while twisting with the hip will place too much strain on the knees.
Starting position should be perpendicular to the attachment and in the finishing position you should be facing away from the attachment site.
Exhale on exertion as you pull and rotate and inhale as you return to the starting position.
Always perform movements in a steady, controlled manner.
Internal Rotation
Tubing should be placed at elbow height.
Using an adequate resistance, step far enough from the anchor so that tube is tight without slack.
Holding elbow steady at your side, start with your hand reaching out while your elbow is bent at 90 degrees.
Keeping elbow stationary, internally rotate your shoulder to pull the cable or tube across your body.
Externally rotate your shoulder to return to starting position.
External Rotation
Tubing should be placed at elbow height.
Using an adequate resistance, step far enough from the anchor so that the tube is tight without slack.
Holding elbow steady at your side, start with your hand across your body while your elbow is bent at 90 degrees.
Keeping elbow stationary, externally rotate your shoulder to pull the cable or tube across your body until your hand is extended away from your body.
Internally rotate your shoulder to return to starting position.
Part 8: Suspension Training Techniques
Suspension Training Basics
Body position and the base used can influence the difficulty of the exercise. Changing positioning is a great way to vary the intensity of suspension exercises and allows individuals at different strength and fitness levels to modify exercises to suit their needs and abilities. When combining vibration with suspension training, making the exercise more difficult intensifies the vibration effect on the targeted muscles.
Body Angle
When standing, changing the angle of your body changes the amount of body weight (resistance) that is used in the exercise. For pulling exercises, standing with feet farther away from the point where the suspension ropes are anchored (standing up straighter) lessens the resistance used, making the exercise easier. Placing the feet closer in line with the anchor point and leaning farther back increases the resistance used, making the exercise harder.
For pressing exercises, placing your feet closer to the anchor point and using a shorter strap/rope length (standing up straighter) will lessen the resistance used, making the exercise easier. By extending the strap/rope length and placing your feet farther away from the anchor point, you increase your body angle, increasing the resistance used and making the exercise harder.
Changing the Base of Support
Base Width
A second way to modify the difficulty of a suspension exercise is changing your base of support. Placing your feet apart and widening your base makes you more stable and lessens the difficulty of the exercise. To make the exercise more difficult, you can lessen your stability by bringing your feet together. The exercise can be progressed even further by balancing on one foot instead of two. This increases the instability, making the exercise much harder to perform. The less stable you are, the more muscles and balance you need to use in performing the exercise.
Length of Stance
Similar to changing the width of your stance, changing the length of your stance also changes your stability. Performing exercises with a stagger stance provides more stability, making the exercise less difficult. As you shorten the distance your feet are staggered, you become less stable, increasing the difficulty of the exercise. Having feet together is the most difficult form of this modification.
Changing Starting Position (Floor Exercises)
Lining up your feet directly under the anchor point lessens the amount of body weight resistance you use, making the exercise easier to perform. The farther away your feet are positioned from the anchor point, the more body weight resistance you use, which makes the exercise more difficult.
Changing Your Center of Gravity (Floor Exercises)
Floor exercises, such as planks, can be made easier or harder depending on your center of gravity. Exercises are easier to perform when you support your body with your forearms. When you support the weight of your body on your hands, you are less stable, which increases the difficulty of the exercise.
Single Handle Configuration
You can change the two handles into one handle by aligning the two handles with one hand above the other. Feed the bottom handle through the triangle of the top handle and then take the handle that is now on the bottom and feed it through the triangle on the top handle. Tug on the handles to tighten the two together and to make sure the handles are adjusted correctly.
Suspension Stretching Exercises
Static passive exercises place a muscle in an extended static stretching position.
Quad Stretch
Targeted Muscle: Quadriceps (front of thigh)
Attachment: Foot/ankle
Put the toe of one foot into one of the handles so the handle rests against the front of your ankle joint.
Shorten the suspension strap/rope so your foot is elevated with your flexed knee pointing downward and your heel closer to hip height (or as high as comfortable).
You may want to hold the other strap/rope or the machine to balance yourself.
Bend the knee of your standing leg to lower your hips, feeling a stretch in your quadriceps (front of thigh).
The more you bend the standing knee, the more you will feel the stretch.
Do not stretch to the point of feeling discomfort or pain. If you feel any pain, immediately release the stretch. Hold a comfortable stretch for 20 to 30 seconds.
Chest Stretch
Targeted Muscle: Pectoralis major (chest)
Secondary Muscle: Deltoids (shoulder)
Attachment: Handles
Stand with the suspension anchor point behind you and lift your arms to shoulder height with your palms facing forward.
Step forward and stop when you feel a stretch through your chest.
To accentuate the stretch, lean your weight forward more.
Do not stretch to the point of feeling discomfort or pain.
If you feel any pain, immediately release the stretch. Hold a comfortable stretch for 20 to 30 seconds.
Shoulder Stretch
Targeted Muscle: Deltoids (shoulder)
Attachment: Handles
Stand with the suspension anchor point behind you and lift your arms to shoulder height, reaching straight ahead.
Raise your arms straight up as you step forward with one leg.
With your hands directly over your head and your palms facing forward, lean your body forward to initiate a stretch in your shoulders.
Do not stretch to the point of feeling discomfort or If you feel any pain, immediately release the stretch.
Hold a comfortable stretch for 20 to 30 seconds.
Lat Stretch
Targeted Muscle: Latissimus dorsi (back)
Attachment: Handles
Stand facing toward the anchor point and step back until your arms are fully extended in front of your chest and the straps/ropes have no slack.
With your feet shoulder-width apart, bend your knees as you shift your weight back like you are sitting in a chair.
Let the straps/ropes pull at your arms as you feel the muscles stretching across your back.
Do not stretch to the point of feeling discomfort or pain.
If you feel any pain, immediately release the stretch. Hold a comfortable stretch for 20 to 30 seconds.
Suspension Stretching Exercises
Suspension Push Up
Facing away from the anchor point, lean your body forward with a staggered stance and lower your chest toward your hands like you are doing a push up.
Perform a push-up but lower your chest to the height of your hands and press up to just short of fully extending the arms.
Having the hands slightly higher than during a standard push up (more toward the shoulders) will help direct the straps/ropes out of your way.
Perform the exercise in a slow, controlled manner.
Increasing the body angle, narrowing the stance or using a one-foot stance will make the exercise more difficult.
Chest Fly
Facing away from the anchor point, lean your body forward.
Starting with your hands extended straight in front of you with your palms facing together, lower your body as you horizontally abduct (widen out) your arms at shoulder height, keeping your elbows almost completely straight.
Perform a chest fly by lowering yourself by fully abducting your arms to be even with your shoulders and then horizontally adduct the arms together back to the starting point.
Try to maintain the same arm angle (slight elbow bend) throughout the whole exercise.
Perform the exercise in a slow, controlled manner.
Increasing the body angle, narrowing the stance or using a one-foot stance will make the exercise more difficult.
Row
Facing the anchor point with your feet staggered and shoulder width apart, start with your hands even with your chest and lean your weight back as you extend your arms.
When performing the row, lower your body by extending your arms fully and then pull your body up until your hands are even with your chest.
Perform the exercise in a slow, controlled manner.
Increasing the body angle, narrowing the stance or using a one-foot stance will make the exercise more difficult.
One-Arm Row
The one-arm row is a more advanced version of the basic row.
Using just one arm increases the resistance, which increases the challenge to the body. The one-arm row utilizes the single-handle configuration.
To set up the single-handle configuration, refer to the one handle configuration instructions earlier in this chapter (see Insert figure 3-12).
Facing the anchor point with your feet staggered and shoulder width apart, start with your hands even with your chest and lean your weight back as you extend your arms.
When performing the row, lower your body by extending your arms fully and then pull your body up until your hands are even with your chest.
Perform the exercise in a slow, controlled manner.
Increasing the body angle, narrowing the stance or using a one-foot stance will make the exercise more difficult.
Dip
Standing under the anchor point with your arms at your side and your palms facing in, hold the handles just outside your shoulders (adjust the strap/rope so the handles are below your hips).
Walk your feet slightly forward or back (placing your feet behind you may be more comfortable for your shoulders), shifting the remainder of your body weight on the handles.
Dips are performed by lowering your hips as you bend your elbows to a 90 degree angle and then pressing your body back up to the starting position.
To keep pressure on the triceps, keep the elbows in Do not let the elbows flare out to the sides.
Perform the exercise in a slow, controlled manner.
The farther you place your feet in front or behind your hips, the more body weight resistance you will use.
Triceps Extension
Standing under the anchor point, extend your arms out at head height.
Lean your body forward so the straps/ropes are taut.
To perform the full triceps extension, keep your hand position stable and lower your body as you bend your elbows, so your hands are even with your forehead and then push your body back to the starting position by extending your arms. To keep pressure on the triceps, keep the elbows in tight.
Do not let the elbows flare out to the sides.
Perform the exercise in a slow, controlled manner.
Increasing the body angle, narrowing the stance or using a one-foot stance will make the exercise more difficult.
Biceps Curl
Facing the anchor point with your feet staggered and shoulder-width apart, start with your hands even with your chest and lean your weight back as you extend your arms. With your palms facing up, flex your elbows, bringing your hands to your chin as you pull your body up.
Then, extend your arms as you lower your body back to the starting position.
To keep pressure on the biceps, keep the elbows in tight.
Do not let the elbows flare out to the sides.
Perform the exercise in a slow, controlled manner.
Increasing the body angle, narrowing the stance or using a one-foot stance will make the exercise more difficult.
Utilizing the Handles for Core and Lower-Body Movements
Heels in the Handles (Exercises Facing Upward)
Extend the straps/ropes to about 8 inches off the ground. Sitting close to the handles and facing the straps/ropes, steady the handles with your hands and then roll back slightly, bringing your knees to your chest, and place your heels into the handles. (Some handles may have an additional loop below the hand grips for your heels.) As you lay back, push your heels down into the handles and extend your legs.
Toes in the Handles (Exercises Facing Downward)
Extend the straps/ropes to about 8 inches off the ground. Sitting close to the handles and facing the straps/ropes, grab the right handle with your right hand and cross your left foot over the top of your right leg, putting your left toes into the handle. (Some handles may have an additional loop below the hand grips for your toes/heels). Then, place your right toes in the left handle. Roll over, bringing your left shoulder over the top. Let your feet rotate in the handles as you rotate into the plank position. Your feet should now be positioned so the tops of your feet are resting against the handles.
Front Plank
Targeted Muscle: Abdominals
Attachment: Foot/ankle
Extend the straps/ropes to about 8 inches off the ground.
Position your toes in the handles as described at the beginning of the core/lower-body section.
Start out in the resting position with your knees and forearms resting on the ground.
Consciously think about keeping your abdominal muscles tight while keeping good posture, maintaining a straight line from your ankles through your hips to your shoulders.
To make the exercise more difficult, perform the exercise on your hands with your arms extended instead of on your forearms.
Side Plank
Targeted Muscle: Obliques (side abdominals)
Attachment: Foot/ankle
Extend the straps/ropes to about 8 inches off the ground. Position your toes in the handles as described at the beginning of the core/lower-body section.
Start in the resting position turned to one side with your hip resting on the ground and with your feet offset (top leg forward) and your body resting on your forearms.
Engage your oblique muscles by lifting your hip up in the air, maintaining a straight line through the center of your Keep your body stable, resting your top hand on your hip.
To make the exercise tougher, raise your top arm straight in the air.
To further increase the intensity of the exercise, balance on one hand with an arm extended in- stead of resting your weight on your forearms.
The most difficult variation involves balancing on your straight arm and extending your top arm straight up in the air.
Perform this exercise equally on both sides.
Glute Bridge
Targeted Muscle: Gluteus maximus
Attachment: Foot/ankle
Extend the straps/ropes to about 8 inches off the ground.
Position your heels in the handles as described at the beginning of the core/lower-body section.
Start in the resting position with your knees bent at 90 degrees and lying with your hips and back on the ground.
With feet suspended and knees bent, lift your hips off the ground.
Think about tightening your abdominals and gluteus maximus as you maintain a straight line from your shoulders through your hips to your knees.
Pike-Ups
Targeted Muscle: Abdominals
Attachment: Foot/ankle
To perform the pike-up, start in the front plank resting position on your knees with your arms extended and your hands on the ground.
Lift your knees up into the extended arm front plank position and execute the pike by raising your hips up while keeping your legs straight.
Your hips will rise up higher as your feet move closer toward your hands.
Pause for a second or two at the top of the pike (where your hips are at their highest point) and then slowly in a controlled manner lower your hips while keeping your legs straight to the arms extended front plank starting position.
Squat
Stand with your arms extended, with your feet placed shoulder width apart and holding the handles for balance.
To perform the squat, keep your chest up and your head facing straight ahead.
Bend your knees and hips as if you are sitting back into a chair.
Lower your hips until your upper thigh is parallel to the floor (knees should be at about 90 degrees).
Keep your chest up, leaning forward slightly, and stick your hips back as you squat to keep your balance and not fall back.
Shifting your hips back will also allow your knees to remain over your toes in a safe position.
After squatting down to 90 degrees, pause and then extend your knees and hips to return to a standing position.
Single-leg Squat
Stand with your arms extended, with your feet placed shoulder-width apart and holding the handles for balance.
To perform the single-leg squat, keep your chest up and your head facing straight ahead.
Straighten one leg out in front and bend the knee and hip of the stance leg as if you are sitting back into a chair.
Lower your hip until your upper thigh is parallel to the floor (knee should be at about 90- degrees).
Keep your chest up, leaning forward slightly, and stick your hips back as you squat to keep your balance and not fall back.
Shifting your hips back will also allow your knees to remain over your toes in a safe position.
After squatting down to 90 degrees, pause and then extend your knee and hip to return to a standing position.
Rear Elevated Split Squat
Attachment: Foot/ankle
Extend the straps/ropes to a comfortable position off the ground for the rear leg.
Position your toes in the handles as described at the beginning of the core/lower-body section.
With the rear leg supported in the handle, position the front foot far enough forward that, when the back leg is lowered to the floor, the front knee does not extend out in front of the toes.
Bending the front knee, drop the hips straight down into 90-degree bend of both front and back legs.
Push up on the front leg, extending the knees and hips back to the starting position.
If needed, something like a wooden dowel can be used for balance, just be sure to keep the emphasis on the leg muscle.
Knees to Elbows
Targeted Muscle: Hip flexors/abdominals
Attachment: Foot/ankle
Extend the straps/ropes to about 8 inches off the ground.
Position your toes in the handles as described at the beginning of the core/lower-body section.
Start out in the resting position similar to the front plank, with your knees and your forearms on the ground.
Lift your knees off the ground and then bend your knees, bringing your knees forward toward your elbows, tucking your knees to your chest.
Then, extend your legs out straight into the front plank position.
Keep your abdominals tight as you tuck your knees forward and then extend your legs out straight in a slow, controlled manner.
To make the exercise more difficult, start from your hands with your arms extended instead of from your forearms.
Twisting Knees to Elbows
Targeted Muscle: Hip flexors/abdominals and obliques
Attachment: Foot/ankle
Extend the straps/ropes to about 8 inches off the ground.
Position your toes in the handles as described at the beginning of the core/lower-body section.
Start out in the resting position similar to the front plank, with your knees and your forearms on the ground.
To involve the oblique muscles, add in a twist by bringing your knees to one side.
Lift your knees off the ground and then bend them, bringing your knees forward toward your elbow on one side, tucking your knees into the outside of your elbow.
Then, extend your legs out straight into the front plank position.
Keep your abdominals tight as you twist and tuck your knees forward and then extend your legs out straight in a slow, controlled manner.
Perform the exercise by alternating repetitions to each side.
To make the exercise more difficult, start from your hands with your arms extended instead of from your forearms.
Leg/Hamstring Curl
Targeted Muscle: Hamstrings (back of thigh)
Attachment: Foot/ankle
The leg/hamstring curl movement is opposite to the knees-to-elbows movement.
Extend the straps/ropes to about 8 inches off the ground. Position your heels in the handles as described at the beginning of the core/lower-body section.
The resting position is like the glute bridge resting position with knees bent at 90 degrees and your body lying with your hips and back on the ground.
Lift your hips off the ground like in the glute bridge exercise.
Keeping your abdominal and gluteus maximus muscles tight, extend your legs out straight in a slow and controlled manner.
As you keep the hips elevated, engage the hamstring muscles to bend your knees as you return to the resting bridge position.
Runners (Face Down)
Targeted Muscle: Hip flexors/abdominals
Attachment: Foot/ankle
Facedown runners are similar to the knees-to-elbows exercise, except the emphasis is placed on one leg instead of both legs.
Start facing down with your knees resting on the ground and then lift your knees up and extend your legs into the front plank position.
Keeping your toes flexed toward your shin, bend one knee, bringing your knee forward toward your chest as far as you can.
To perform the exercise, keep your hips elevated and alternate legs in a running-type motion. Try to keep your upper body stable on the ground and concentrate on not rotating from side to side.
To add more emphasis on hip flexors/abdominals, the movement can be slowed down with pauses between alternating the positions of the leg.
Runners (Face Up)
Targeted Muscle: Hamstrings (back of thigh)
Attachment: Foot/ankle
Face up runners are similar to the leg/hamstring curl exercise, except the emphasis is placed on one leg instead of both legs.
Start facing up, with your legs extended, and elevate your hips off the ground to help engage the muscles.
Keeping your toes flexed toward your shin, bend one knee, bringing your heel back toward your glutes as far as you can.
To perform the exercise, keep your hips elevated and alternate legs in a running-type motion.
Try to keep your upper body stable on the ground and concentrate on not rotating from side to side.
To make the exercise easier if needed, you can actually rest your hips lightly on the ground to lessen the load placed on the hamstrings.
To add more emphasis on hamstrings, the movement can be slowed down with pauses between alternating the positions of the leg.
Fall Out
Targeted Muscle: Abdominals
Secondary Muscles: Deltoids (shoulders) and triceps brachii (back of upper arm)
Attachment: Handles
Stand with your feet shoulder-width Facing away from the anchor point, grab the handles with your arms at your side.
Leaning your body-weight forward slowly, raise your arms to make a straight line from your hands to your ankles.
Keeping your arms straight and abdominals tight, pull your arms down to the starting position.
To make the exercise harder, start from your knees as you face away from the anchor point.
To further increase the exercise intensity, perform the exercise from your knees while facing the anchor point.
References:
Sections in this chapter are adapted from my previously published books:
Dornemann, M. POWERREV Youth Athletic Development Program: Building Champions in Sports and in Life. Ronkonkoma, NY: Linus, 2015.
Dornemann, T. M. and A. Mikheev. Russian Vibration Training: The Mikheev Method. Monterey, CA: Healthy Learning, 2013.