
Chapter 07: POWER DEVELOPMENT: TRIPLE EXTENSION EXPLOSIVE LIFTING
POWER DEVELOPMENT: TRIPLE EXTENSION EXPLOSIVE LIFTING

Dave Kemble
Teaching Instructor East Carolina University
Program Coordinator for Health Fitness Specialist East Carolina University
USA Weightlifting National Coach and Instructor
IN THE PHYSICAL development of athletes, power output is king. While being strong is important, if an athlete cannot produce high force over a short amount of time, he/she will not perform on the field or court at a high level. This is due to the fact that in most sports there is a limited amount of time an athlete can produce force into the ground or other implement during competition. For example, let’s compare the bench press lift to the shot put event in track and field. During a 1-RM bench press, barbell velocity in advanced lifters is approximately 0.17 ± 0.04 m/s (1), while the average shot put release maximal velocity in elite males is 13.69 ± 0.26 m/s (IAAF World Championships 2017–Men’s Shot Put). From this data, it is clear to see the velocities between these two maximal effort activities are vastly different. Therefore, athletes must train for power when doing training activities outside of their sport.
Terms and Definitions
Before we dive deeper into how to influence power production in athletes, we must first define certain variables related to power production:
- Force (F) is the push or pull impacted on an object and is the product of mass multiplied by acceleration. In the weight room, body weight and external resistance (barbells, resistance bands, medicine balls, etc.) are often used as resistance forces in order to bring about positive adaptations of the musculature, skeletal, and connective Force is typically measured in Newtons (N). N = 1kg . 1 m/s2
- Velocity (V) is the change in position of an object in reference to time. Velocity is typically measured in m/s. In the weight room, training can involve a variety of velocities ranging from 0 m/s (isometric exercise) to maximal (jumping, throwing and sprinting).
- Force-Velocity Curve (FV) is a display of how force and velocity interact with one In this curve one can clearly see there is a negative relationship between the two variables. For an athlete to create maximal force, velocity of movement must be low. In contrast, for an athlete to reach high velocities there is not enough time to produce high forces, therefore forces are quite low. Terms such as maximal strength, strength-speed, power, speed strength and speed are often used in conjunction with the FV curve.
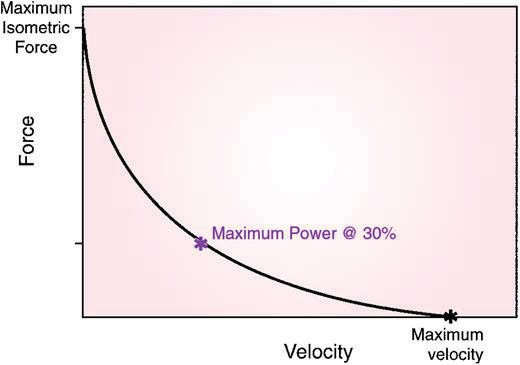
Figure 7.1
- Strength is an ability to produce force at a given Strength can be directly evaluated using a 1-repetition maximum (1-RM) test or estimated using data from a repetition maximum test (RM). Maximal strength or low-speed strength is typically measured using a 1-repetition maximum (1-RM) test for lifts such as the back squat, bench press or deadlift. Utilizing these lifts during training typically results in athletes gaining strength because the velocities displayed during maximal efforts are quite low. These lifts have mean velocities of 0.30 ± 0.05 m/s, 0.17 ± 0.04 m/s and 0.15 ± 0.15 m/s respectively (1). Thus, allowing more time for force development. Dynamic or high-speed strength can be evaluated using 1-RM testing for explosive lifts such as the snatch, clean or jerk. These explosive lifts are recognized as producing the highest power output amongst all forms of resistance training, as they have both high force and high velocity requirements. For example, maximal barbell velocities for these lifts are as follows: snatch = 1.65 m/s to 2.0 m/s, clean = 1.2 – 1.6 m/s, and jerk = 2.0 – 2.5 m/s (3). NOTE: maximal velocity ranges for each lift are due to height differences amongst athletes.
- Power (P) is a product of force and velocity (P = F . V). Power is best produced at moderate forces and moderate Looking at the FV curve again, one can clearly see this interaction once power output is displayed too.
Power Development for Athletes
Now that you understand the rationale for developing power in athletes and the basic background in how force, velocity and power interact, you can train for power output.
Plyometrics
Hopping, skipping, jumping, running, throwing and tossing are all forms of plyometric activities. Plyometric exercises rely on the concept of rate of force development (RFD). Simply put, muscles reach high forces over short time periods. This high RFD is possible due to the stretch-shortening cycle (SSC) all plyometric exercises have in common. The SSC uses stored energy and reflexive properties of the specialized muscle fibers to create high force output over short time periods. Phases of the SSC include: eccentric (muscle stretches), amortization (isometric) and concentric (muscle shortens).
The eccentric phase determines the intensity of the plyometric exercise. The more loading that occurs during the eccentric phase of the movement, the greater the intensity of the plyometric exercise. For example, let’s compare the box jump (a jump from the ground to the top of a box) to a depth jump (jumping from the top of the box to the ground and immediately jumping off the ground). There is more potential energy in landing on the ground during a box jump than the countermovement of a box jump. Therefore, the depth jump is a much more intense plyometric exercise than a box jump. Below is a table of various plyometric exercises and their absolute intensities (4). NOTE: Relative intensity should be established for each individual athlete.
| Low Intensity | Medium Intensity | High Intensity |
| Skip | Tuck Jump | Depth Jump |
| Vertical Jump | Split Squat Jump | Multiple Box Jump |
| Broad Jump | Hurdle Hop | Bounding |
| Box Jump | Jump from Box | Multiple Hurdle Hop |
| MB Chest Pass | Clap Push-ups | |
| MB Scoop Toss | Depth Push-ups | |
| MB Slams | ||
| MB Rotational Pass |
Table 7.1
Before you implement plyometrics into a program, your athletes should have a base level of strength supported by several months of resistance training (4). Other prerequisites include appropriate levels of speed, flexibility, balance and landing mechanics (for lower-body drills).
Weightlifting Movements
The sport of weightlifting has been described as the sport for all sports (5). That’s because all three movements in the sport of weightlifting involve triple extension, which is extension of the hips, knees and ankles. Athletes in various sports display triple extension during competition. Activities such as sprinting, jumping and even throwing a baseball involve triple extension of the lower body. During explosive phases of the competition lifts in the sport of weightlifting (second pulls of snatch and clean and the drive phase of the jerk) is where peak power output occurs, as the barbell is still being accelerated and will not reach its maximal velocity until after the athlete has ceased to apply upward force to it. Compare this barbell acceleration to the actions seen in the back squat, bench press and deadlift. The barbell will decelerate as the athlete completes upward force. It is easy to see how the lifts involved in the sport of weightlifting are superior in the development of power output in athletes.
Readiness to Perform Weightlifting Movements
Before adding weightlifting movements into an athlete’s training, one first must establish basic strength and flexibility minimums for each athlete. If athletes cannot properly perform the assessments, extra strength and flexibility training may be necessary before progressing. USA Weightlifting recommends the following assessments before beginning snatch, clean and jerk-related training:
Overhead Squat (OHS): is used to ensure your athletes possess appropriate levels of strength and flexibility to perform snatch-related lifts overhead and in the deep squat position. Before beginning the OHS assessment, the snatch-grip must be determined.
There are a number of ways to determine the appropriate grip to use. One recommended way to find this grip is to place the bar in the hip crease while hinging at the hips (pushing the hips back). With the barbell still in the hip crease, slide the hands out until the elbows are fully extended. This should be just about right for most athletes. NOTE: Taller athletes may find their hands are in contact with the sleeves of the barbell. This is fine and appropriate due to their arm lengths.
To perform the OHS, the barbell will be overhead above the shoulders with elbows extended while shoulders are externally rotated and the scapula retracted and in upward rotation. Feet should be shoulder width apart. Begin the movement by flexing the knees and hips until your hip crease is below the superior border of the patella. In the bottom position of the OHS, the torso ideally will be held vertical. Some forward incline in the torso will probably occur, but the torso should not incline more than the tibias. The spine is held rigid with no observable flexion and the barbell is balanced over the middle of the foot (between the heel and ball of the foot). Knees are in line with the feet while the feet are flat on the ground. After pausing in the bottom position for 2-3 seconds, stand and recover.
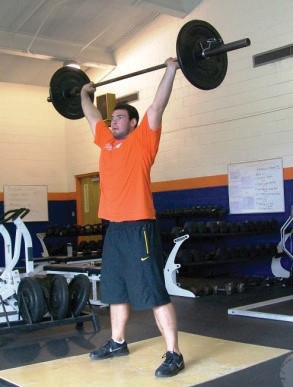
Figure 7.2: Partner Rotation Starting Position
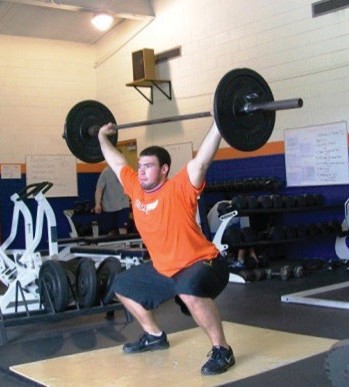
Figure 7.3: Partner Rotation Finishing Position
Snatch-grip Pull: is used to ensure your athletes possess appropriate levels of strength and flexibility to perform snatch-related lifts when pulling from the floor.
The stance will be hip to shoulder width with the feet in contact with the floor through the entire movement. The barbell should be over the widest part of the foot (the first metatarsal). The grip width will be the same as the one used in the OHS. NOTE: The use of a hookgrip is strongly recommended to get your athletes used to pulling the snatch and clean with this style of grip.
A hookgrip is a version of an overhand, closed grip (closed referring to the thumb being wrapped around the bar). In the hookgrip the thumb is tucked under the fingers to provide a stronger grip.
a. overhand
b. underhand
c. alternating
d. hook
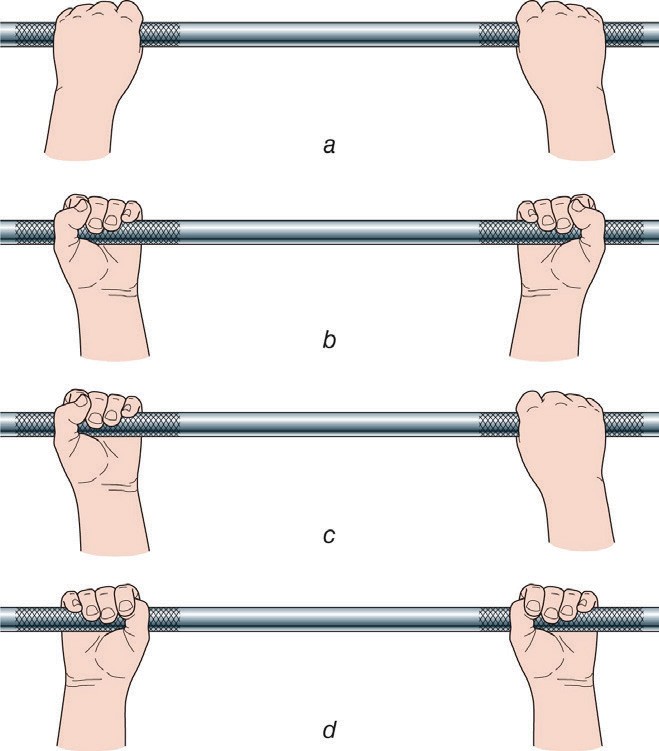
Figure 7.4: *Essentials of Strength Training and Conditioning – NSCA (4th ed.)
The get-set position is established by lowering the hips, pushing the knees forward (tibia more horizontal touching or almost touching the barbell) and raising the torso until the shoulders are stacked directly over or slightly in advance of the barbell. The shoulders should never be behind the barbell. Using the musculature of the legs and hips, drive the feet into the platform, allowing the knees to displace rearward (tibia will become more vertical). As the athlete is pulling, the hips and shoulders should rise together at the same rate, maintaining a constant back angle as established in the get-set position. As the bar rises, maintain close proximity of the barbell to the lower body by utilizing the latissimus dorsi musculature while keeping the elbows fully extended. Continue extending the hips and knees until the torso is fully erect.
Front Squat: is used to ensure your athletes possess appropriate levels of strength and flexibility to perform clean-related lifts.
To begin, the barbell will be in the front rack position. Stand behind the bar with the bar resting high on your chest. Keep your deltoids with the elbows high (humerus approximately parallel to the ground). Feet are shoulder width apart. Begin the movement by flexing the knees and hips until your hip crease is below the superior border of the patella. In the bottom position, the torso ideally will be held vertical. Some forward incline in the torso will probably occur, but the torso should not incline more than the tibias. The spine is held rigid with no observable flexion, the barbell is balanced over the middle of the foot (between the heel and ball of the foot), knees are in line with the feet, feet flat on the ground. After pausing in the bottom position for 2-3 seconds, stand and recover.

Figure 7.5: Front squat top position
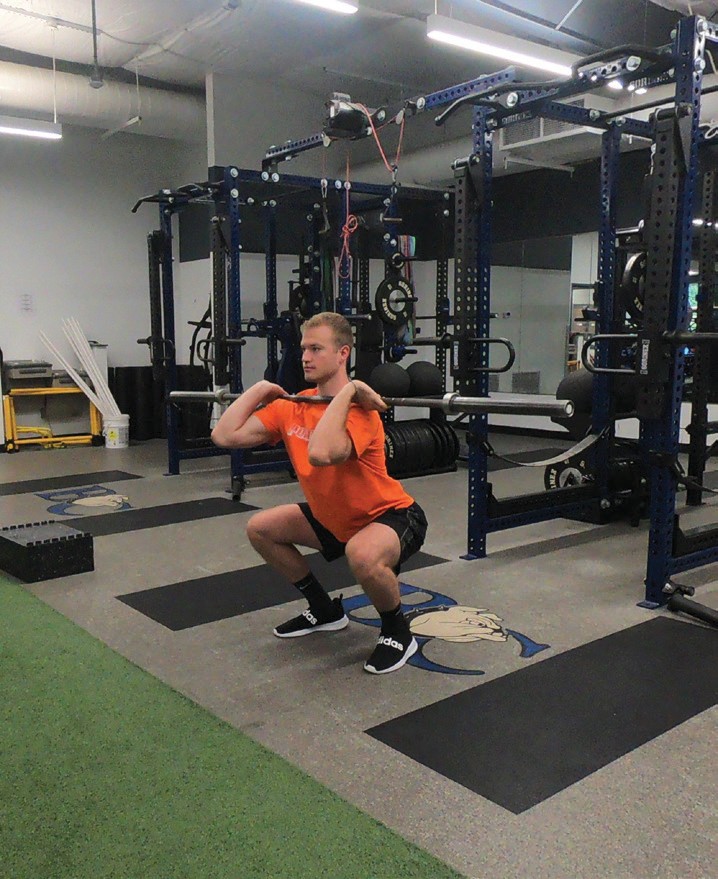
Figure 7.6: Front squat bottom position
Press: is used to ensure your athletes possess appropriate levels of strength and flexibility to perform jerk-related lifts.
The barbell should sit high on the deltoids using a closed grip just outside shoulder-width. The elbows spread down and out (just ahead of the barbell). Stand with feet approximately hip width apart. The movement is executed by using only the musculature of the upper body (deltoids and triceps). Press the barbell from the shoulders into the overhead position, which will cause the barbell to travel both up and slightly back behind the ears. In the overhead position, the barbell should be directly above the shoulders, hips, knees and ankles. After pausing in the overhead position for 2-3 seconds, lower the bar- bell back to the shoulders.
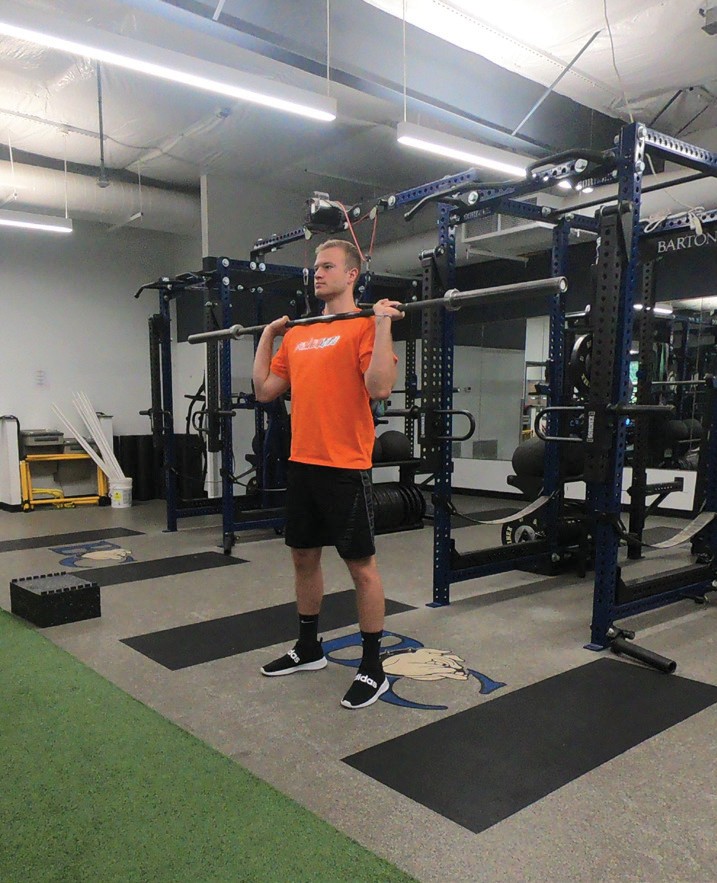
Figure 7.7: Front squat top position

Figure 7.8: Front squat bottom position
Training with the Snatch, Clean and Jerk and Weightlifting Nomenclature
USA Weightlifting endorses the use of a top-down and partial movements approach when teaching the lifts. What this means is that athletes should perform hang or block variations for the snatch and clean before starting lifts from the platform. It is also generally recommended that athletes perform power variations before attempting to execute the deep squats used in the snatch and clean or split technique of the jerk. Below is a description of the nomenclature–or common words used in the discipline of weight-lifting–needed to fully understand all of the variations of the snatch, clean and jerk.
Hang: this term is used to describe a starting position in which the barbell and discs (bumper plates) are “hanging” above the platform.
There are an infinite number of hanging positions that could be used. Here are some common positions: high hang (sometimes referred to the power position), above the knee, middle of the knee and below the knee. By performing hanging variations, coaches are removing portions of the pull in the snatch or clean, thus removing some of the technical work, especially when performed in the high hang or above the knee positions. Hanging variations are great for developing positional strength, as the athlete must hold the barbell as he/she assumes the correct position to hang from. Hanging variations can also be used when trying to remove additional stress from executing the full pull from the platform. Again, this is especially true when hanging from the high hand and above the knee positions, as pulling from below the knee increases fatigue to the lower back.
Block: this term is used to describe a starting position in which the discs (bumper plates) are resting on an object (i.e., pulling blocks) elevated above the platform.
Block work is an excellent option when working on technique, as the coach can focus on positional work by getting his/her athletes in the correct starting position each rep. Additionally, block variations can also remove stress from training, as the athlete does not have to hold positions as is required during hanging variations. Finally, when coaches want to work on RFD, block variations are ideal as the athlete will begin with very little force since the weight of the barbell is resting on the blocks and there is a shorter time frame to develop force in the pull compared to pulling from the platform. When pulling blocks are not available, coaches may choose to rest the barbell on safety arms of racks. However, athletes should be encouraged to slowly return the barbell to the arms to avoid damaging the barbells.
Power: this term is used to describe the squatting depth in the receiving positions of the snatch, clean and jerk. During training when these lifts are received in an above parallel squat, power variations are being implemented. Additionally, power variations are lighter than full squat variations due to the greater barbell displacement. So, when programming calls for greater barbell velocity, power variations can be used with great success.
Teaching the Snatch and Clean
Each phase of the lift is equally important and thus must be fully understood by the coach in order to effectively teach the full lift.
Get-set: To execute a technically sound snatch or clean from the platform, the get-set position must be well established. In this position you will want to see the following:
- Feet flat and approximately shoulder width apart: toes may be turned out slightly in order to accommodate hip mobility and/or torso to limb ratios.
- Shoulders in internal rotation: elbows should point to bar ends.
- Appropriate grip width: snatch-grip clean grip. The use of a hookgrip should be encouraged.
- Knees: as your athlete lowers his/her body down, the knees will push forward, inclining the tibias in the process. This will place a little more pressure towards the balls of the feet, but heels should stay down.
- Hips and shoulders: these joints are dependent upon one another. The hips are low but not too low. Hip starting position will have an impact on the shoulder starting position. The hips should be lowered to a position in which the shoulders are stacked directly over the barbell or slightly in front of it. Lowering the hips should never cause the shoulders to travel behind the barbell.
- Back angle: the angle of the torso relative to the This back angle is created in the get-set position and should not significantly change during the first pull.
- Spine: set in complete extension with no observable flexion.
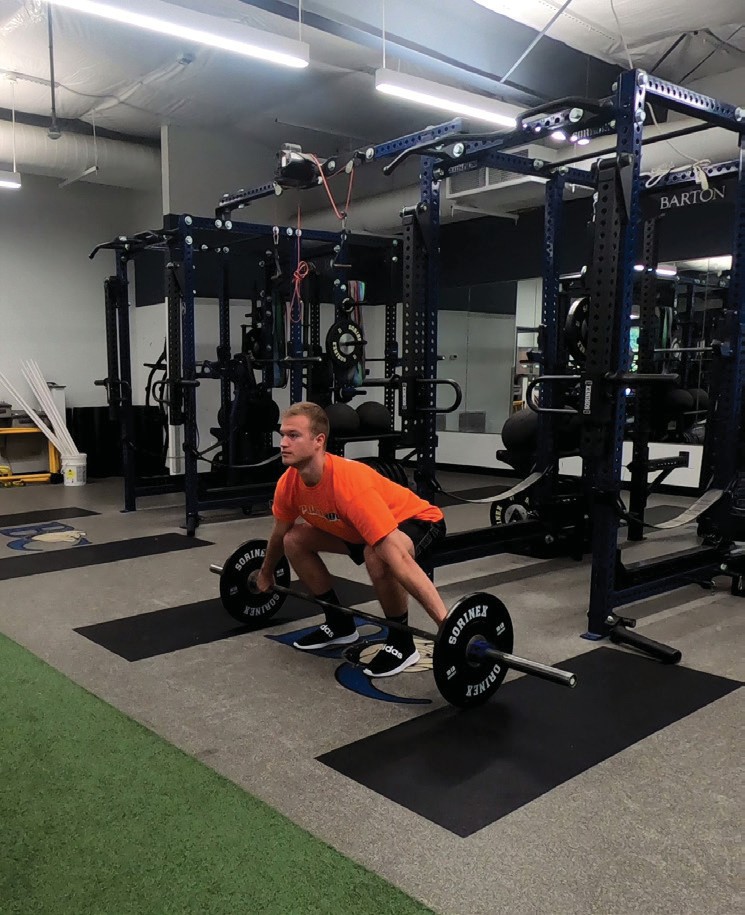
Figure 7.9: Snatch Get Set
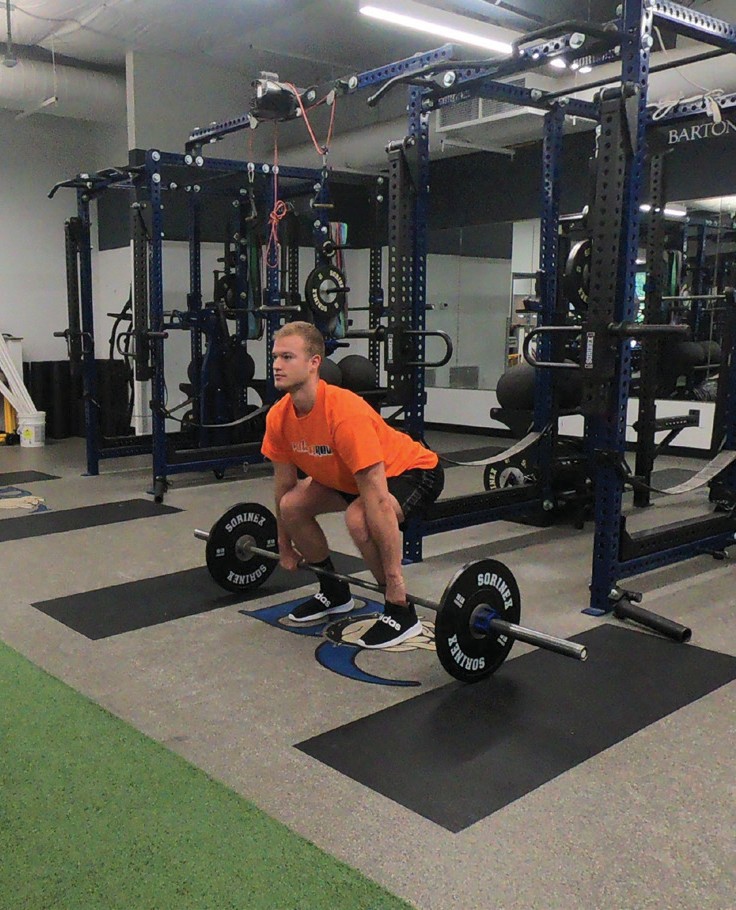
Figure 7.10: Clean Get Set
1st Pull: The first pull is described as the displacement of the barbell to just beyond the knee. This portion of the pull lasts until the knee has reached its greatest extension.
During the first pull, the musculature of the legs (quadriceps) should be the primary driving force. As the athlete performs the first pull, his/her knees should displace rearward and begin shifting his/her weight from the ball of the foot towards the heel gradually. This rearward shifting of the athlete’s weight should not cause a significant change in the back angle created in the get-set position. This will cause the athlete’s tibia to become more vertical. Along with the use of the latissimus dorsi, this should facilitate an upward and rearward displacement of the barbell. At the end of the first pull, as the barbell has moved up and back, the athlete’s shoulders should be in advance of the barbell.
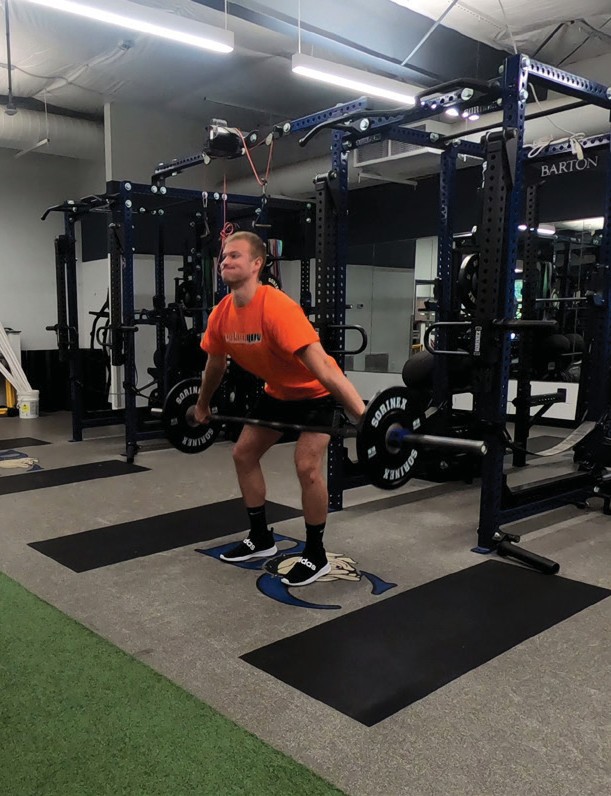
Figure 7.11: Snatch 1st Pull
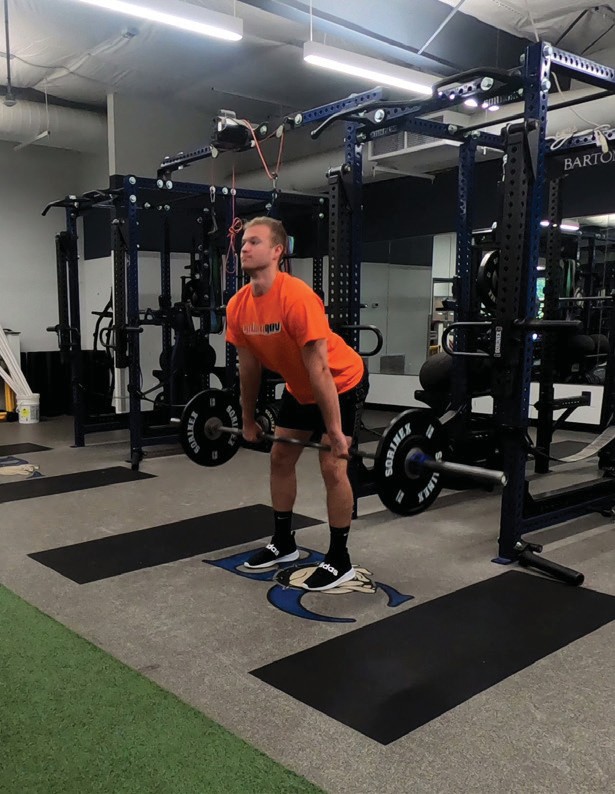
Figure 7.12: Clean 1st Pull
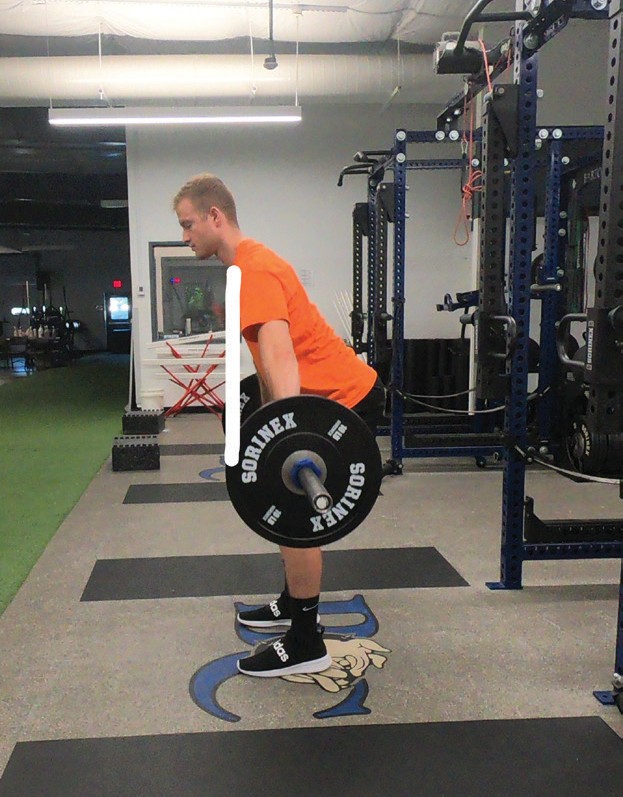
Figure 7.13: Line indicates how shoulders stay in advance (in front) of the bar
Reposition: This phase has been called by many different names such as the transition, scoop or double-knee bend. Whatever you choose to call it, this is how the athlete gets into a strong power position in order to execute a powerful second pull.
At the completion of the first pull, the torso will rapidly move upright while the knees flex and shift forward of the barbell. The distribution of weight should once again move forward on the foot (just behind the ball of the foot), but the heels should remain down. As the athlete is performing the reposition, coaches should observe barbell contact with the athlete. In the snatch, this point of contact should be on the hip and during the clean it should be on the middle to upper thigh. In advanced lifters, coaches may also hear an audible sound that occurs with this contact. It is important to note that during the reposition the athlete should attempt to keep his/her shoulders in front of the barbell as long as possible.
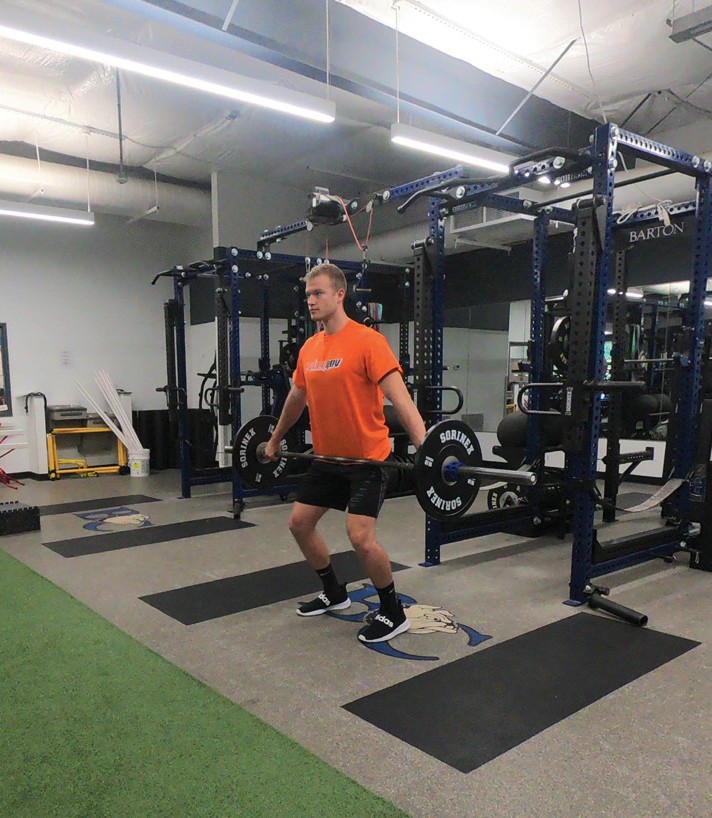
Figure 7.14: Snatch Reposition
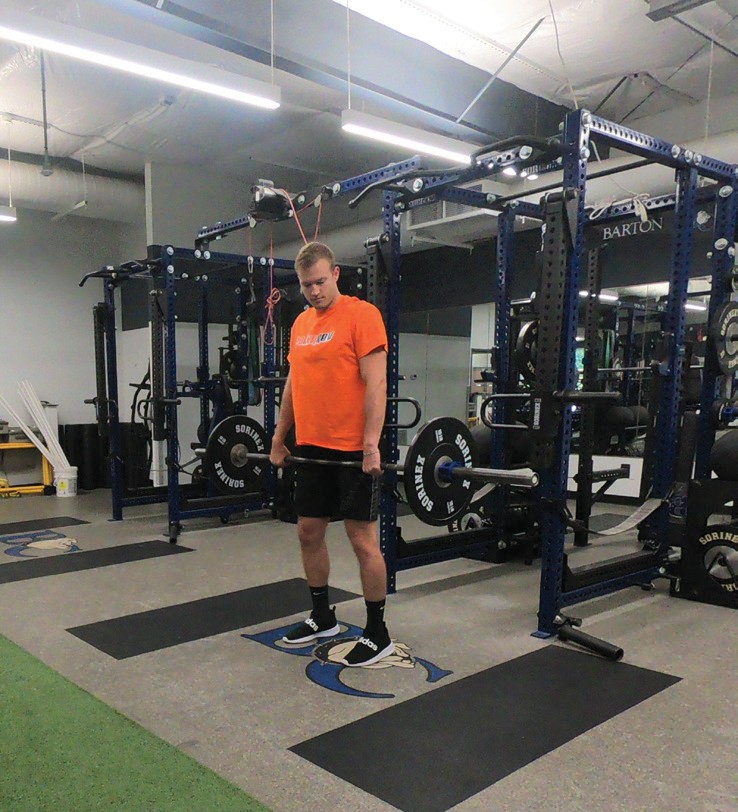
Figure 7.15: Clean Reposition
2nd Pull: In the power position the athlete will be in a very strong position to exert maximal force into the platform. Here the musculature of the legs and hips will drive into the platform and the athlete will reach a point of triple extension as the heels elevate from the platform. The final event that should occur in the second pull is an aggressive shoulder shrug. With a properly executed second pull, the barbell will continue to accelerate beyond this point of triple extension.
The musculature of the arms should be relaxed with no elbow flexion. Only the legs, hips and back musculature is involved in the pull. Coaches should work hard to correct any elbow flexion that occurs before the second pull.
Pull-under: Now it is time for the musculature of the arms and shoulders to take over. As the barbell is still accelerating upward, the athlete should aggressively pull him/herself under the barbell using the arms and shoulders. As the athlete does so, his/her feet shift quickly and outward into the receiving position (approximately shoulder width).
Snatch: The athlete should focus on pulling his/her elbows up and out when pulling under the barbell. As the barbell travels past the chest, the elbows will rotate behind the barbell and the athlete will then push him/herself down under the barbell to prepare to receive the barbell overhead.
Clean: The athlete should focus on pulling his/her elbows up and back when pulling under the barbell. As the barbell travels past the waist, the elbows will rotate forward and up as the athlete prepares to receive the barbell high on the deltoids.
Receive: This can also be called the catch phase. Receiving the barbell should always occur at its greatest height.
Snatch: As the athlete pulls under the bar, he/she will then begin pushing the body under the bar as arms fully extend to position the bar over the shoulders/upper-back and over the base of support. The depth at which the athlete receives the bar partially determines how we name the lift.

Figure 7.16: Snatch Get Set
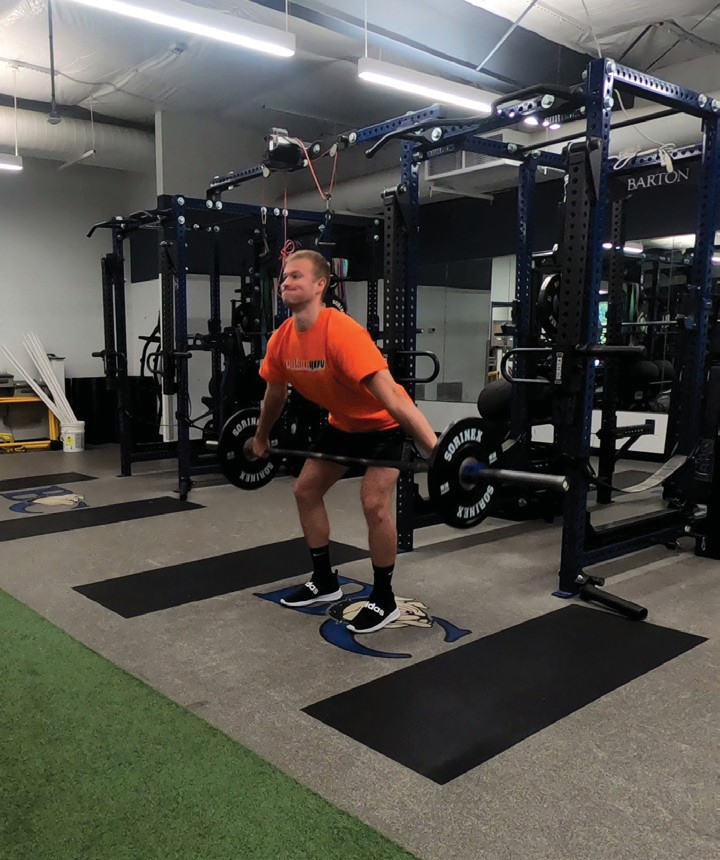
Figure 7.17: Snatch First Pull
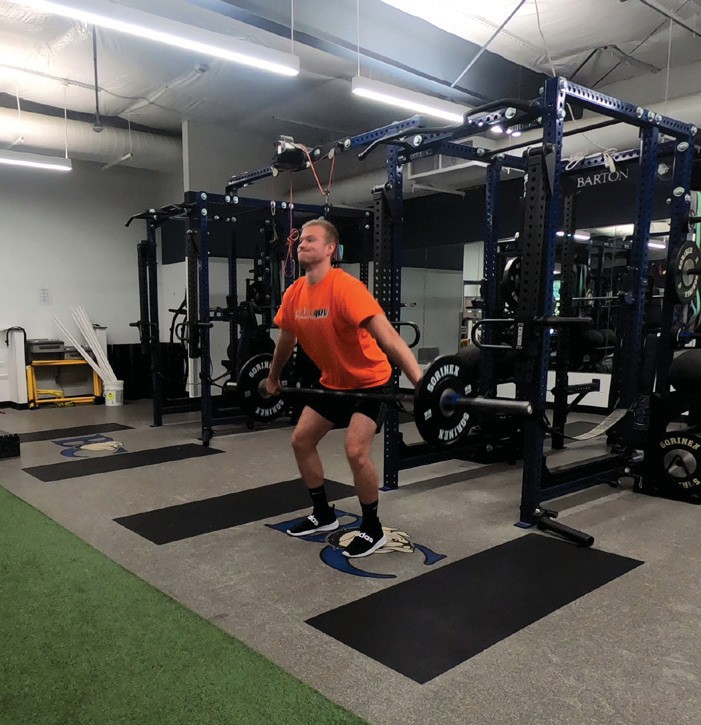
Figure 7.18: Snatch Power Position
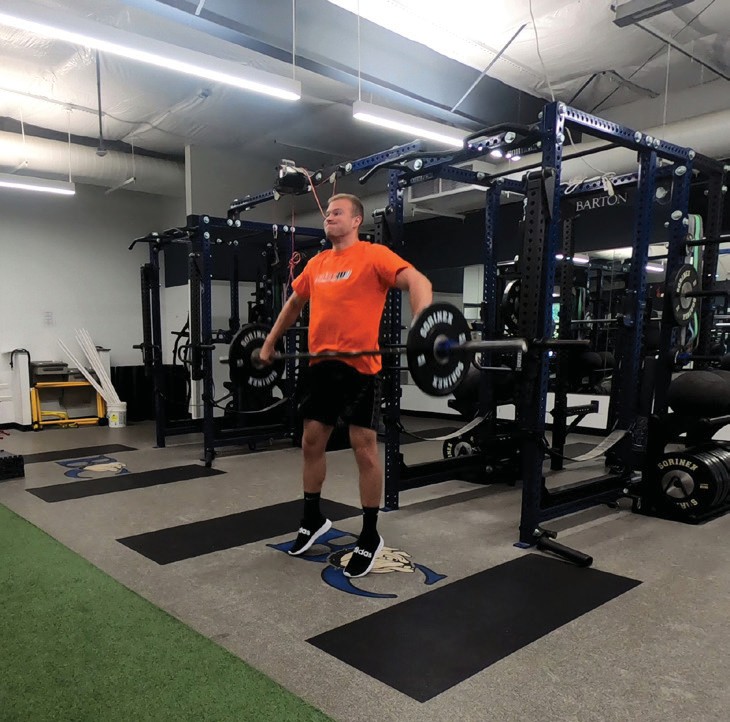
Figure 7.19: Snatch Triple Extension
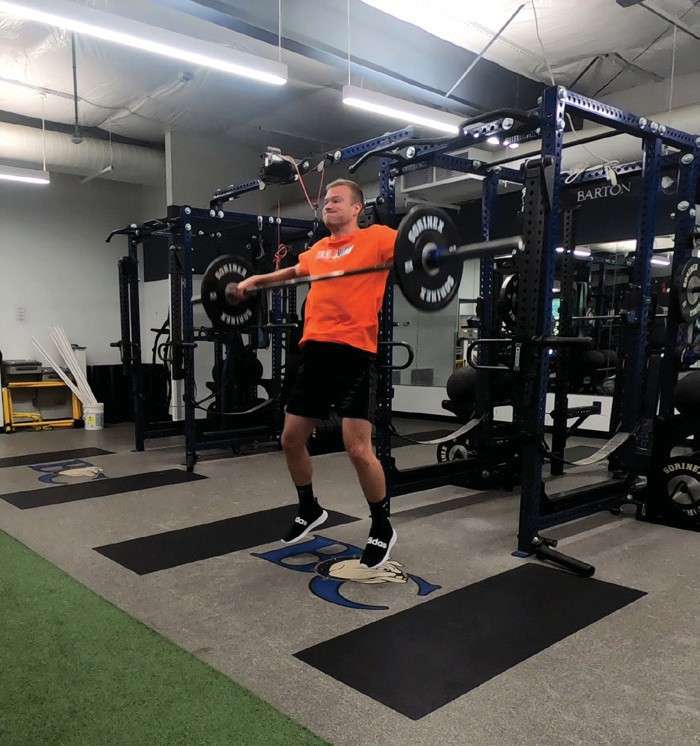
Figure 7.20: Snatch Pull Under

Figure 7.21: Snatch Catch
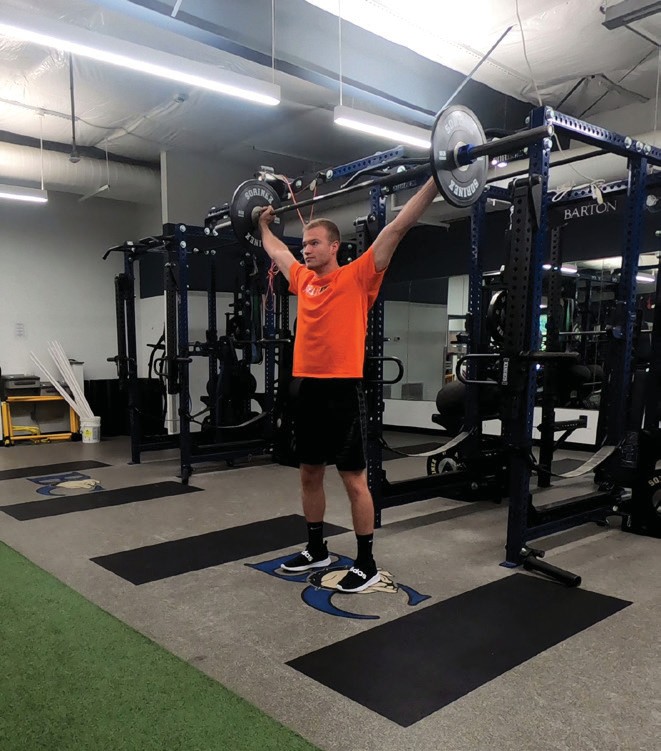
Figure 7.22: Snatch Recover
Clean: As the athlete pulls under the bar, he/she will then push the elbows up and in front of the barbell, receiving the barbell high on the deltoids and over the base of support. The depth at which the athlete receives the bar partially determines how we name the lift.
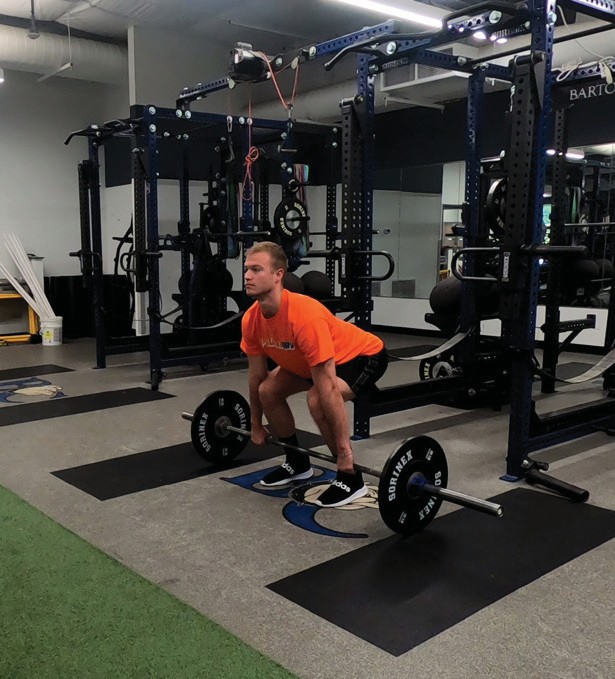
Figure 7.23: Clean Get Set
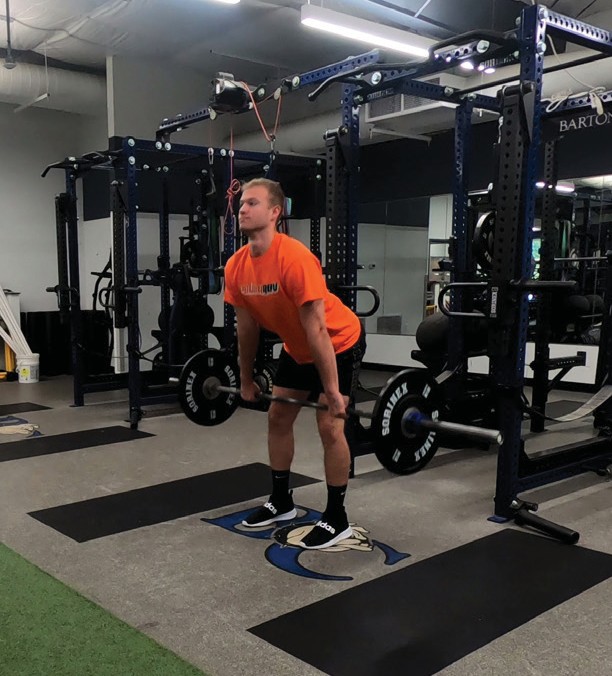
Figure 7.24: Clean First Pull
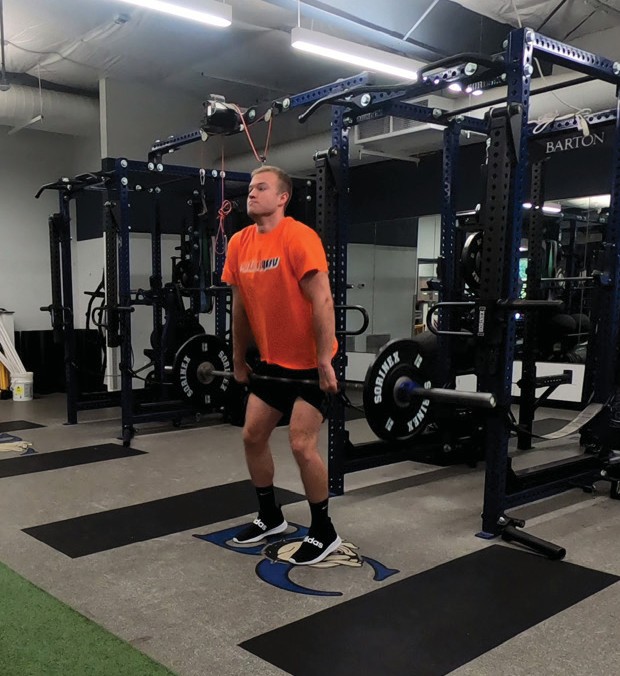
Figure 7.25: Clean Power Position

Figure 7.26: Clean Triple Extension
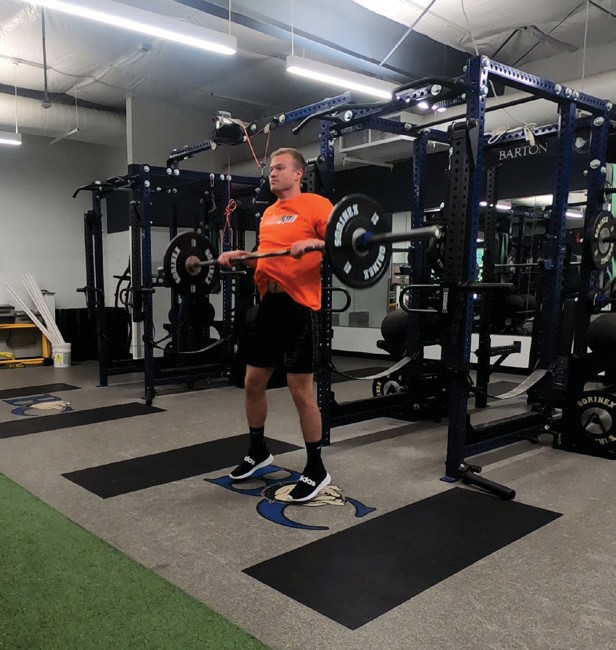
Figure 7.27: Clean Pull Under
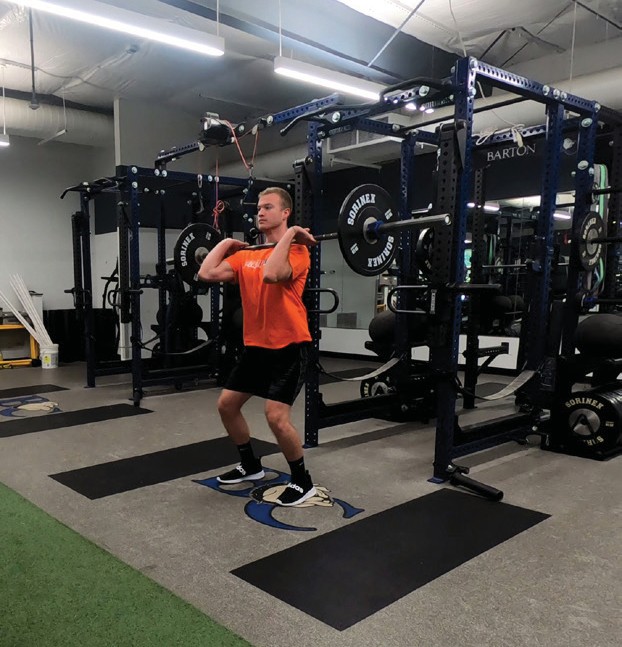
Figure 7.28: Clean Catch
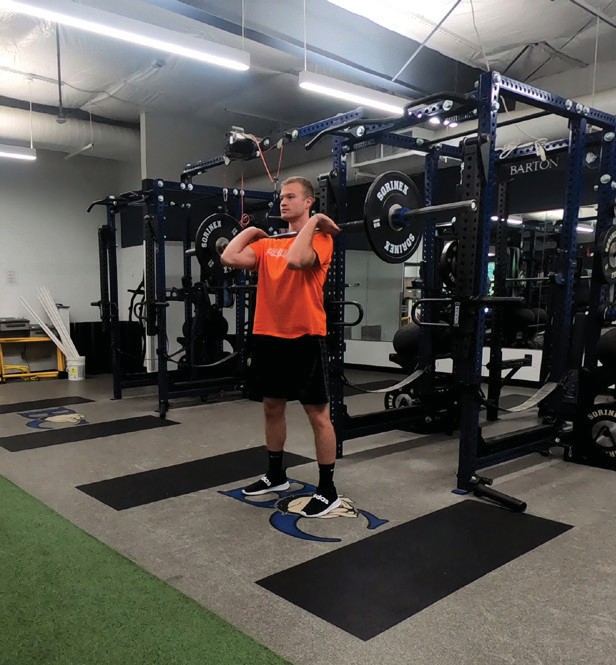
Figure 7.29: Clean Recover
Recover: After receiving the barbell overhead or on the deltoids in a balanced state, the athlete should once again use the musculature of the legs and hips to stand tall before lowering the barbell back down to the platform.
Variations of the Snatch
| Power Variations | Deep Squat Variations |
| High-hang Power Snatch | High-hang Snatch |
| Hang Above the Knee Power Snatch | Hang Above the Knee Snatch |
| Hang Below the Knee Power Snatch | Hang Below the Knee Snatch |
| Power Snatch | Snatch |
| Power Snatch + OHS* |
Table 7.2: * Example complex to get athletes ready for the full deep squat snatch
Variations of the Clean
| Power Variations | Deep Squat Variations |
| High-hang Power Clean | High-hang Clean |
| Hang Above the Knee Power Clean | Hang Above the Knee Clean |
| Hang Below the Knee Power Clean | Hang Below the Knee Clean |
| Power Clean | Clean |
| Power Clean + FS* |
Table 7.3: * Example complex to get athletes ready for the full deep squat clean
Teaching the Jerk
As we described in the section above when teaching the snatch and clean lifts, there are also phases of the jerk.
Get-set: Similar to the pulling stances of the snatch and clean, the athlete’s feet should be approximately hip width. The barbell should rest high on the deltoids with the scapula protracted and slightly elevated. The elbows should be spread out and point down slightly. A full grip (barbell in palm of hand) is recommended but not required. The athlete’s hands should be relaxed.
Behind the neck variations exist too. Basically all that is changed is that the barbell will rest on high on the trapezius muscles and the elbows should be directly under the barbell.
Dip: The dip involves the athlete sitting down (and slightly back) in ~¼ squat with feet flat. Your athlete should have a preference for the front edge of the heel when dipping. A dip depth is approximately 8-12% of the athlete’s height. When teaching the dip, first start by encouraging a deep breath and bracing of the core musculature. Keep the torso vertical during the dip to ensure the bar path stays vertical. The dip should be short and quick (think SSC as described in the plyometric section above) but controlled–positions and change of direction (COD) are most important. Upper-body angles remain constant during the dip phase.
Athletes will generally want to dip deeper than necessary. This will more than likely cause problems in either their upright posture or ability to change directions quickly.
Drive: The musculature of the legs and hips drive the barbell off of the shoulders through rapid triple extension (max power output). The drive phase too must be vertical. Encourage the athlete to stay back during the drive phase. Athletes that tend to dip too far back on the heels will then drift forward in their drive phase. Make sure their dip is more balanced in the middle of the foot.
Push-under: After a full extension of legs and hips, the athlete quickly begins to push his/her body down under the bar with arms and shoulders. The athlete receives the bar behind head at arm’s length with torso vertical (although in power jerk variations a slight incline of the torso is necessary as the hips sit back and down).
Footwork: As the arms and shoulders are pushing the athlete down, the feet will either shift outward to shoulder width in a power jerk or shift to the split position in a split jerk. Split stance is typically more comfortable for most athletes, especially those with thoracic spine and overhead mobility limitations. In the split position the main points of emphasis are:
- Front foot flat
- Front tibia vertical, knee stacked over heel
- Back knee flexed
- Back heel up with ball of the foot down
- Hips under the barbell
- Feet move in sagittal plane (do not let move inward)
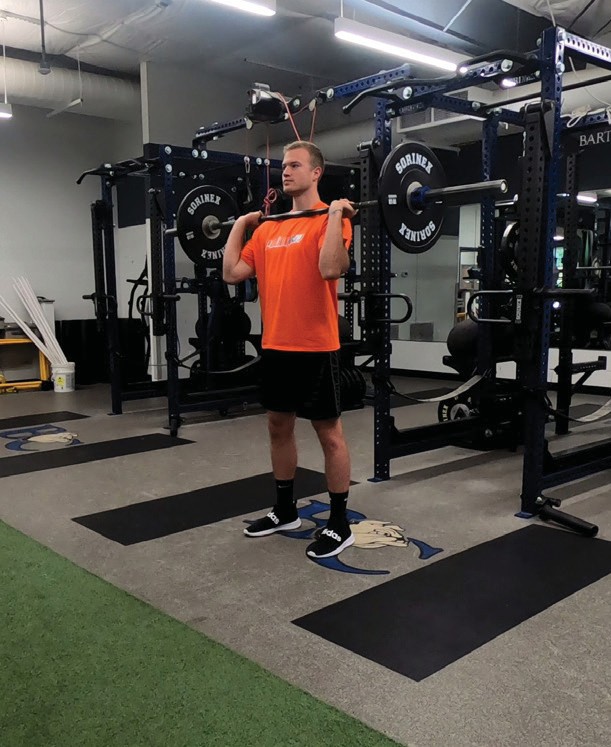
Figure 7.30: Get Set
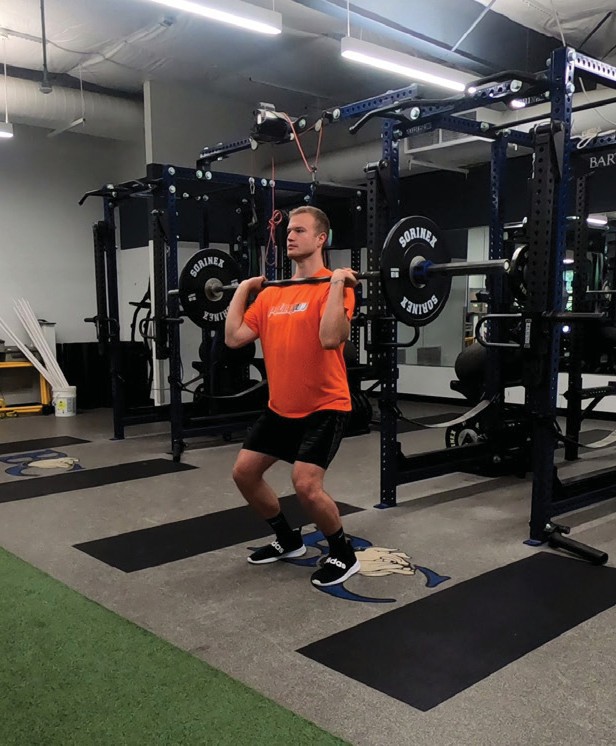
Figure 7.31: Dip
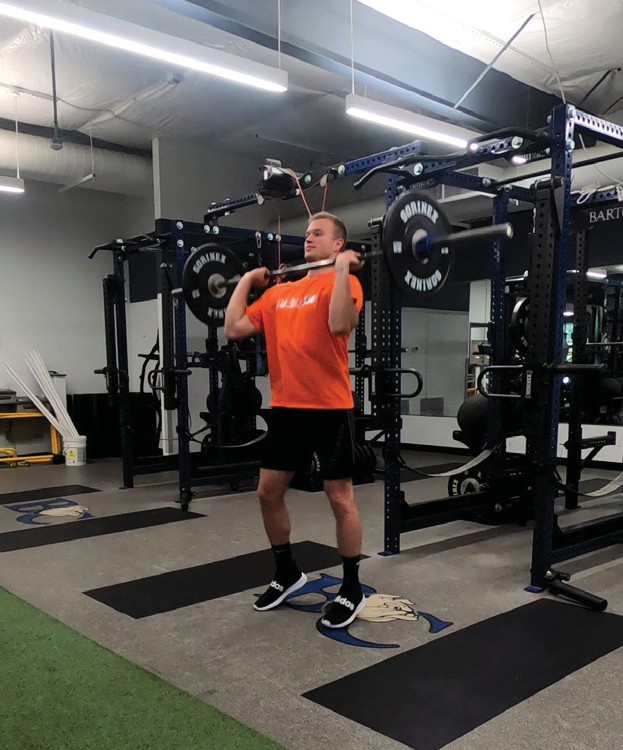
Figure 7.32: Drive
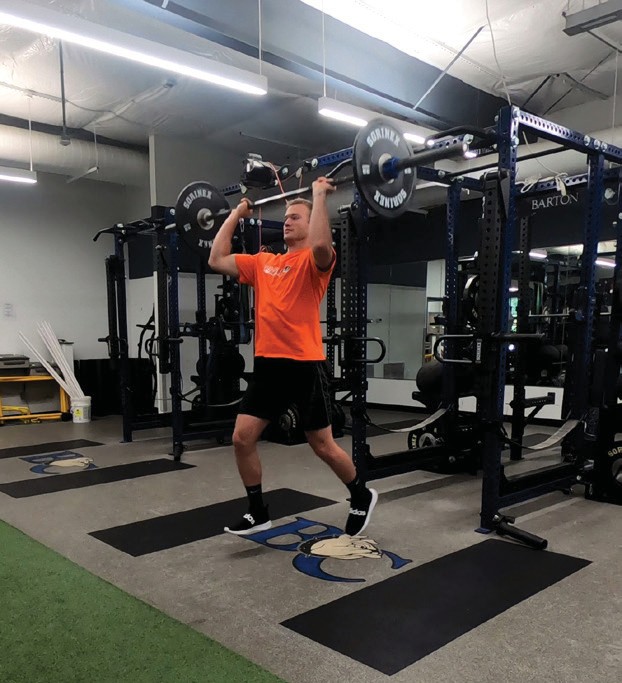
Figure 7.33: Push-under
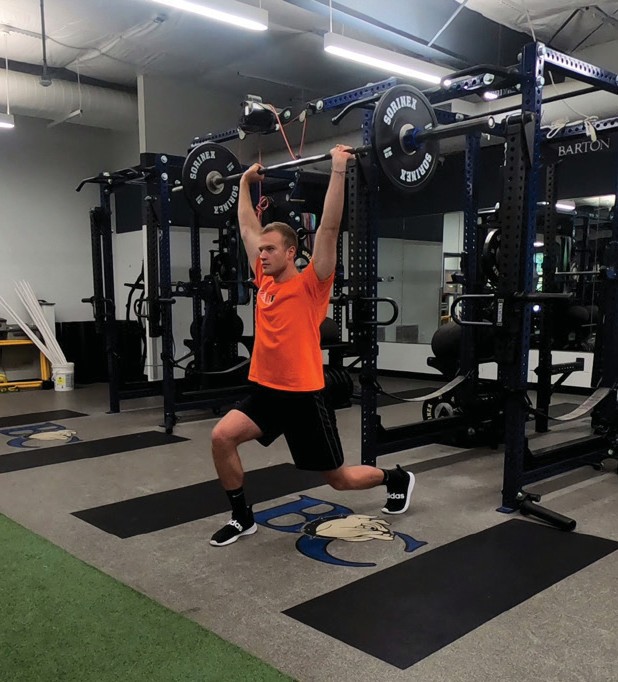
Figure 7.34: Footwork (Split Jerk Position)
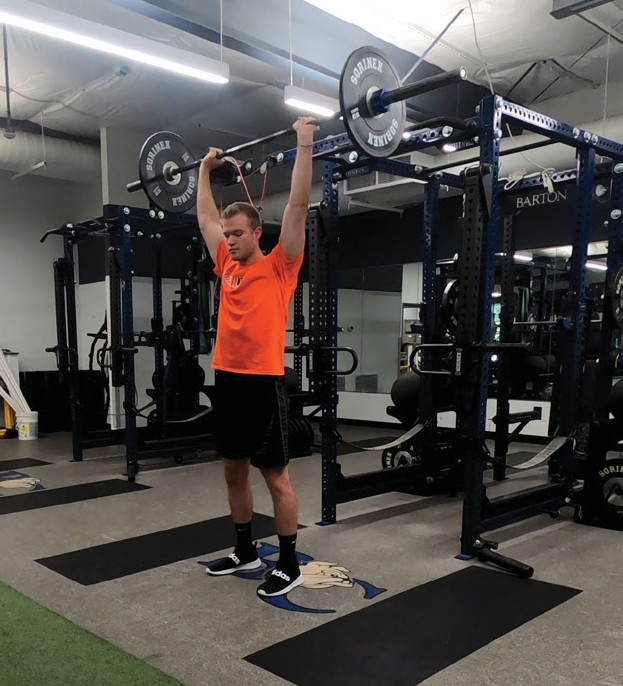
Figure 7.35: Power Jerk Position
Variations of the Jerk
| Behind the Neck Variations | Front Rack Variations |
| Push Press | Push Press |
| Power Jerk | Power Jerk |
| Split Jerk | Split Jerk |
Table 7.4:
Below are some example workouts with progressions when teaching the snatch, clean and jerk. There are no definitive time frames for these progressions to occur. Some athletes may advance weekly, while others may take more time before they have mastered the skills needed to advance. Please use your best judgment for your particular circumstance.
Example Snatch-related Workouts with Progressions
Start of Snatch Training:
| High-hang Snatch Extension | 3 x 5 |
| Snatch-grip Push Press | 3 x 5 |
| Snatch Pull | 3 x 5 |
| Back Squat | 3 x 5 |
* If athlete is using legs and hips well in extension, then progression can be made to snatch high pull.
# If overhead position has been established, then progression can be made to OHS.
Table 7.5:
Progression 1:
| High-hang Snatch Extension | 3 x 5 |
| Snatch-grip Push Press | 3 x 5 |
| Snatch Pull | 3 x 5 |
| Back Squat | 3 x 5 |
* If athlete is using legs and hips well in extension, then progression can be made to snatch high pull.
# If overhead position has been established, then progression can be made to OHS.
Table 7.6:
Progression 2:
| High-hang Muscle Snatch + Overhead Squat* | 3 x 3 + 1 (3 muscle snatch + 1 OHS) |
| Overhead Squat | 3 x 3 |
| Snatch Extension+ | 3 x 5 |
| Back Squat | 3 x 5 |
* If timing of extension to high pull is occurring well, then progression can be made to muscle snatch.
+ If athlete is pulling well, then progression can be made to snatch extension.
Table 7.7:
Progression 3:
| High-hang Power Snatch + Overhead Squat* | 3 x 3 + 1 (3 power snatch + OHS) |
| Snatch Balance+ | 3 x 3 |
| Snatch Extension | 3 x 5 |
| Back Squat | 3 x 5 |
* If arm action is proper in muscle snatch, then progression can be made to power snatch.
+ If OHS training has gone well, the progression can be made to snatch balance.
Table 7.8:
Progression 4:
| High-hang Snatch* | 3 x 3 |
| Snatch Balance | 3 x 3 |
| Snatch Extension | 3 x 5 |
| Back Squat | 3 x 5 |
* If power snatch + OHS has been established, then progression can be made to full snatch.
Table 7.9:
Start of Clean & Jerk Training:
| High-hang Clean Extension | 3 x 5 |
| Press | 3 x 5 |
| Clean Pull | 3 x 5 |
| Front Squat | 3 x 5 |
* If power snatch + OHS has been established, then progression can be made to full snatch.
Table 7.10:
Progression 1:
| High-hang Clean High Pull | 3 x 5 |
| Push Press+ | 3 x 5 |
| Clean Pull | 3 x 5 |
| Front Squat | 3 x 5 |
* If athlete is using legs and hips well in extension, then progression can be made to clean high pull.
+ If the overhead position has been established, then progression can be made to push press.
Table 7.11:
Progression 2:
| High-hang Muscle Clean + Front Squat* | 3 x 3 + 1 |
| Push Press | 3 x 5 |
| Clean Extension+ | 3 x 5 |
| Front Squat | 3 x 5 |
* If timing of extension to high pull is occurring well, then progression can be made to muscle clean.
+ If athlete is pulling well, then progression can be made to clean extension.
Table 7.12:
Progression 3:
| High-hang Power Clean + Front Squat* | 3 x 3 + 1 |
| Power Jerk+ | 3 x 3 |
| Clean Extension | 3 x 5 |
| Front Squat | 3 x 5 |
* If arm action is proper in muscle snatch, then progression can be made to power snatch.
+ If dip and drive are good in push press, then progression can be made to power jerk.
Table 7.13:
Progression 4:
| High-hang Clean + Power Jerk*^ | 3 x 3 + 3 |
| Split Footwork | 3 x 5 |
| Clean Extension | 3 x 5 |
| Front Squat | 3 x 5 |
* If power clean + FS has been established, then progression can be made to full clean.
+ Here we have put clean and power jerk together.
Table 7.14:
Progression 5:
| High-hang Clean + Split Jerk* | 3 x 3 + 3 |
| Clean Extension | 3 x 5 |
| Front Squat | 3 x 5 |
* If footwork has been established for split position, then progression can be made to split
Table 7.15:
References: Chapter 7
- Weightlifting: sport for all sports https://abebooks.com/9788860282705/Weightlifting-Sport-sports- Urso-Antonio-8860282705/plp
- NSCA’s Essentials
- VBT Paper
- Soviet Manual
- Hamill, Knutzen, and Derrick. Biomechanical Basis of Human Movement (5th edition). Philadelphia, Pennsylvania: Wolters & Kluwer, 2022.