
Chapter 09: SPEED TRAINING
SPEED TRAINING

Tim Dornemann, Ed. D., CES, PES, CSCS, OS Pro
Exercise Science Program & Kinesiology Director, Barton College
Associate Professor of Exercise Science, Barton College
&
Scott O’Dell
Director of Strength & Conditioning, East Central University
“SPEED KILLS.” CHANCES are you have heard this more than one time in the sports world when referring to how one team can defeat their opponent. Next to head and heart, nothing is deadlier to the opponent than speed, regardless of the sport. When you beat your opponent from point A to point B, you are the one who gets the ball or keeps them from getting the ball or the one who steals a base or steals a double turning it into an out. The more speed you have behind you on the point of body-to-body impact with an opponent in a contact sport, then the more hurt and pain you inflict.
It does not take a lot to sell people on the importance of speed. Many believe that speed is strictly genetic, but as an effective sports performance coach you know this is false. With the appropriate inte- gral approach that involves weight training, sprinting, plyometrics, dynamic flexibility and more, the physiological proponents of the body can be developed to make the body perform faster and more explosively.
Speed can also be taught in the form of technique. With no physiological change in the body whatsoever, the athlete can become faster by learning proper technique with the proper body angles and movement. Can you take the slowest person in town and have them competing in the next Olympic games in the 100-meter competition? Absolutely not, as this level of competition incorporates the proper physiological and biomechanical training of the body combined with genetics. But you can make anyone remarkably faster and take them to a whole new level of performance by appropriately training the physical makeup of the body and teaching the body correct biomechanics for maximum speed.
The bigger a muscle is, the more potential it has to generate force. Contrarily, some believe that the bigger the muscle, the slower the athlete, but that is false. The bigger the engine is in your car, then the faster the car is. The same applies here, it is just that this new bigger muscle must now be taught how to apply its new force potential. Training the muscles for increased force production, power, and speed will result in increases in muscle mass due to the fact that fast-twitch muscle fibers have much greater growth potential than slow twitch muscle fibers do.
The purpose of the speed program is to develop maximal speed in the forward direction. The speed training program consists of sprint technique, acceleration, resistance speed and maximum speed drills. As training progresses, the rest intervals are decreased from roughly a 5:1 to 3:1 rest-to-work ratio as conditioning improves. Since optimal performance is desired during maximum speed drills, time for full recovery between sprints is allowed. The number of repetitions performed for each drill is progressively increased as conditioning improves to maintain an adequate training stimulus. The sprint distance is also progressively increased in certain drills to increase the exercise demands.
There are two styles of sprinting: drive sprinting and reach and pull sprinting. Drive sprinting style uses the body’s full potential for speed and acceleration. Drive sprinting uses triple extension (ankle, knee and hip) into the ground, therefore projecting the body across the ground to increase stride length. Drive sprinters also work for minimal “back-action” (this is where the heel goes through a butt-kicking motion and then the sprinter pulls their knee through, not wanting to waste valuable time in the hip cycle). Drive sprinters do their best to bring the knee straight up into position to drive off of the ground and avoid the wasted time of a butt-kicking motion and then pulling their knee through. Also, the toes and heels should be up, driving the balls of the feet into the ground.
An easy indication to tell if your athletes are drive sprinting is to look at their shin angles. When the knee is in front of the ankle, this is a positive shin angle. When the knee is behind the ankle joint this is referred to as a negative shin angle. When your athletes have positive shin angles they are drive sprinting, driving the force from the hip extension into the ground.
Reach and pull sprinting is still commonly used, but is an inferior style to drive-style sprinting. Reach and pull sprinters stand very upright and reach the foot out in front of the body to pull the body across the ground. There is a misconception that this is how to increase stride length; this is what we describe as over-striding. Over-striding is commonly associated with hamstring pulls. Reach and pull sprinters also have a tendency to run with very bad back action, hence wasting time in their hip cycle.
Many coaches also still like to teach a “velocity phase.” This is a phase where the sprinter is trying to maintain their speed after reaching their full acceleration. Since sprinters sprint for distances long enough to require maintaining max speed, some feel this is necessary for actual sprinters in track and field, but as part of a sports performance program we must remember that our athletes are not just sprinters–we are developing the total athlete. Teaching only drive sprinting also minimizes the risk of hamstring injury due to over-striding. Most hamstring injuries occur when the hip is flexed and the knee is extended. Over-striding puts the hamstring in this position. Furthermore, good sprinters should be able to hold their acceleration mechanics for 40 meters or more (Seagrave, 2008); then why spend time on the complexity and injury risk of a velocity phase unless it is a 100 meter sprinter?
The only sport where the velocity phase is necessary is in track and field; since other sports require constant stop and go, acceleration and deceleration and change of direction, the majority of athletes never even have the chance to achieve a velocity phase. The only sprint components that are necessary to teach for effectiveness, time, efficiency and simplicity are acceleration, drive sprinting, and working to maintain drive sprinting through an entire sprint. Sprinting is one of many aspects of performance training needed by athletes and their chosen sport(s), therefore the velocity phase is not critical when training the total athlete in a sports performance program.
The most powerful body angle to accelerate from the ground is at 45 degrees. This was demonstrated in a very forceful way by the late Sean Taylor, of the Washington Redskins, in the 2007 National Football League’s (NFL) Pro Bowl when he hit the American Football Conference (AFC) punter Brian Moorman. It was an earth shattering hit in which Taylor had his body in a 45-degree angle from the ground upon the point of impact. This is the same thing with speed, the most powerful acceleration will take place when the body is at a 45-degree angle off of the ground. The 45-degrees from the ground for the take off point is the same angle airplanes and shot putters use, due to the power of the acceleration.
To see an example, view the NFL Films YouTube clip, “2006 PB – Sean Taylor hit on Brian Moorman HD.”

Also highly crucial–and far too often ignored–is the arm action. Usually, the faster the arms move, the faster the legs move (Bowerman & Freeman, 1991). Elbows should be locked at 90 degrees. Any longer of an arm extension than this and the arms will move slower. Any shorter than this diminishes any force production from the arms to transfer through the core to the legs. With a proper arm swing, driving the right elbow back will then transfer a force through the core to the left hip to make the left hip drive into the ground harder; the same takes place when you drive the left elbow back, transferring force into the right hip. Hands and shoulders need to be relaxed and moving straight forward and backward. This is another reason rotational strength is important: so the athlete has the strength to stop themselves from swaying with wasted lateral movement. The hands should travel from shoulder height to the glute.
Good posture is another point of emphasis as good posture produces 10-12% more force production (Farentinos & Radcliffe, 1999). Good posture will also help to ensure proper muscle firing sequence (Seagrave, 2008): (1) good posture activates the hip flexor, (2) the activated hip flexor activates the glute, (3) the glute must be activated before the If any of these are thrown out of sequence, such as poor posture shutting down the hip flexor and therefore shutting down the glute, then the hamstrings become overloaded with work and pull during hip extension.
There should be no drills that focus or emphasize a butt-kicking motion. There are plenty of warm-up drills for the hip flexor and quads, so there is no need to practice a butt-kicking drill that pro- vides repetition for poor sprinting mechanics.
Sprinter’s Start (Seagrave, 2008): The sprinter’s start can vary from coach to coach; the following coaching pointers are a starting point. Each individual athlete may have better acceleration with some minor changes, but this is a starting point to work from and will consistently be close, if not perfect, for most athletes’ maximum acceleration.
- The front foot should be placed two feet from the starting line.
- The back toe is lined up with the front heel.
- The back knee is at about a 120-degree angle.
- Hips are higher than the shoulders.
- The front hand should be at the starting line.
- The front elbow should not be locked out but have a slight bend.
- Chin should be tucked down.
- Initial push should come from both feet. The back foot actually produces more force while the front foot takes longer to produce force. A good understanding is that the front foot is in the same position as the sticking point of a deep squat, producing slower movement, whereas the back foot is in a position similar to the higher point of a deep squat when speed through that range of motion is greater.
- The correct muscle firing sequence should be applied by focusing on the glutes first, then the hamstrings.
- Acceleration can take place for over 40 yards in good sprinters.
Two-point sprinter’s start: Legs in the exact same positioning as the sprinter’s start, only now lift the hand up and (as much as possible) attempt to keep the back parallel with the ground, both elbows locked at 90 degrees and the weight up on the balls of the feet leaning forward.
During training, things such as exactly how far the feet are from the starting line or the angle of the back knee can be experimented with for each individual athlete’s best acceleration time. In discussing the sprinter’s start, Seagrave went on to state that the smaller, quicker athletes may benefit more from being closer to the line for quicker more acute movements; versus the bigger, more powerful athlete’s being a little further from the line for more sweeping power movements. Put a slight emphasis on the center of gravity being out in front of the body, while being careful not to be so far out in front that the athlete is out of control and fails to get hip and knee extension. Brandon Marcello and Mark Verstegan explain center of gravity in the book High-Performance Sports Conditioning (2001) with the following:
Center of mass is the hypothetical balance point of the body, which is located at 55 percent of height in women and 57 percent of height in men (Hay and Reid, 1988). The center of mass is a constant and will always lie within the body. Height, sex, and body type affect an athlete’s center of mass.
In a static, erect position, the center of mass will be located at the same point as the center of gravity. The difference is that the location of the center of gravity shifts with movement; it will fluctuate within the body, and many sport actions will shift it outside the body. This shift of the center of gravity away from the center of mass creates movement.
This proper acceleration technique being practiced will translate through the field/court/track and all areas of movement. These are basic fundamentals of movement to get from point A to point B that should be taking place during all movement that involve an acceleration or re-acceleration such as: lateral cuts, diagonal cuts, rotation, linear sprints, and points of impact with another athlete during contact sports.
Speed training should also be progressed in the following order throughout the off-season plan: (1) resistance, (2) over speed, this phase will further be discussed, (3) maximum speed.
- Resistance will overload the muscle and physiologically help the muscle develop more force production, along with teaching great technique with a forward body lean (lean should come from the ankles, not the waist) and positive shin angles. Using resistance training early in the off-season also “eases” the body into speed training by preparing the muscles in a slower movement and can also decrease the impact on the joints early in training, e. sprinting up an incline catches the foot at a higher point so it doesn’t have the full force into the ground. Be careful not to spend too much time in this phase, however, as it also teaches a slower movement with longer foot contact time with the ground, both of which are not what you want when heading into competition.
- The overspeed method should be considered very thoroughly before performing in your pro- This is a method where the athlete trains at speeds about 8-13% faster than their fastest speed. It is done to put the body in a position where it is moving faster than normal to help the body to adapt to the faster movement as a way to improve stride frequency while sprinting. The- oretically over speed makes great sense as it forces the hip cycle to go through faster than it can without any implementation. But the negative side to this is that it enforces terrible technique by causing braking (when the heel hits the ground first) and over-striding. Usually, the athlete ends up allowing themselves to be pulled, therefore losing their good technique and form. Seagrave (2008) warned highly against over-speed training, with the exception of elite athletes. If you must, then it would be most ideal to perform over-speed training down a hill with 1–2 degrees of downgrade (a very slight and gradual downgrade). Some coaches use bungees/resistance cords to provide resistance speed training; however, these should not be used if they negatively affect form. What all too often happens when using bungees is that athletes get pulled, their arm swing comes up too high and the braking and over-striding take place. No implement that can impair technique should ever be used. In speed training, technique should always be of first priority over all other training theories and implements.
- In max speed sprints the athlete sprints for a given distance on flat ground with no implements on your playing surface with maximum traction, then allows for maximum The emphasis here is on speed, not conditioning. This is good to have last in the progression to head into competition since we are working on teaching our new potential for force production to now perform very acutely for maximum speed and power.
When training for speed, providing full recovery is essential. The goal of speed training is to increase how fast an athlete can go from point A to point B; the goal is not for energy system development. Not providing adequate recovery prevents the ability to optimally increase speed.
Speed Progression
Phase I: Resistance Speed
- Hills
- Research shows that anything greater than an eight degree angle uphill sprinting has a negative effect on speed training due to too much resistance hindering technique, foot quickness and the speed of muscle contraction.
- In resistance sprinting, you want to be able to maintain 90 percent or more of your maximum speed (Pearson, 2014).
- Partner Towing – 10 yards tow and then release for the second 10 yards
- Barefoot Striders
- Good for learning technique, having shoes and socks off naturally causes the athlete to do a better job of keeping their heels and toes up giving them quicker feet off the ground. They also have a more natural tendency to bring their knees up higher.
- Hills
Phase II: Over-Speed
- Downhill Running – On a 2-3% downgrade (any more slope will cause a loss of technique)
- Barefoot Striders
Note: bungee drills are often referenced with overspeed training; however, often athletes lose proper form due to being pulled, resulting in arms swinging too high, breaking and overstriding. All drills should emphasize and reinforce proper mechanics and drills that can result in promoting bad technique should be avoided.
Phase III: Max Speed Sprints
- No resistance or assistance
- Give full recovery time between sprints
- Goal is improving speed, not conditioning
Speed Drill Technique
Technique Drills
Arm Swing (seated or one knee)
- Keep good posture
- Elbows locked at 90 degrees
- Relax hand, face and neck
- Swing arms from facial check to back pocket
- Body should start bouncing up and down (showing transfer of power from arms to legs)

Figure 9.1: Arm Swings (Side View) – Elbow and hand position
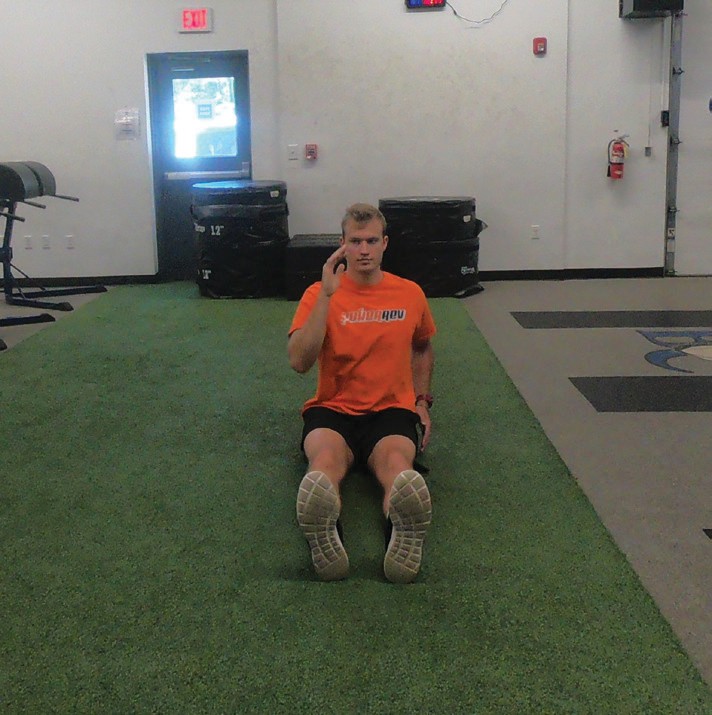
Figure 9.2: Arm Swings (Front View) – Arms tight to the body without rotating across body
Video 9.1
Leaning Wall March
- Keep body in a straight line at a 45 degree angle
- Hands placed overhead, leaning on wall
- Bring knee forward
- Keep toe and heel up
- Foot strike even with mid-foot of plant leg
- Avoid any back action

Figure 9.3: Wall March Starting Position
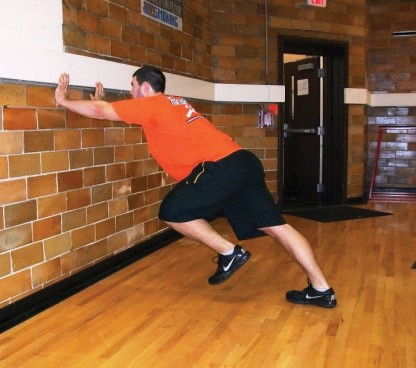
Figure 9.4: Wall March Knee Up Position
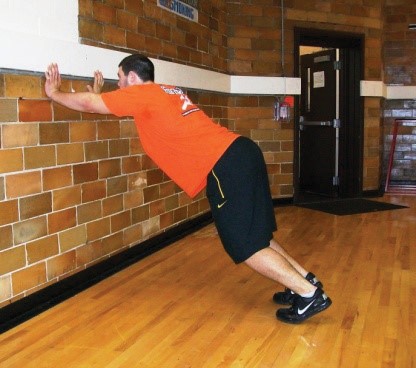
Figure 9.5: Wall March Foot Strike Position
Video 9.2
Video 9.3
Acceleration Drills
Falling Start
- Keep body in straight line
- Lean forward as far as possible while keeping it in a straight line
- At last moment, pull knee up to catch body
- Accelerate for given distance
- Emphasize high knee and toes
- Avoid any back action
Video 9.4
Video 9.5
Video 9.6
Kneeling Start
- Start kneeling on one knee
- As you start, forward, push off of kneeling leg, driving body forward
- Push out, not up and push off both feet
- Avoid back action, try to keep body in a straight line and at 45-degree angle
Video 9.7
Push Up Start
- Start laying stomach down
- As you start forward, push upper body up like doing a push up
- Pull one leg up under body
- Push out, not up and pushing off both feet
- Avoid back action, try to keep body in a straight line and at 45 degree angle
Video 9.8
Sprinters Start/3 Point Start (right handed example)
- Place both toes on a line
- Step back to line up right toe with left heel
- Turn on right heel 90 degrees, pointing toe to the side
- Turn on right toes 90 degrees (feet should be about shoulder width apart)
- Kneel down on right knee
- Place right hand down to the side of right knee
- Flatten back and raise hips (back leg at a 120-degree angle)
- Lean body weight forward with pressure on the front hand and balls of feet
- Push out, not up and pushing off both feet
- Avoid back action, try to keep body in a straight line and at 45-degree angle
Video 9.9
Two Point Starts
- Same position as sprinter start, except slightly more upright
- Hand is not on ground (only feet have ground contact)
Video 9.10
Two Point Start Variations:
- Forward – Sprint forward, pushing off of both feet, coming out low and explosive with knees and toes up.
- Lateral – Push off of both feet, pick up and open the near knee and toe up and point to the direction you are sprinting, coming out low and explosive with knees and toes up.
- Reverse – Push off both feet towards the direction of sprinting while turning over the designated shoulder, opening up with the same leg as the shoulder, turning and pivoting off of the opposite leg. With the leg opening up as the body is turning, the knee and toe should point in the direction being sprinted towards as you are coming out low and explosive with knees and toes up.
Video 9.11
Video 9.12
Build Up Sprints
- Building up speed gradually, emphasizing arm-swing build up as speed builds up
- Cones can be used to indicate speed changes
- Example: Cones at 10, 20, 30 and 40 yards
- 0 to 10 yards – Walking pace
- 10 to 20 yards – 25% run or jogging pace
- 20 to 30 yards – 50% run
- 30 to 40 yards – 75% run
- 40 yards – 100% sprint for a couple strides
- Emphasize breakdown technique to slow down and stop
- Drop hips and widen feet
- Use short, choppy steps to stop under control
- Example: Cones at 10, 20, 30 and 40 yards
Video 9.13
Resistance Drills
Sled Walk
- This is more of a leg strength exercise than a running form exercise (therefore greater loads can be used)
- Using resistance from a sled or other apparatus (e.g., tire), have a hip or upper body harness linking athlete to the sled
- Have athlete start far enough in front of the sled so that there is no slack in the rope from the sled to the harness
- Start in a three point start
- Walk forward using good form (arm swing, body angle), pulling the sled 20-40 yards
- Emphasize staying on toes to accentuate working the calf muscles
Sled Pull
- Using resistance from a sled or other apparatus (like a tire), have a hip or upper body harness linking athlete to the sled
- Have athlete start far enough in front of the sled so that there is no slack in the rope from the sled to the harness
- Start the athlete in a three point start
- Sprint forward using good form (arm swing, body angle) pulling the sled 20-40 yards
- Generally, it is best to use up to 10% of the athlete’s body weight for resistance
- If resistance causes the athlete to use bad form, stop and lower resistance
Parachute
- Start with the parachute chord extended behind the athlete
- Have a partner hold the parachute up so that it can catch air once the athlete starts moving
- Start in a 3 point stance
- Partner releases the parachute when the runner starts moving
- Sprint forward against the resistance of the parachute using good form (arm swing, body angle) for 20-40 yards or longer (parachute works well for longer distances)
Partner Tow
- Using partners, have one athlete stand behind the runner and have a towel placed around the runner’s waist with the ends held by the athlete in back
- The runner starts in a staggered stance and leans forward against the resistance from behind
- The runner drives knees up, going forward against the resistance using proper arm swing
- Don’t let the front runner lean too far forward (if they are leaning too far, have partner lessen resistance)
- Partner allows runner to move forward against resistance for 5-10 yards, then lets go of one end of the towel to release the runner
- The runner continues to sprint, using good form, for a total of 20-40 yards
Uphill Running
- Use a hill with up to a 2-3% upgrade (any more slope will cause a loss of technique)
- Run uphill using good form (if form is broken, then hill is too steep and bad habits are intro- duced or reinforced)
- The slight uphill slope provides resistance, which increases strength as a means to help increase stride length
Over Speed Drills
Release Harness
- Using equipment like a bullet belt, have a partner provide resistance for the sprinter
- The sprinter cycles their legs as fast as they can while using good form
- The partner provides resistance from behind over the first 5-10 meters and then releases the partner by pulling back the handle, causing the Velcro to detach to let the sprinter go
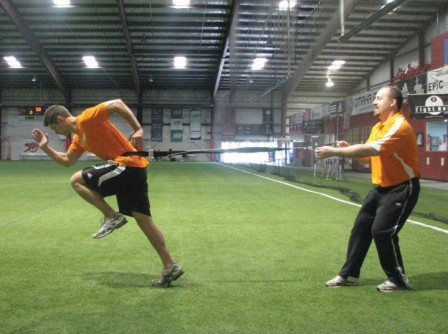
Figure 9.6:
Downhill Running
- Use a hill with up to a 2-3% downgrade (any more slope will cause a loss of technique)
- Run downhill using good form (if form is broken, then hill is too steep and bad habits are intro- duced or reinforced)
- The slight downhill slope quickens the stride turnover rate as a means to help increase stride frequency
References:
- Bowerman, J. Freeman, W.H. (1991). High Performance Training for Track and Field. Champaign, IL: Human Kinetics.
- Farentinos, R. Radcliffe, J. (1999). High Powered Champaign, IL: Human Kinetics.
- Foran, B. (2001). High Performance Sports Conditioning. Champaign, IL: Human Kinetics.
- Hay, G. Reid, J.G. (1988). Anatomy, Mechanics, and Human Motion, 2nd ed. Englewood Cliffs, NJ: Prentice Hall.
- Pearson, (2014). National Strength and Conditioning Association Minnesota Sports Performance Clinic. University of Minnesota.
- Seagrave, (2008). United States of America Track and Field Level I Certification Workshop. The University of North Carolina-Chapel Hill.
Sections in this chapter are adapted from previously published books by Dornemann and O’Dell:
-
- Dornemann, M. POWERREV Youth Athletic Development Program: Building Champions in Sports and in Life. Ronkonkoma, NY: Linus, 2016.
- O’Dell, S. The Power Revolution: A Sports Performance Guide to Achieving Maximum Power. Monterey, CA: Coaches Choice, 2015.